Lab-15:Linux bridge with basic firewall

Almost all Linux distributions are shipped with Linux bridge. In this lab I will demonstrate how to setup a Linux bridge with VMs attached to it simulating as hosts.  I will also show how to add basic firewall rule to bridge
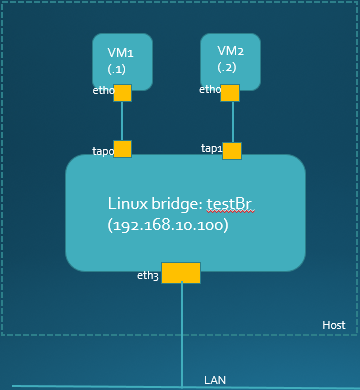
Topology:

My test bridge mapped to physical interface and two virtual interfaces. VMs are connected to virtual interfaces on bridge. I am using Linux Mint on VMs. Please note that mapping to physical interface is optional it is required only if you need external connectivity for your VMs

linux_bridge_5
Linux bridge topology

Pre-condition:

  • Linux bridge package (able to run brctl command), virtual box and your favorite VM image. I like Linux Mint because it is light weight and boots fast
  • sudo apt-get install uml-utilities bridge-utils

Procedure:

  • Try bridge command
sjakhwal@rtxl3rld05:~$ sudo brctl --help
Usage: brctl [commands]
commands:
        addbr           <bridge>                add bridge
        delbr           <bridge>                delete bridge
        addif           <bridge> <device>       add interface to bridge
        delif           <bridge> <device>       delete interface from bridge
        hairpin         <bridge> <port> {on|off}        turn hairpin on/off
        setageing       <bridge> <time>         set ageing time
        setbridgeprio   <bridge> <prio>         set bridge priority
        setfd           <bridge> <time>         set bridge forward delay
        sethello        <bridge> <time>         set hello time
        setmaxage       <bridge> <time>         set max message age
        setpathcost     <bridge> <port> <cost>  set path cost
        setportprio     <bridge> <port> <prio>  set port priority
        show            [ <bridge> ]            show a list of bridges
        showmacs        <bridge>                show a list of mac addrs
        showstp         <bridge>                show bridge stp info
        stp             <bridge> {on|off}       turn stp on/off
  • Create a test bridge. Note: virbr0 is a default bridge created by Linux
sjakhwal@rtxl3rld05:~$ sudo brctl addbr testBr
sjakhwal@rtxl3rld05:~$ sudo brctl show
bridge name     bridge id               STP enabled     interfaces
testBr          8000.000acd27b824       no              
virbr0          8000.000000000000       yes
sjakhwal@rtxl3rld05:~$ ip addr
10: testBr: <BROADCAST,MULTICAST> mtu 1500 qdisc noop state DOWN group default
    link/ether 00:0a:cd:27:b8:24 brd ff:ff:ff:ff:ff:ff
  • Bring the test bridge to UP state
sjakhwal@rtxl3rld05:~$ sudo ip link set testBr up
sjakhwal@rtxl3rld05:~$ ip addr
10: testBr: <BROADCAST,MULTICAST,UP,LOWER_UP> mtu 1500 qdisc noqueue state UP group default
    link/ether 00:0a:cd:27:b8:24 brd ff:ff:ff:ff:ff:ff
    inet6 fe80::20a:cdff:fe27:b824/64 scope link
       valid_lft forever preferred_lft forever
  • Attach a physical port to test bridge. In this case I am using eth3 physical port. Note: This step is needed only if you are planning to have external connectivity to your bridge, otherwise you can skip it
sjakhwal@rtxl3rld05:~$ ifconfig eth3
eth3      Link encap:Ethernet  HWaddr 00:0a:cd:27:b8:24
          inet6 addr: fe80::20a:cdff:fe27:b824/64 Scope:Link
          UP BROADCAST RUNNING PROMISC MULTICAST  MTU:1500  Metric:1
          RX packets:3413 errors:0 dropped:283 overruns:0 frame:0
          TX packets:8 errors:0 dropped:0 overruns:0 carrier:0
          collisions:0 txqueuelen:1000
          RX bytes:1352737 (1.3 MB)  TX bytes:648 (648.0 B)

sjakhwal@rtxl3rld05:~$
sjakhwal@rtxl3rld05:~$ sudo brctl addif testBr eth3
sjakhwal@rtxl3rld05:~$ sudo brctl show
bridge name     bridge id               STP enabled     interfaces
testBr          8000.000acd27b824       no              eth3
virbr0          8000.000000000000       yes
  • To make setting persistent we need to update interfaces file.
    • I am using Ubuntu so my changes are in /etc/network/interfaces, in case of Centos you need to create ifcfg-testBr file under /etc/sysconfig/network-scripts.
    • restart network manager to activate changes $sudo service network-manager restart

Please note that IP address has moved from physical interface to bridge. There is no IP address provisioned on physical interface

sjakhwal@rtxl3rld05:~$cat interfaces
auto eth3
iface eth3 inet manual
pre-up ifconfig eth3 up

## test bridge
auto testBr
iface testBr inet static
bridge_ports eth3
bridge_stp off
bridge_fd 0.0
address 192.168.10.100
netmask 255.255.255.0
network 192.168.10.0
broadcast 192.168.10.255
  • Make sure bridge gets the IP address and UP & RUNNING
sjakhwal@rtxl3rld05:/etc/network$ ifconfig testBr
testBr    Link encap:Ethernet  HWaddr 00:0a:cd:27:b8:24
          inet addr:192.168.10.100  Bcast:192.168.10.255  Mask:255.255.255.0
          inet6 addr: fe80::20a:cdff:fe27:b824/64 Scope:Link
          UP BROADCAST RUNNING MULTICAST  MTU:1500  Metric:1
          RX packets:64 errors:0 dropped:0 overruns:0 frame:0
          TX packets:8 errors:0 dropped:0 overruns:0 carrier:0
          collisions:0 txqueuelen:0
          RX bytes:11747 (11.7 KB)  TX bytes:648 (648.0 B)

sjakhwal@rtxl3rld05:~$ ip addr
5: testBr: <BROADCAST,MULTICAST,UP,LOWER_UP> mtu 1500 qdisc noqueue state UP group default
    link/ether 00:0a:cd:27:b8:24 brd ff:ff:ff:ff:ff:ff
    inet 192.168.10.100/24 brd 192.168.10.255 scope global testBr
       valid_lft forever preferred_lft forever
    inet6 fe80::20a:cdff:fe27:b824/64 scope link
       valid_lft forever preferred_lft forever

sjakhwal@rtxl3rld05:~$ ifconfig eth3
eth3      Link encap:Ethernet  HWaddr 00:0a:cd:27:b8:24
          UP BROADCAST RUNNING MULTICAST  MTU:1500  Metric:1
          RX packets:15 errors:0 dropped:0 overruns:0 frame:0
          TX packets:2330 errors:0 dropped:0 overruns:0 carrier:0
          collisions:0 txqueuelen:1000
          RX bytes:1206 (1.2 KB)  TX bytes:447039 (447.0 KB)
  • Create two virtual interfaces and connect them to test bridge.
sjakhwal@rtxl3rld05:~$ sudo tunctl
Set 'tap0' persistent and owned by uid 0
sjakhwal@rtxl3rld05:$ sudo tunctl
Set 'tap1' persistent and owned by uid 0

sjakhwal@rtxl3rld05:/sbin$ ip addr
16: tap0: <BROADCAST,MULTICAST> mtu 1500 qdisc noop state DOWN group default qlen 500
    link/ether de:57:03:0e:b7:ba brd ff:ff:ff:ff:ff:ff
17: tap1: <BROADCAST,MULTICAST> mtu 1500 qdisc noop state DOWN group default qlen 500
    link/ether 22:f8:6e:cf:0e:7a brd ff:ff:ff:ff:ff:ff

sjakhwal@rtxl3rld05:$ sudo ip link set tap0 up
sjakhwal@rtxl3rld05:$ sudo ip link set tap1 up

sjakhwal@rtxl3rld05:~$ sudo brctl addif testBr tap0
sjakhwal@rtxl3rld05:~$ sudo brctl addif testBr tap1
sjakhwal@rtxl3rld05:$ sudo brctl show
bridge name     bridge id               STP enabled     interfaces
testBr          8000.000acd27b824       no              eth3
                                                        tap0
                                                        tap1
virbr0          8000.000000000000       yes
  • At this point we have 3 ports bridge. We need host to connect to bridge ports so we can test our bridge. Below step is to simulate virtual host using VMs.
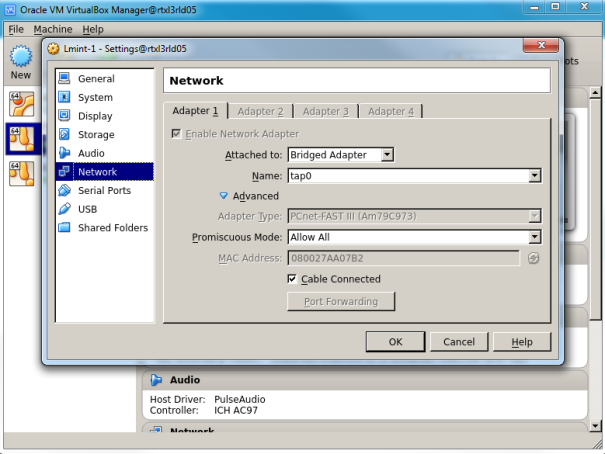
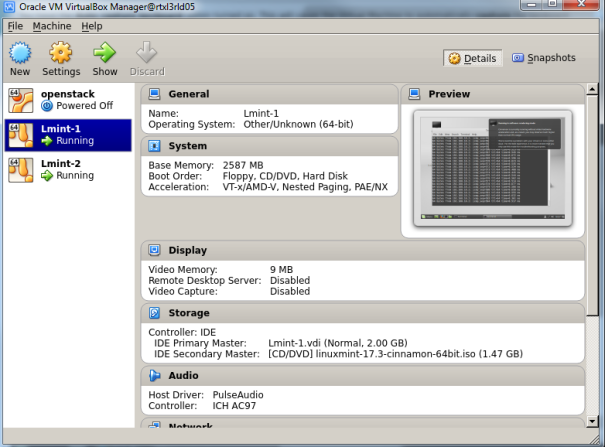
  • On the virtual box start two VMs. I am using Linux mint for my VMs. In the virtual box under setting select ‘Attached to’ as Bridge Adopter and under name drop down select ‘tap0’ for first VM and ‘tap1’ for second VM. Set promiscuous mode to ‘allow all’

linux_bridge_3

linux_bridge_4

  • Setup IP addresses on VMs
    • VM1: sudo ifconfig eth0 192.168.10.1 up
    • VM2:sudo ifconfig eth0 192.168.10.2 up
  • Ping from VM1 to VM2. Ping is successful
  • Ping to VMs from host machine. Ping is successful
sjakhwal@rtxl3rld05:/etc/network$ ip addr
24: tap0: <BROADCAST,MULTICAST,UP,LOWER_UP> mtu 1500 qdisc pfifo_fast master testBr state UP group default qlen 500
    link/ether ce:b5:77:bd:f5:79 brd ff:ff:ff:ff:ff:ff
    inet6 fe80::ccb5:77ff:febd:f579/64 scope link
       valid_lft forever preferred_lft forever
25: tap1: <BROADCAST,MULTICAST,UP,LOWER_UP> mtu 1500 qdisc pfifo_fast master testBr state UP group default qlen 500
    link/ether 9e:53:00:9c:cb:c7 brd ff:ff:ff:ff:ff:ff
    inet6 fe80::9c53:ff:fe9c:cbc7/64 scope link
       valid_lft forever preferred_lft forever

sjakhwal@rtxl3rld05:/etc/network$ ping 192.168.10.1
PING 192.168.10.1 (192.168.10.1) 56(84) bytes of data.
64 bytes from 192.168.10.1: icmp_seq=1 ttl=64 time=0.506 ms
64 bytes from 192.168.10.1: icmp_seq=2 ttl=64 time=0.352 ms
64 bytes from 192.168.10.1: icmp_seq=3 ttl=64 time=0.340 ms
64 bytes from 192.168.10.1: icmp_seq=4 ttl=64 time=0.334 ms
64 bytes from 192.168.10.1: icmp_seq=5 ttl=64 time=0.397 ms
^C
--- 192.168.10.1 ping statistics ---
5 packets transmitted, 5 received, 0% packet loss, time 3998ms
  • Just to prove that our VMs are in fact connected to tap interfaces lets try some tests. Disable tap interface and check ping connectivity to VM
sjakhwal@rtxl3rld05:/etc/network$ ping 192.168.10.1
PING 192.168.10.1 (192.168.10.1) 56(84) bytes of data.
64 bytes from 192.168.10.1: icmp_seq=1 ttl=64 time=0.162 ms
64 bytes from 192.168.10.1: icmp_seq=2 ttl=64 time=0.211 ms
^C
--- 192.168.10.1 ping statistics ---
2 packets transmitted, 2 received, 0% packet loss, time 1000ms
rtt min/avg/max/mdev = 0.162/0.186/0.211/0.028 ms

#disable tap interface
sjakhwal@rtxl3rld05:/etc/network$ sudo ip link set tap0 down
[sudo] password for sjakhwal:
sjakhwal@rtxl3rld05:/etc/network$ ping 192.168.10.1
PING 192.168.10.1 (192.168.10.1) 56(84) bytes of data.
^C
--- 192.168.10.1 ping statistics ---
6 packets transmitted, 0 received, 100% packet loss, time 5039ms

sjakhwal@rtxl3rld05:/etc/network$ ip addr
24: tap0: <BROADCAST,MULTICAST> mtu 1500 qdisc pfifo_fast master testBr state DOWN group default qlen 500
    link/ether ce:b5:77:bd:f5:79 brd ff:ff:ff:ff:ff:ff
25: tap1: <BROADCAST,MULTICAST,UP,LOWER_UP> mtu 1500 qdisc pfifo_fast master testBr state UP group default qlen 500
    link/ether 9e:53:00:9c:cb:c7 brd ff:ff:ff:ff:ff:ff
    inet6 fe80::9c53:ff:fe9c:cbc7/64 scope link
       valid_lft forever preferred_lft forever

#enable tap interface
sjakhwal@rtxl3rld05:/etc/network$ sudo ip link set tap0 up
sjakhwal@rtxl3rld05:/etc/network$ ping 192.168.10.1
PING 192.168.10.1 (192.168.10.1) 56(84) bytes of data.
64 bytes from 192.168.10.1: icmp_seq=1 ttl=64 time=0.405 ms
64 bytes from 192.168.10.1: icmp_seq=2 ttl=64 time=0.165 ms
64 bytes from 192.168.10.1: icmp_seq=3 ttl=64 time=0.234 ms
64 bytes from 192.168.10.1: icmp_seq=4 ttl=64 time=0.299 ms
^C
--- 192.168.10.1 ping statistics ---
4 packets transmitted, 4 received, 0% packet loss, time 2999ms
rtt min/avg/max/mdev = 0.165/0.275/0.405/0.090 ms

Firewalling to Linux bridge is provided by ebtables. Ebtables firewall applies to Link layer so filtering is based on MAC only.  Lets try some basic rules

  • FORWARD chain: Forward chain applied when traffic goes from one port to another port in a bridge, in our case between VMs
  • Add MAC filter rule so traffic from VM1 to VM2 dropped, I am using VM1 source MAC to filter the traffic. run ping from VM1 to VM2 make sure ping dropped
sjakhwal@rtxl3rld05:/etc/network$ sudo ebtables -A FORWARD -s 8:0:27:aa:7:b2 -j DROP
sjakhwal@rtxl3rld05:/etc/network$ sudo ebtables -L
Bridge table: filter
Bridge chain: INPUT, entries: 0, policy: ACCEPT
Bridge chain: FORWARD, entries: 1, policy: ACCEPT
-s 8:0:27:aa:7:b2 -j DROP
Bridge chain: OUTPUT, entries: 0, policy: ACCEPT
sjakhwal@rtxl3rld05:/etc/network$ sudo ebtables -L --Lc
Bridge table: filter
Bridge chain: INPUT, entries: 0, policy: ACCEPT
Bridge chain: FORWARD, entries: 1, policy: ACCEPT
-s 8:0:27:aa:7:b2 -j DROP , pcnt = 0 -- bcnt = 0

Bridge chain: OUTPUT, entries: 0, policy: ACCEPT
sjakhwal@rtxl3rld05:/etc/network$ sudo ebtables -L --Lc
Bridge table: filter
Bridge chain: INPUT, entries: 0, policy: ACCEPT
Bridge chain: FORWARD, entries: 1, policy: ACCEPT
-s 8:0:27:aa:7:b2 -j DROP , pcnt = 5 -- bcnt = 420
Bridge chain: OUTPUT, entries: 0, policy: ACCEPT

sjakhwal@rtxl3rld05:/etc/network$ sudo ebtables -L --Lc
Bridge table: filter
Bridge chain: INPUT, entries: 0, policy: ACCEPT
Bridge chain: FORWARD, entries: 1, policy: ACCEPT
-s 8:0:27:aa:7:b2 -j DROP , pcnt = 11 -- bcnt = 756
Bridge chain: OUTPUT, entries: 0, policy: ACCEPT
sjakhwal@rtxl3rld05:/etc/network$
  • INPUT chain: Input chain applied to incoming traffic  to local host. In our case bridge (192.178.10.100) is local host
  • Add MAC filter rule so traffic from VM1 to bridge dropped. run ping from VM1 to bridge IP, make sure ping dropped
sjakhwal@rtxl3rld05:/etc/network$ sudo ebtables -A INPUT -s 8:0:27:aa:7:b2 -j DROP
sjakhwal@rtxl3rld05:/etc/network$ sudo ebtables -L
Bridge table: filter
Bridge chain: INPUT, entries: 1, policy: ACCEPT
-s 8:0:27:aa:7:b2 -j DROP
Bridge chain: FORWARD, entries: 0, policy: ACCEPT
Bridge chain: OUTPUT, entries: 0, policy: ACCEPT

sjakhwal@rtxl3rld05:/etc/network$ sudo ebtables -L --Lc
Bridge table: filter
Bridge chain: INPUT, entries: 1, policy: ACCEPT
-s 8:0:27:aa:7:b2 -j DROP , pcnt = 11 -- bcnt = 418
Bridge chain: FORWARD, entries: 0, policy: ACCEPT
Bridge chain: OUTPUT, entries: 0, policy: ACCEPT

sjakhwal@rtxl3rld05:/etc/network$ sudo ebtables -L --Lc
Bridge table: filter
Bridge chain: INPUT, entries: 1, policy: ACCEPT
-s 8:0:27:aa:7:b2 -j DROP , pcnt = 14 -- bcnt = 502
Bridge chain: FORWARD, entries: 0, policy: ACCEPT
Bridge chain: OUTPUT, entries: 0, policy: ACCEPT

sjakhwal@rtxl3rld05:/etc/network$ sudo ebtables -L --Lc
Bridge table: filter
Bridge chain: INPUT, entries: 1, policy: ACCEPT
-s 8:0:27:aa:7:b2 -j DROP , pcnt = 17 -- bcnt = 586
Bridge chain: FORWARD, entries: 0, policy: ACCEPT
Bridge chain: OUTPUT, entries: 0, policy: ACCEPT
sjakhwal@rtxl3rld05:/etc/network$
  • OUTPUT chain: Output chain applied to outgoing traffic from local host. In our case bridge (192.168.10.100) is the local host
  • Add MAC filter rule so traffic from bridge to VM1 dropped, –Lc option gives the count when rule get hit
sjakhwal@rtxl3rld05:~$ sudo ebtables -A OUTPUT -d 8:0:27:aa:7:b2 -j DROP
sjakhwal@rtxl3rld05:~$ sudo ebtables -L
Bridge table: filter
Bridge chain: INPUT, entries: 0, policy: ACCEPT
Bridge chain: FORWARD, entries: 0, policy: ACCEPT
Bridge chain: OUTPUT, entries: 1, policy: ACCEPT
-d 8:0:27:aa:7:b2 -j DROP
sjakhwal@rtxl3rld05:~$ ping 192.168.10.1
PING 192.168.10.1 (192.168.10.1) 56(84) bytes of data.
^C
--- 192.168.10.1 ping statistics ---
4 packets transmitted, 0 received, 100% packet loss, time 3024ms
sjakhwal@rtxl3rld05:~$ sudo ebtables -L --Lc
Bridge table: filter
Bridge chain: INPUT, entries: 0, policy: ACCEPT
Bridge chain: FORWARD, entries: 0, policy: ACCEPT
Bridge chain: OUTPUT, entries: 1, policy: ACCEPT
-d 8:0:27:aa:7:b2 -j DROP , pcnt = 7 -- bcnt = 420

You can delete bridge using these commands

sjakhwal@rtxl3rld05:~$ brctl show
bridge name    bridge id        STP enabled    interfaces
testBr        8000.000acd27b824    no        eth3
                            tap0
                            tap1
virbr0        8000.000000000000    yes   

#edit bridge to down state 
sjakhwal@rtxl3rld05:~$ sudo ip link set testBr down
[sudo] password for sjakhwal: 
sjakhwal@rtxl3rld05:~$ sudo brctl delbr testBr
sjakhwal@rtxl3rld05:~$ sudo brctl show
bridge name    bridge id        STP enabled    interfaces
virbr0        8000.000000000000    yes        
sjakhwal@rtxl3rld05:~$


References:

Ebtables documentation


Lab-14:Using Openstack REST API

In this lab I will demonstrate how to use REST API in Openstack. I will show this using curl command line.

REST API resource url

Pre-condition:

  • Openstack lab running & controller IP address is xxx.254.209.85. I am using Lab for this

Procedure:

  • First we  need to take care of authentication token and tenant-id . Look for ‘token’ and associated ‘id’, ‘tenant’ and associated ‘id’ field in below curl command response. Set OS_USERNAME and OS_PASSWORD environment variables. Note: Token comes with expiry time of 1 hr you need to run this command again after 1 hr to get new token

    • export OS_USERNAME=test
    • export OS_PASSWORD=test
    • export OS_TENANT_NAME=firstTenant
    • curl -s -X POST http://xxx.254.209.85:5000/v2.0/tokens \
      -H “Content-Type: application/json” \
      -d ‘{“auth”: {“tenantName”: “‘”$OS_TENANT_NAME”‘”, “passwordCredentials”: {“username”: “‘”$OS_USERNAME”‘”, “password”: “‘”$OS_PASSWORD”‘”}}}’ \
      | python -m json.tool
[root@localhost ~(keystone_test)]# curl -s -X POST http://xxx.254.209.85:5000/v2.0/tokens \
> -H "Content-Type: application/json" \
> -d '{"auth": {"tenantName": "'"$OS_TENANT_NAME"'", "passwordCredentials": {"username": "'"$OS_USERNAME"'", "password": "'"$OS_PASSWORD"'"}}}' \
> | python -m json.tool
{
"token": {
 "audit_ids": [
 "6JilWHTFR-6TDMENY5QmIQ"
 ],
 "expires": "2016-03-29T22:28:27Z",
 "id": "a0f5a8b0675949f5b80defd8a90d7782",
 "issued_at": "2016-03-29T21:28:27.727707",
 "tenant": {
 "description": null,
 "enabled": true,
 "id": "a6615546ebd3445d89d5d1ffb00e06e5",
 "name": "firstTenant"
 }
 },
 "user": {
 "id": "8cef3fa9c76947bbbbdeecd693a060c4",
 "name": "test",
 "roles": [
 {
 "name": "_member_"
 }
 ],
 "roles_links": [],
 "username": "test"
 }
 }
}
  • You can also get token and tenant id by using keystone command on Openstack
[root@localhost ~(keystone_admin)]# keystone token-get
+-----------+----------------------------------+
|  Property |              Value               |
+-----------+----------------------------------+
|  expires  |       2016-03-31T16:13:47Z       |
|     id    | cb58dd94be994239b6744c4c1190b8ea |
| tenant_id | 59c358a9e1d444a5a642c0d14ca6d606 |
|  user_id  | ee357a337aa8473d840342543ce89d7b |
+-----------+----------------------------------+
  • Set the environment variables for authentication token and tenant id
export OS_TOKEN=a0f5a8b0675949f5b80defd8a90d7782
export OS_TENANT_ID=a6615546ebd3445d89d5d1ffb00e06e5
  • GET all flavors
curl -s -H "X-Auth-Token: $OS_TOKEN" \
 http://xxx.254.209.85:8774/v2/$OS_TENANT_ID/flavors \
 | python -m json.tool
  • GET images
curl -s -H "X-Auth-Token: $OS_TOKEN" \
 http://xxx.254.209.85:8774/v2/$OS_TENANT_ID/images \
 | python -m json.tool
  • GET all instances
curl -s -H "X-Auth-Token: $OS_TOKEN" \
 http://xxx.254.209.85:8774/v2/$OS_TENANT_ID/servers \
 | python -m json.tool
  • GET detail instance info, provide instance-id from above command
curl -s -H "X-Auth-Token: $OS_TOKEN" \
 http://xxx.254.209.85:8774/v2/$OS_TENANT_ID/servers/8b666fa7-0143-4a87-a61e-ece9146cf121 \
 | python -m json.tool
  • GET instance IP addresses
curl -s -H "X-Auth-Token: $OS_TOKEN" \
http://xxx.254.209.85:8774/v2/$OS_TENANT_ID/servers/8b666fa7-0143-4a87-a61e-ece9146cf121/ips \
| python -m json.tool
{
    "addresses": {
        "firstTenant_net": [
            {
                "addr": "192.168.11.3",
                "version": 4
            },
            {
                "addr": "xxx.254.209.87",
                "version": 4
            }
        ]
    }
}
  • GET networks
curl -s -H "X-Auth-Token: $OS_TOKEN" \
  http://xxx.254.209.85:8774/v2/$OS_TENANT_ID/os-networks \
  | python -m json.tool
  • GET tenant networks
curl -s -H "X-Auth-Token: $OS_TOKEN" \
  http://xxx.254.209.85:8774/v2/$OS_TENANT_ID/os-tenant-networks \
  | python -m json.tool
[root@localhost ~(keystone_test)]# curl -s -H "X-Auth-Token: $OS_TOKEN" \
>   http://xxx.254.209.85:8774/v2/$OS_TENANT_ID/os-tenant-networks \
>   | python -m json.tool
{
    "networks": [
        {
            "cidr": "None",
            "id": "b480ec2d-47ca-4459-bc6f-b28e7b7650f5",
            "label": "public"
        },
        {
            "cidr": "None",
            "id": "67eef7cd-bc40-4aa3-b244-8c3bf64826f0",
            "label": "firstTenant_net"
        }
    ]
}

Below are sample POST commands.

  • Create network using POST
curl -i \
-H "Content-Type: application/json" \
-s -H "X-Auth-Token: $OS_TOKEN" \
  -d '
{
    "network": {
        "name": "sample_network",
        "admin_state_up": true
    }
} ' \
-X POST http://xxx.254.209.85:9696/v2.0/networks | python -m json.tool
[root@localhost ~(keystone_test)]# curl -s -H "X-Auth-Token: $OS_TOKEN_ID"  -X GET http://167.254.209.85:9696/v2.0/networks 
   {
            "admin_state_up": true,
            "id": "586539c9-f3b3-4cb1-a983-a3669a2b51a7",
            "mtu": 0,
            "name": "sample_network",
            "router:external": false,
            "shared": false,
            "status": "ACTIVE",
            "subnets": [],
            "tenant_id": "a6615546ebd3445d89d5d1ffb00e06e5"
        }
  • Create sub-network using POST
curl -i \
-H "Content-Type: application/json" \
-s -H "X-Auth-Token: $OS_TOKEN" \
  -d '
{
    "subnet": {
        "network_id": "586539c9-f3b3-4cb1-a983-a3669a2b51a7",
        "ip_version": 4,
        "cidr": "192.168.12.0/24",
    "name": "sample_network_subnet"
    }
} ' \
-X POST http://xxx.254.209.85:9696/v2.0/subnets
curl -s -H "X-Auth-Token: $OS_TOKEN"  -X GET http://xxx.254.209.85:9696/v2.0/subnets \
 | python -m json.tool
 {
            "allocation_pools": [
                {
                    "end": "192.168.12.254",
                    "start": "192.168.12.2"
                }
            ],
            "cidr": "192.168.12.0/24",
            "dns_nameservers": [],
            "enable_dhcp": true,
            "gateway_ip": "192.168.12.1",
            "host_routes": [],
            "id": "7703e1c1-af63-40a3-bea5-d8acad4d03de",
            "ip_version": 4,
            "ipv6_address_mode": null,
            "ipv6_ra_mode": null,
            "name": "sample_network_subnet",
            "network_id": "586539c9-f3b3-4cb1-a983-a3669a2b51a7",
            "subnetpool_id": null,
            "tenant_id": "a6615546ebd3445d89d5d1ffb00e06e5"
        }
    ]

References:

Openstack REST API

Lab-13:Deploying Openstack using packstack allinone

In this lab I will demonstrate how to deploy Openstack using packstack as allinone option. All in one mean using one machine to deploy all Openstack components (compute,network node & controller). Below is the picture when Openstack deployed in one machine

openstack_topo2
All in one Openstack

pre-condition:

  • Machine with RHEL 7 installed
[root@localhost ~(keystone_test)]# cat /etc/*-release
NAME="Red Hat Enterprise Linux Server"
VERSION="7.2 (Maipo)"
ID="rhel"
ID_LIKE="fedora"
VERSION_ID="7.2"
PRETTY_NAME="Red Hat Enterprise Linux"

My machine RAM (snapshot taken after starting Openstack)

[root@localhost ~(keystone_test)]# free -t
              total        used        free      shared  buff/cache   available
Mem:       12121796     6171100     5266048       17272      684648     5656100
Swap:       6160380           0     6160380
Total:     18282176     6171100    11426428

Procedure:

  • Subscribe to Redhat for Enterprise Linux and also for Openstack 7.0
>sudo subscription-manager register
>sudo subscription-manager subscribe --auto
>sudo subscription-manager list --consumed
  • Subscribe required Repos
>sudo subscription-manager repos --disable=*
>sudo subscription-manager repos --enable=rhel-7-server-rpms --enable=rhel-7-server-optional-rpms --enable=rhel-7-server-extras-rpms --enable=rhel-7-server-openstack-7.0-rpms
  • Install the necessary yum packages, adjust the repository priority, and update
>yum install -y yum-utils
>yum update -y
  • Disable NetworkManager then reboot
 >sudo systemctl disable NetworkManager
 >sudo systemctl enable network
  • Set selinux to permissive mode. Edit config file (/etc/selinux/config)
    SELINUX=permissive
  • Reboot machine
 >reboot
  • Install the packStack.
 >sudo yum install -y openstack-packstack
  • Run pacstack as allinone. This will take around 10-15 mins, after successful run you will see “Installation completed successfully” message.
  • Packstack will create an answer file in your local directory so next time when you run packstack you can specify answer file instead of typing options on command line (packstack –allinone –answer-file <answer file name>)
 >packstack --allinone --os-ceilometer-install=n --os-cinder-install=n --nagios-install=n
**** Installation completed successfully ******
Additional information:
 * A new answerfile was created in: /root/packstack-answers-20160328-123852.txt
 * Time synchronization installation was skipped. Please note that unsynchronized time on server instances might be problem for some OpenStack components.
 * File /root/keystonerc_admin has been created on OpenStack client host xxx.254.209.85. To use the command line tools you need to source the file.
 * To access the OpenStack Dashboard browse to http://xxx.254.209.85/dashboard .
Please, find your login credentials stored in the keystonerc_admin in your home directory.
 * The installation log file is available at: /var/tmp/packstack/20160328-123851-o7e3NS/openstack-setup.log
 * The generated manifests are available at: /var/tmp/packstack/20160328-123851-o7e3NS/manifests
  • Openstack creates three OVS bridges
    • br-ex: bridge connected to external public interface and openstack router
    • br-int: integration bridge tenants will be connected to this bridge. it will also be connected to br-tun
    • br-tun:tunnel bridge we are not using this bridge it is used for tunneling between tenants in different machines. since in our setup all tenants are in same machine this bridge is not needed
[root@localhost ~]# ip add
1: lo: <LOOPBACK,UP,LOWER_UP> mtu 65536 qdisc noqueue state UNKNOWN 
    link/loopback 00:00:00:00:00:00 brd 00:00:00:00:00:00
    inet 127.0.0.1/8 scope host lo
       valid_lft forever preferred_lft forever
    inet6 ::1/128 scope host 
       valid_lft forever preferred_lft forever
4: enp1s0: <BROADCAST,MULTICAST,UP,LOWER_UP> mtu 1500 qdisc mq state UP qlen 1000
    link/ether 2c:27:d7:1c:88:a8 brd ff:ff:ff:ff:ff:ff
    inet xxx.254.209.85/16 brd 167.254.255.255 scope global enp1s0
       valid_lft forever preferred_lft forever
    inet6 fe80::2e27:d7ff:fe1c:88a8/64 scope link 
       valid_lft forever preferred_lft forever
5: ovs-system: <BROADCAST,MULTICAST> mtu 1500 qdisc noop state DOWN 
    link/ether be:16:1c:25:91:40 brd ff:ff:ff:ff:ff:ff
6: br-tun: <BROADCAST,MULTICAST> mtu 1500 qdisc noop state DOWN 
    link/ether c2:b8:31:d6:54:49 brd ff:ff:ff:ff:ff:ff
12: br-int: <BROADCAST,MULTICAST> mtu 1500 qdisc noop state DOWN 
    link/ether d2:e4:ec:56:2f:44 brd ff:ff:ff:ff:ff:ff
15: br-ex: <BROADCAST,MULTICAST,UP,LOWER_UP> mtu 1500 qdisc noqueue state UNKNOWN 
    link/ether 00:0a:cd:2a:14:08 brd ff:ff:ff:ff:ff:ff
    inet 172.24.4.225/28 scope global br-ex
       valid_lft forever preferred_lft forever
    inet6 fe80::20a:cdff:fe2a:1408/64 scope link 
       valid_lft forever preferred_lft forever
[root@localhost ~]# systemctl enable network
  • I am using physical interface ‘enps10’ for tenant external network. This port will be connected to external bridge (br-ex). We need to make changes in network config files to achieve this, these files are located at /etc/systemconfig/network-scripts. Note:I am hiding first octet of public IP address for security reason
  • Restart network manager after making the changes (sudo /etc/init.d/network restart)
[root@localhost network-scripts]# cat ifcfg-br-ex 
ONBOOT=yes
DEVICE=br-ex
IPADDR=xxx.254.209.85
PREFIX=24
GATEWAY=xxx.254.209.126
DNS1=xxx.127.133.13
DNS2=xxx.127.133.14
DEVICETYPE=ovs
BOOTPROTO=none
TYPE=OVSBridge
  • Edit ifcfg-enp1s0 file. Note: physical interface doesn’t contain IP address
[root@localhost network-scripts]# cat ifcfg-enp1s0
TYPE=OVSPort
DEVICE=enp1s0
DEVICETYPE=ovs
BOOTPROTO=static
NAME=enp1s0
UUID=7f0ffb54-7870-430d-bec7-bc3249414a2a
ONBOOT=yes
OVS_BRIDGE=br-ex
[root@localhost network-scripts]#
  • IP address after changing network config files, you see IP address is now under bridge br-ex. No IP on physical interface enp1s0
[root@localhost network-scripts]# ip addr
1: lo: <LOOPBACK,UP,LOWER_UP> mtu 65536 qdisc noqueue state UNKNOWN
    link/loopback 00:00:00:00:00:00 brd 00:00:00:00:00:00
    inet 127.0.0.1/8 scope host lo
       valid_lft forever preferred_lft forever
    inet6 ::1/128 scope host
       valid_lft forever preferred_lft forever
4: enp1s0: <BROADCAST,MULTICAST,UP,LOWER_UP> mtu 1500 qdisc mq master ovs-system state UP qlen 1000
    link/ether 78:ac:c0:a5:65:11 brd ff:ff:ff:ff:ff:ff
    inet6 fe80::7aac:c0ff:fea5:6511/64 scope link
       valid_lft forever preferred_lft forever
5: ovs-system: <BROADCAST,MULTICAST> mtu 1500 qdisc noop state DOWN
    link/ether 32:3c:45:a8:5c:55 brd ff:ff:ff:ff:ff:ff
7: br-int: <BROADCAST,MULTICAST> mtu 1500 qdisc noop state DOWN
    link/ether ca:31:61:70:2e:4b brd ff:ff:ff:ff:ff:ff
8: br-tun: <BROADCAST,MULTICAST> mtu 1500 qdisc noop state DOWN
    link/ether ca:11:74:2d:ea:40 brd ff:ff:ff:ff:ff:ff
69: br-ex: <BROADCAST,MULTICAST,UP,LOWER_UP> mtu 1500 qdisc noqueue state UNKNOWN
    link/ether 78:ac:c0:a5:65:11 brd ff:ff:ff:ff:ff:ff
    inet xxx.254.209.85/24 brd xxx.254.209.255 scope global br-ex
       valid_lft forever preferred_lft forever
    inet6 fe80::383b:d5ff:fe88:e443/64 scope link
       valid_lft forever preferred_lft forever
[root@localhost network-scripts]#

## Physical interface enp1s0 became bridge br-ex interface
[root@localhost network-scripts]# ovs-vsctl show
  Bridge br-ex
        Port "enp1s0"
            Interface "enp1s0"
        Port br-ex
            Interface br-ex
                type: internal
    ovs_version: "2.4.0
  • Check Openstack status everything looks good here. All required services are active
[root@localhost network-scripts]# openstack-status
== Nova services ==
openstack-nova-api:                     active
openstack-nova-cert:                    active
openstack-nova-compute:                 active
openstack-nova-network:                 inactive  (disabled on boot)
openstack-nova-scheduler:               active
openstack-nova-conductor:               active
== Glance services ==
openstack-glance-api:                   active
openstack-glance-registry:              active
== Keystone service ==
openstack-keystone:                     inactive  (disabled on boot)
== Horizon service ==
openstack-dashboard:                    active
== neutron services ==
neutron-server:                         active
neutron-dhcp-agent:                     active
neutron-l3-agent:                       active
neutron-metadata-agent:                 active
neutron-openvswitch-agent:              active
== Swift services ==
openstack-swift-proxy:                  active
openstack-swift-account:                active
openstack-swift-container:              active
openstack-swift-object:                 active
== Cinder services ==
openstack-cinder-api:                   active
openstack-cinder-scheduler:             active
openstack-cinder-volume:                active
openstack-cinder-backup:                active
== Support services ==
mysqld:                                 inactive  (disabled on boot)
openvswitch:                            active
dbus:                                   active
target:                                 active
rabbitmq-server:                        active
memcached:                              active
== Keystone users ==
Warning keystonerc not sourced
  • Packstack creates admin user credentials in /root. Source admin credentials
    >. /root/keystonerc_admin
[root@localhost network-scripts(keystone_admin)]# nova image-list
+--------------------------------------+--------+--------+--------+
| ID | Name | Status | Server |
+--------------------------------------+--------+--------+--------+
| cb9fbbf7-5f85-46fc-8d1a-4fa77822ced8 | cirros | ACTIVE | |
+--------------------------------------+--------+--------+--------+
  • Openstack by default creates 5 flavors we will create a new one with less resources
>nova flavor-create m1.nano auto 128 1 1
[root@localhost network-scripts(keystone_admin)]# nova flavor-list
+--------------------------------------+-----------+-----------+------+-----------+------+-------+-------------+-----------+
| ID                                   | Name      | Memory_MB | Disk | Ephemeral | Swap | VCPUs | RXTX_Factor | Is_Public |
+--------------------------------------+-----------+-----------+------+-----------+------+-------+-------------+-----------+
| 1                                    | m1.tiny   | 512       | 1    | 0         |      | 1     | 1.0         | True      |
| 2                                    | m1.small  | 2048      | 20   | 0         |      | 1     | 1.0         | True      |
| 3                                    | m1.medium | 4096      | 40   | 0         |      | 2     | 1.0         | True      |
| 4                                    | m1.large  | 8192      | 80   | 0         |      | 4     | 1.0         | True      |
| 5                                    | m1.xlarge | 16384     | 160  | 0         |      | 8     | 1.0         | True      |
| 89fee0c6-febe-44fe-9824-cb5821b2660c | m1.nano   | 128       | 1    | 0         |      | 1     | 1.0         | True      |
+--------------------------------------+-----------+-----------+------+-----------+------+-------+-------------+-----------+
  • Create external network. This network will be used by openstack router to communicate with public network. Note: only admin user has permission to create external network
    >neutron net-create public –router:external=True
[root@localhost network-scripts(keystone_admin)]# neutron net-create public \
--router:external=True
Created a new network:
+---------------------------+--------------------------------------+
| Field                     | Value                                |
+---------------------------+--------------------------------------+
| admin_state_up            | True                                 |
| id                        | b480ec2d-47ca-4459-bc6f-b28e7b7650f5 |
| mtu                       | 0                                    |
| name                      | public                               |
| provider:network_type     | vxlan                                |
| provider:physical_network |                                      |
| provider:segmentation_id  | 77                                   |
| router:external           | True                                 |
| shared                    | False                                |
| status                    | ACTIVE                               |
| subnets                   |                                      |
| tenant_id                 | 59c358a9e1d444a5a642c0d14ca6d606     |
+---------------------------+--------------------------------------+
  • Create sub-network for external network. Note: I am using public address space for this
  • Allocation pool is for floating IP addresses. floating IP address explained in later steps
    >neutron subnet-create –disable-dhcp public xxx.254.209.0/24 \
    –name public_subnet –allocation-pool start=xxx.254.209.86,end=xxx.254.209.88
[root@localhost network-scripts(keystone_admin)]# neutron subnet-create \
--disable-dhcp public xxx.254.209.0/24 \
--name public_subnet --allocation-pool start=xxx.254.209.86,end=xxx.254.209.88
Created a new subnet:
+-------------------+------------------------------------------------------+
| Field             | Value                                                |
+-------------------+------------------------------------------------------+
| allocation_pools  | {"start": "xxx.254.209.86", "end": "xxx.254.209.88"} |
| cidr              | xxx.254.209.0/24                                     |
| dns_nameservers   |                                                      |
| enable_dhcp       | False                                                |
| gateway_ip        | xxx.254.209.1                                        |
| host_routes       |                                                      |
| id                | c9044111-f77b-49ab-8543-02b2c5166deb                 |
| ip_version        | 4                                                    |
| ipv6_address_mode |                                                      |
| ipv6_ra_mode      |                                                      |
| name              | public_subnet                                        |
| network_id        | b480ec2d-47ca-4459-bc6f-b28e7b7650f5                 |
| subnetpool_id     |                                                      |
| tenant_id         | 59c358a9e1d444a5a642c0d14ca6d606                     |
+-------------------+------------------------------------------------------+
[root@localhost network-scripts(keystone_admin)]# neutron net-list
+--------------------------------------+--------+-------------------------------------------------------+
| id                                   | name   | subnets                                               |
+--------------------------------------+--------+-------------------------------------------------------+
| b480ec2d-47ca-4459-bc6f-b28e7b7650f5 | public | c9044111-f77b-49ab-8543-02b2c5166deb xxx.254.209.0/24 |
+--------------------------------------+--------+-------------------------------------------------------+
  • Create a tenant
    >keystone tenant-create –name firstTenant
[root@localhost network-scripts(keystone_admin)]# keystone tenant-create \
--name firstTenant
+-------------+----------------------------------+
|   Property  |              Value               |
+-------------+----------------------------------+
| description |                                  |
|   enabled   |               True               |
|      id     | a6615546ebd3445d89d5d1ffb00e06e5 |
|     name    |           firstTenant            |
+-------------+----------------------------------+
[root@localhost network-scripts(keystone_admin)]#
  • Create user for the tenant
    >keystone user-create –name test –tenant firstTenant –pass test
[root@localhost network-scripts(keystone_admin)]# keystone user-create \
--name test --tenant firstTenant --pass test
/usr/lib/python2.7/site-packages/keystoneclient/shell.py:65: DeprecationWarning: 
The keystone CLI is deprecated in favor of python-openstackclient. For a Pyt
  'python-keystoneclient.', DeprecationWarning)
+----------+----------------------------------+
| Property |              Value               |
+----------+----------------------------------+
|  email   |                                  |
| enabled  |               True               |
|    id    | 8cef3fa9c76947bbbbdeecd693a060c4 |
|   name   |               test               |
| tenantId | a6615546ebd3445d89d5d1ffb00e06e5 |
| username |               test               |
+----------+----------------------------------+
[root@localhost network-scripts(keystone_admin)]#
  • create new user credentials and store credentials in /root/keystonerc_test
[root@localhost network-scripts(keystone_admin)]# cd /root
[root@localhost ~(keystone_admin)]# ls
anaconda-ks.cfg  demo_rsa.pub  keystonerc_admin  keystonerc_open  open_rsa.pub
demo_rsa         Desktop       keystonerc_demo   open_rsa         packstack-answers-20160328-123852.txt
[root@localhost ~(keystone_admin)]# cat keystonerc_admin > keystonerc_test
[root@localhost ~(keystone_admin)]# ls
anaconda-ks.cfg  demo_rsa.pub  keystonerc_admin  keystonerc_open  open_rsa      packstack-answers-20160328-123852.txt
demo_rsa         Desktop       keystonerc_demo   keystonerc_test  open_rsa.pub

[root@localhost ~(keystone_admin)]# cat keystonerc_test 
unset OS_SERVICE_TOKEN
export OS_USERNAME=test
export OS_PASSWORD=test
export OS_AUTH_URL=http://xxx.254.209.85:5000/v2.0
export PS1='[\u@\h \W(keystone_test)]\$ '
export OS_TENANT_NAME=firstTenant
export OS_REGION_NAME=RegionOne

#source test resource
[root@localhost ~(keystone_admin)]# . keystonerc_test
  • create a keypair and add it to nova. We will this keypair to login to tenant Instance
    >ssh-keygen -f test_rsa -t rsa -b 2048 -N ‘ ‘
    >nova keypair-add –pub-key test_rsa.pub test //its two dash pub, WordPress editor has issue showing two dash
[root@localhost ~(keystone_test)]# nova keypair-list
+------+-------------------------------------------------+
| Name | Fingerprint                                     |
+------+-------------------------------------------------+
| test | 5f:ba:9b:01:d6:dd:11:e3:3e:19:aa:78:cd:6d:c0:0e |
+------+-------------------------------------------------+
[root@localhost ~(keystone_admin)]#
  • Create  tenant network. Tenant network is a private network, it is used by tenant Instances to communicate with each other.
    >neutron net-create firstTenant_net
[root@localhost ~(keystone_test)]# neutron net-create firstTenant_net
Created a new network:
+-----------------+--------------------------------------+
| Field           | Value                                |
+-----------------+--------------------------------------+
| admin_state_up  | True                                 |
| id              | 67eef7cd-bc40-4aa3-b244-8c3bf64826f0 |
| mtu             | 0                                    |
| name            | firstTenant_net                      |
| router:external | False                                |
| shared          | False                                |
| status          | ACTIVE                               |
| subnets         |                                      |
| tenant_id       | a6615546ebd3445d89d5d1ffb00e06e5     |
+-----------------+--------------------------------------+
  • Create sub-network for tenant network. Note that I am using private IP subnet for it
    >neutron subnet-create –name firstTenant_subnet \
    –dns-nameserver 8.8.8.8 firstTenant_net 192.168.11.0/24
[root@localhost ~(keystone_test)]# neutron subnet-create --name firstTenant_subnet \
--dns-nameserver 8.8.8.8 firstTenant_net 192.168.11.0/24
Created a new subnet:
+-------------------+----------------------------------------------------+
| Field             | Value                                              |
+-------------------+----------------------------------------------------+
| allocation_pools  | {"start": "192.168.11.2", "end": "192.168.11.254"} 
| cidr              | 192.168.11.0/24                                    |
| dns_nameservers   | 8.8.8.8                                            |
| enable_dhcp       | True                                               |
| gateway_ip        | 192.168.11.1                                       |
| host_routes       |                                                    |
| id                | 1955a8db-e59d-434e-9584-b45b7a66ccb7               |
| ip_version        | 4                                                  |
| ipv6_address_mode |                                                    |
| ipv6_ra_mode      |                                                    |
| name              | firstTenant_subnet                                 |
| network_id        | 67eef7cd-bc40-4aa3-b244-8c3bf64826f0               |
| subnetpool_id     |                                                    |
| tenant_id         | a6615546ebd3445d89d5d1ffb00e06e5                   |
+-------------------+----------------------------------------------------+
[root@localhost ~(keystone_test)]# neutron net-list
+--------------------------------------+-----------------+---------------------------------------------------+
| id                                   | name            | subnets                                              |
+--------------------------------------+-----------------+---------------------------------------------------+
| b480ec2d-47ca-4459-bc6f-b28e7b7650f5 | public          | c9044111-f77b-49ab-8543-02b2c5166deb                 |
| 67eef7cd-bc40-4aa3-b244-8c3bf64826f0 | firstTenant_net | 1955a8db-e59d-434e-9584-b45b7a66ccb7 192.168.11.0/24 |
+--------------------------------------+-----------------+---------------------------------------------------+
  • So now we have two networks created 1) external public network to communicate with external world and 2) private internal network for tenant
  • Create router. Router connects tenants to external world by performing NAT and inter-tenant routing
    >neutron router-create pub_router
[root@localhost ~(keystone_test)]# neutron router-create pub_router
Created a new router:
+-----------------------+--------------------------------------+
| Field                 | Value                                |
+-----------------------+--------------------------------------+
| admin_state_up        | True                                 |
| external_gateway_info |                                      |
| id                    | 602dc4e2-24b6-401e-be1f-4e4ac3008b3b |
| name                  | pub_router                           |
| routes                |                                      |
| status                | ACTIVE                               |
| tenant_id             | a6615546ebd3445d89d5d1ffb00e06e5     |
+-----------------------+--------------------------------------+
  • Create router gateway. Note: we are setting gateway by using public network we created above (xxx.254.209.0). By default openstack takes first IP in the subnet to setup gateway , in our case xxx.254.209.1
    >neutron router-gateway-set pub_router public
[root@localhost ~(keystone_test)]# neutron router-gateway-set pub_router public
Set gateway for router pub_router
  • Now we need to stitch router to tenant network. Add one router interface to tenant network. Note: The stitching is happening by setting router interface to same IP as tenant network gateway-ip in our case it is 192.168.11.1
  • At this point we are done with network setup
    >neutron router-interface-add pub_router firstTenant_subnet
[root@localhost ~(keystone_test)]# neutron router-interface-add pub_router \
firstTenant_subnet
Added interface 1e062199-c036-4bcb-93ea-48c2f6dbc42e to router pub_router.
  • Create security rule so instances can accept ICMP and SSH traffic
    >neutron security-group-rule-create –protocol icmp default
    >neutron security-group-rule-create –protocol tcp \
    –port-range-min 22 –port-range-max 22 default
  • Create an instance. This command need UUID of tenant network,  try ‘neutron net-list’ command to get  id of tenant network
  • We are passing keypair ‘test’ we created earlier

>nova boot –poll –flavor m1.nano –image cirros    –nic net-id=67eef7cd-bc40-4aa3-b244-8c3bf64826f0 –key-name test firstTenant_firstVM

[root@localhost ~(keystone_test)]# nova boot --poll --flavor m1.nano \
--image cirros --nic net-id=67eef7cd-bc40-4aa3-b244-8c3bf64826f0 \
--key-name test firstTenant_firstVM
+--------------------------------------+------------------------------------------------+
| Property                             | Value                                          |
+--------------------------------------+------------------------------------------------+
| OS-DCF:diskConfig                    | MANUAL                                         |
| OS-EXT-AZ:availability_zone          |                                                |
| OS-EXT-STS:power_state               | 0                                              |
| OS-EXT-STS:task_state                | scheduling                                     |
| OS-EXT-STS:vm_state                  | building                                       |
| OS-SRV-USG:launched_at               | -                                              |
| OS-SRV-USG:terminated_at             | -                                              |
| accessIPv4                           |                                                |
| accessIPv6                           |                                                |
| adminPass                            | ucjzL4J5kNDS                                   |
| config_drive                         |                                                |
| created                              | 2016-03-28T20:15:37Z                           |
| flavor                               | m1.nano (89fee0c6-febe-44fe-9824-cb5821b2660c) |
| hostId                               |                                                |
| id                                   | 8b666fa7-0143-4a87-a61e-ece9146cf121           |
| image                                | cirros (cb9fbbf7-5f85-46fc-8d1a-4fa77822ced8)  |
| key_name                             | test                                           |
| metadata                             | {}                                             |
| name                                 | firstTenant_firstVM                            |
| os-extended-volumes:volumes_attached | []                                             |
| progress                             | 0                                              |
| security_groups                      | default                                        |
| status                               | BUILD                                          |
| tenant_id                            | a6615546ebd3445d89d5d1ffb00e06e5               |
| updated                              | 2016-03-28T20:15:38Z                           |
| user_id                              | 8cef3fa9c76947bbbbdeecd693a060c4               |
+--------------------------------------+------------------------------------------------+
Server building... 100% complete
Finished
[root@localhost ~(keystone_test)]# nova list
+--------------------------------------+---------------------+--------+------------+-------------+---------+
| ID                                   | Name                | Status | Task State | Power State | Networks                     |
+--------------------------------------+---------------------+--------+------------+-------------+---------+
| 8b666fa7-0143-4a87-a61e-ece9146cf121 | firstTenant_firstVM | ACTIVE | -          | Running     | firstTenant_net=192.168.11.3 |
+--------------------------------------+---------------------+--------+------------+-------------+---------+
[root@localhost ~(keystone_test)]#

Open a browser and point to http://<your ip>/dashboard. Login as test/test. Under ‘Network’ ‘Nework-topology’ you should see this picture

openstack_allinone

Lets take a break and review what has been created so far as far network is concerned

  1. We have created public network with public IP subnet, xxx.254.209.0/24
  2. We have created tenant private network with private IP subnet, 192.168.11.0/24
  3. We have created a router and assigned public gateway to it
  4. We have stitched public and private (tenant) network together
  5. We have created an instance on tenant network


  • Next step is to give public network access to tenant instance. This is done by creating floating IP network. Below command gets  IP address from public network address pool (xxx.254.209.0)
    >nova floating-ip-create public
[root@localhost ~(keystone_test)]# nova floating-ip-create public
+--------------------------------------+----------------+-----------+----------+--------+
| Id                                   | IP             | Server Id | Fixed IP | Pool   |
+--------------------------------------+----------------+-----------+----------+--------+
| 4b041d17-91e2-40c4-8a22-23ed9dd1f697 | xxx.254.209.87 | -         | -        | public |
+--------------------------------------+----------------+-----------+----------+--------+
  • Assign floating IP from above step to our instance.What this step is doing is creating NAT rule in router for our instance so instance can communicate with external world
  • Note: ‘networks’ field show two IPs, one for internal and one for public network. The router uses public IP for NAT function
    >nova add-floating-ip firstTenant_firstVM xxx.254.209.87
[root@localhost ~(keystone_test)]# nova add-floating-ip firstTenant_firstVM xxx.254.209.87
[root@localhost ~(keystone_test)]# nova list
+--------------------------------------+---------------------+--------+------------+-------------+-----------+
| ID                                   | Name                | Status | Task State | Power State | Networks                                     |
+--------------------------------------+---------------------+--------+------------+-------------+-----------+
| 8b666fa7-0143-4a87-a61e-ece9146cf121 | firstTenant_firstVM | ACTIVE | -          | Running     | firstTenant_net=192.168.11.3, 167.254.209.87 |
+--------------------------------------+---------------------+--------+------------+-------------+-----------+

Below is the picture of our network.

openstack_topo1

  • login to instance using ssh key over public network
[root@localhost ~(keystone_test)]# ls
anaconda-ks.cfg  demo_rsa.pub  keystonerc_admin  keystonerc_open  open_rsa      packstack-answers-20160328-123852.txt  test_rsa.pub
demo_rsa         Desktop       keystonerc_demo   keystonerc_test  open_rsa.pub  test_rsa
[root@localhost ~(keystone_test)]# ssh -i test_rsa cirros@xxx.254.209.87
$ 
$ ip addr
1: lo: <LOOPBACK,UP,LOWER_UP> mtu 16436 qdisc noqueue 
    link/loopback 00:00:00:00:00:00 brd 00:00:00:00:00:00
    inet 127.0.0.1/8 scope host lo
    inet6 ::1/128 scope host 
       valid_lft forever preferred_lft forever
2: eth0: <BROADCAST,MULTICAST,UP,LOWER_UP> mtu 1400 qdisc pfifo_fast qlen 1000
    link/ether fa:16:3e:de:94:ce brd ff:ff:ff:ff:ff:ff
    inet 192.168.11.3/24 brd 192.168.11.255 scope global eth0
    inet6 fe80::f816:3eff:fede:94ce/64 scope link 
       valid_lft forever preferred_lft forever
$ route
Kernel IP routing table
Destination     Gateway         Genmask         Flags Metric Ref    Use Iface
default         192.168.11.1    0.0.0.0         UG    0      0        0 eth0
192.168.11.0    *               255.255.255.0   U     0      0        0 eth0
$ 
$ ping xxx.254.209.126
PING 167.254.209.126 (xxx.254.209.126): 56 data bytes
64 bytes from xxx.254.209.126: seq=1 ttl=254 time=2.742 ms

--- xxx.254.209.126 ping statistics ---
4 packets transmitted, 3 packets received, 25% packet loss
round-trip min/avg/max = 2.456/2.767/3.105 ms
$ $ exit
Connection to xxx.254.209.87 closed.
[root@localhost ~(keystone_test)]#
  •  Below some useful logs
    [root@localhost ~(keystone_test)]# ip netns
    qrouter-602dc4e2-24b6-401e-be1f-4e4ac3008b3b
    qdhcp-67eef7cd-bc40-4aa3-b244-8c3bf64826f0
    [root@localhost ~(keystone_test)]# ip netns exec qrouter-602dc4e2-24b6-401e-be1f-4e4ac3008b3b ip addr
    1: lo: <LOOPBACK,UP,LOWER_UP> mtu 65536 qdisc noqueue state UNKNOWN 
        link/loopback 00:00:00:00:00:00 brd 00:00:00:00:00:00
        inet 127.0.0.1/8 scope host lo
           valid_lft forever preferred_lft forever
        inet6 ::1/128 scope host 
           valid_lft forever preferred_lft forever
    13: qg-18cece2c-b0: <BROADCAST,MULTICAST,UP,LOWER_UP> mtu 1500 qdisc noqueue state UNKNOWN 
        link/ether fa:16:3e:39:9b:9a brd ff:ff:ff:ff:ff:ff
        inet xxx.254.209.86/24 brd xxx.254.209.255 scope global qg-18cece2c-b0
           valid_lft forever preferred_lft forever
        inet6 fe80::f816:3eff:fe39:9b9a/64 scope link 
           valid_lft forever preferred_lft forever
    14: qr-1e062199-c0: <BROADCAST,MULTICAST,UP,LOWER_UP> mtu 1500 qdisc noqueue state UNKNOWN 
        link/ether fa:16:3e:02:af:9c brd ff:ff:ff:ff:ff:ff
        inet 192.168.11.1/24 brd 192.168.11.255 scope global qr-1e062199-c0
           valid_lft forever preferred_lft forever
        inet6 fe80::f816:3eff:fe02:af9c/64 scope link 
           valid_lft forever preferred_lft forever
    [root@localhost ~(keystone_test)]# ip netns exec qrouter-602dc4e2-24b6-401e-be1f-4e4ac3008b3b ping xxx.254.209.126
    PING xxx.254.209.126 (xxx.254.209.126) 56(84) bytes of data.
    64 bytes from xxx.254.209.126: icmp_seq=1 ttl=255 time=9.53 ms
    64 bytes from xxx.254.209.126: icmp_seq=2 ttl=255 time=2.04 ms
    64 bytes from xxx.254.209.126: icmp_seq=3 ttl=255 time=2.52 ms
    ^C
    --- xxx.254.209.126 ping statistics ---
    3 packets transmitted, 3 received, 0% packet loss, time 2002ms
    rtt min/avg/max/mdev = 2.045/4.701/9.539/3.426 ms
    [root@localhost ~(keystone_test)]# 

    [root@localhost ~(keystone_test)]# ip netns exec qdhcp-67eef7cd-bc40-4aa3-b244-8c3bf64826f0 ip addr
    1: lo: <LOOPBACK,UP,LOWER_UP> mtu 65536 qdisc noqueue state UNKNOWN 
        link/loopback 00:00:00:00:00:00 brd 00:00:00:00:00:00
        inet 127.0.0.1/8 scope host lo
           valid_lft forever preferred_lft forever
        inet6 ::1/128 scope host 
           valid_lft forever preferred_lft forever
    12: tap95895d8b-77: <BROADCAST,MULTICAST,UP,LOWER_UP> mtu 1500 qdisc noqueue state UNKNOWN 
        link/ether fa:16:3e:8f:1b:a1 brd ff:ff:ff:ff:ff:ff
        inet 192.168.11.2/24 brd 192.168.11.255 scope global tap95895d8b-77
           valid_lft forever preferred_lft forever
        inet6 fe80::f816:3eff:fe8f:1ba1/64 scope link 
           valid_lft forever preferred_lft forever
    [root@localhost ~(keystone_test)]# ip netns exec qdhcp-67eef7cd-bc40-4aa3-b244-8c3bf64826f0 ping 192.168.11.1
    PING 192.168.11.1 (192.168.11.1) 56(84) bytes of data.
    64 bytes from 192.168.11.1: icmp_seq=1 ttl=64 time=0.327 ms
    64 bytes from 192.168.11.1: icmp_seq=2 ttl=64 time=0.056 ms
    ^C
    --- 192.168.11.1 ping statistics ---
    2 packets transmitted, 2 received, 0% packet loss, time 999ms
    rtt min/avg/max/mdev = 0.056/0.191/0.327/0.136 ms
    [root@localhost ~(keystone_test)]# 

    [root@localhost ~(keystone_test)]# ip addr
    1: lo: <LOOPBACK,UP,LOWER_UP> mtu 65536 qdisc noqueue state UNKNOWN 
        link/loopback 00:00:00:00:00:00 brd 00:00:00:00:00:00
        inet 127.0.0.1/8 scope host lo
           valid_lft forever preferred_lft forever
        inet6 ::1/128 scope host 
           valid_lft forever preferred_lft forever
    2: ens2: <NO-CARRIER,BROADCAST,MULTICAST,UP> mtu 1500 qdisc pfifo_fast state DOWN qlen 1000
        link/ether 00:13:3b:10:b7:2a brd ff:ff:ff:ff:ff:ff
        inet 192.168.10.1/24 brd 192.168.10.255 scope global ens2
           valid_lft forever preferred_lft forever
    3: ens5: <NO-CARRIER,BROADCAST,MULTICAST,UP> mtu 1500 qdisc pfifo_fast master ovs-system state DOWN qlen 1000
        link/ether 00:0a:cd:2a:14:08 brd ff:ff:ff:ff:ff:ff
    4: enp1s0: <BROADCAST,MULTICAST,UP,LOWER_UP> mtu 1500 qdisc mq master ovs-system state UP qlen 1000
        link/ether 2c:27:d7:1c:88:a8 brd ff:ff:ff:ff:ff:ff
        inet6 fe80::2e27:d7ff:fe1c:88a8/64 scope link 
           valid_lft forever preferred_lft forever
    5: ovs-system: <BROADCAST,MULTICAST> mtu 1500 qdisc noop state DOWN 
        link/ether 56:c4:71:ce:82:c4 brd ff:ff:ff:ff:ff:ff
    7: br-tun: <BROADCAST,MULTICAST> mtu 1500 qdisc noop state DOWN 
        link/ether ea:0f:f5:22:6c:4a brd ff:ff:ff:ff:ff:ff
    8: br-int: <BROADCAST,MULTICAST> mtu 1500 qdisc noop state DOWN 
        link/ether d2:e4:ec:56:2f:44 brd ff:ff:ff:ff:ff:ff
    11: br-ex: <BROADCAST,MULTICAST,UP,LOWER_UP> mtu 1500 qdisc noqueue state UNKNOWN 
        link/ether 00:0a:cd:2a:14:08 brd ff:ff:ff:ff:ff:ff
        inet xxx.254.209.85/24 brd xxx.254.209.255 scope global br-ex
           valid_lft forever preferred_lft forever
        inet6 fe80::5cf4:8dff:fe8d:3446/64 scope link 
           valid_lft forever preferred_lft forever
    15: qbr44a1eb3f-a8: <BROADCAST,MULTICAST,UP,LOWER_UP> mtu 1500 qdisc noqueue state UP 
        link/ether 82:58:a3:06:44:c0 brd ff:ff:ff:ff:ff:ff
    16: qvo44a1eb3f-a8@qvb44a1eb3f-a8: <BROADCAST,MULTICAST,PROMISC,UP,LOWER_UP> mtu 1500 qdisc pfifo_fast master ovs-system state UP qlen 1000
        link/ether 66:8b:21:ce:0b:ca brd ff:ff:ff:ff:ff:ff
        inet6 fe80::648b:21ff:fece:bca/64 scope link 
           valid_lft forever preferred_lft forever
    17: qvb44a1eb3f-a8@qvo44a1eb3f-a8: <BROADCAST,MULTICAST,PROMISC,UP,LOWER_UP> mtu 1500 qdisc pfifo_fast master qbr44a1eb3f-a8 state UP qlen 1000
        link/ether 82:58:a3:06:44:c0 brd ff:ff:ff:ff:ff:ff
        inet6 fe80::8058:a3ff:fe06:44c0/64 scope link 
           valid_lft forever preferred_lft forever
    18: tap44a1eb3f-a8: <BROADCAST,MULTICAST,UP,LOWER_UP> mtu 1500 qdisc pfifo_fast master qbr44a1eb3f-a8 state UNKNOWN qlen 500
        link/ether fe:16:3e:de:94:ce brd ff:ff:ff:ff:ff:ff
        inet6 fe80::fc16:3eff:fede:94ce/64 scope link 
           valid_lft forever preferred_lft forever

    [root@localhost ~(keystone_test)]# ip netns exec qrouter-602dc4e2-24b6-401e-be1f-4e4ac3008b3b iptables -S -t nat
    -P PREROUTING ACCEPT
    -P INPUT ACCEPT
    -P OUTPUT ACCEPT
    -P POSTROUTING ACCEPT
    -N neutron-l3-agent-OUTPUT
    -N neutron-l3-agent-POSTROUTING
    -N neutron-l3-agent-PREROUTING
    -N neutron-l3-agent-float-snat
    -N neutron-l3-agent-snat
    -N neutron-postrouting-bottom
    -A PREROUTING -j neutron-l3-agent-PREROUTING
    -A OUTPUT -j neutron-l3-agent-OUTPUT
    -A POSTROUTING -j neutron-l3-agent-POSTROUTING
    -A POSTROUTING -j neutron-postrouting-bottom
    -A neutron-l3-agent-OUTPUT -d xxx.254.209.87/32 -j DNAT --to-destination 192.168.11.3
    -A neutron-l3-agent-POSTROUTING ! -i qg-18cece2c-b0 ! -o qg-18cece2c-b0 -m conntrack ! --ctstate DNAT -j ACCEPT
    -A neutron-l3-agent-PREROUTING -d 169.254.169.254/32 -i qr-+ -p tcp -m tcp --dport 80 -j REDIRECT --to-ports 9697
    -A neutron-l3-agent-PREROUTING -d xxx.254.209.87/32 -j DNAT --to-destination 192.168.11.3
    -A neutron-l3-agent-float-snat -s 192.168.11.3/32 -j SNAT --to-source xxx.254.209.87
    -A neutron-l3-agent-snat -j neutron-l3-agent-float-snat
    -A neutron-l3-agent-snat -o qg-18cece2c-b0 -j SNAT --to-source xxx.254.209.86
    -A neutron-l3-agent-snat -m mark ! --mark 0x2 -m conntrack --ctstate DNAT -j SNAT --to-source xxx.254.209.86
    -A neutron-postrouting-bottom -m comment --comment "Perform source NAT on outgoing traffic." -j neutron-l3-agent-snat

    [root@localhost ~(keystone_test)]# ovs-vsctl show
    42a06974-d8e8-46aa-973f-732a0c1284bd
        Bridge br-int
            fail_mode: secure
            Port "qvo44a1eb3f-a8"
                tag: 1
                Interface "qvo44a1eb3f-a8"
            Port patch-tun
                Interface patch-tun
                    type: patch
                    options: {peer=patch-int}
            Port "tap95895d8b-77"
                tag: 1
                Interface "tap95895d8b-77"
                    type: internal
            Port br-int
                Interface br-int
                    type: internal
            Port int-br-ex
                Interface int-br-ex
                    type: patch
                    options: {peer=phy-br-ex}
            Port "qr-1e062199-c0"
                tag: 1
                Interface "qr-1e062199-c0"
                    type: internal
        Bridge br-tun
            fail_mode: secure
            Port patch-int
                Interface patch-int
                    type: patch
                    options: {peer=patch-tun}
            Port br-tun
                Interface br-tun
                    type: internal
        Bridge br-ex
            Port "ens5"
                Interface "ens5"
            Port "enp1s0"
                Interface "enp1s0"
            Port phy-br-ex
                Interface phy-br-ex
                    type: patch
                    options: {peer=int-br-ex}
            Port "qg-18cece2c-b0"
                Interface "qg-18cece2c-b0"
                    type: internal
            Port br-ex
                Interface br-ex
                    type: internal
        ovs_version: "2.4.0"
    [root@localhost ~(keystone_test)]# 

    [root@localhost ~(keystone_test)]# ovs-ofctl show br-int
    OFPT_FEATURES_REPLY (xid=0x2): dpid:0000d2e4ec562f44
    n_tables:254, n_buffers:256
    capabilities: FLOW_STATS TABLE_STATS PORT_STATS QUEUE_STATS ARP_MATCH_IP
    actions: output enqueue set_vlan_vid set_vlan_pcp strip_vlan mod_dl_src mod_dl_dst mod_nw_src mod_nw_dst mod_nw_tos mod_tp_src mod_tp_dst
     5(int-br-ex): addr:f6:c7:6d:bf:bc:e3
         config:     0
         state:      0
         speed: 0 Mbps now, 0 Mbps max
     6(patch-tun): addr:46:47:a7:29:a2:7b
         config:     0
         state:      0
         speed: 0 Mbps now, 0 Mbps max
     7(tap95895d8b-77): addr:00:00:00:00:00:00
         config:     PORT_DOWN
         state:      LINK_DOWN
         speed: 0 Mbps now, 0 Mbps max
     8(qr-1e062199-c0): addr:00:00:00:00:00:00
         config:     PORT_DOWN
         state:      LINK_DOWN
         speed: 0 Mbps now, 0 Mbps max
     9(qvo44a1eb3f-a8): addr:66:8b:21:ce:0b:ca
         config:     0
         state:      0
         current:    10GB-FD COPPER
         speed: 10000 Mbps now, 0 Mbps max
     LOCAL(br-int): addr:d2:e4:ec:56:2f:44
         config:     PORT_DOWN
         state:      LINK_DOWN
         speed: 0 Mbps now, 0 Mbps max
    OFPT_GET_CONFIG_REPLY (xid=0x4): frags=normal miss_send_len=0
    [root@localhost ~(keystone_test)]# ovs-ofctl show br-ex
    OFPT_FEATURES_REPLY (xid=0x2): dpid:0000000acd2a1408
    n_tables:254, n_buffers:256
    capabilities: FLOW_STATS TABLE_STATS PORT_STATS QUEUE_STATS ARP_MATCH_IP
    actions: output enqueue set_vlan_vid set_vlan_pcp strip_vlan mod_dl_src mod_dl_dst mod_nw_src mod_nw_dst mod_nw_tos mod_tp_src mod_tp_dst
     1(enp1s0): addr:2c:27:d7:1c:88:a8
         config:     0
         state:      0
         current:    100MB-FD COPPER AUTO_NEG
         advertised: 10MB-HD 10MB-FD 100MB-HD 100MB-FD 1GB-HD 1GB-FD COPPER AUTO_NEG AUTO_PAUSE
         supported:  10MB-HD 10MB-FD 100MB-HD 100MB-FD 1GB-HD 1GB-FD COPPER AUTO_NEG
         speed: 100 Mbps now, 1000 Mbps max
     2(ens5): addr:00:0a:cd:2a:14:08
         config:     0
         state:      LINK_DOWN
         current:    10MB-HD AUTO_NEG
         advertised: 10MB-HD 10MB-FD 100MB-HD 100MB-FD 1GB-HD 1GB-FD COPPER AUTO_NEG AUTO_PAUSE AUTO_PAUSE_ASYM
         supported:  10MB-HD 10MB-FD 100MB-HD 100MB-FD 1GB-HD 1GB-FD COPPER AUTO_NEG
         speed: 10 Mbps now, 1000 Mbps max
     3(phy-br-ex): addr:4e:61:b1:1d:80:c9
         config:     0
         state:      0
         speed: 0 Mbps now, 0 Mbps max
     4(qg-18cece2c-b0): addr:00:00:00:00:00:00
         config:     PORT_DOWN
         state:      LINK_DOWN
         speed: 0 Mbps now, 0 Mbps max
     LOCAL(br-ex): addr:00:0a:cd:2a:14:08
         config:     0
         state:      0
         speed: 0 Mbps now, 0 Mbps max
    OFPT_GET_CONFIG_REPLY (xid=0x4): frags=normal miss_send_len=0
    [root@localhost ~(keystone_test)]# ovs-ofctl show br-tun
    OFPT_FEATURES_REPLY (xid=0x2): dpid:0000ea0ff5226c4a
    n_tables:254, n_buffers:256
    capabilities: FLOW_STATS TABLE_STATS PORT_STATS QUEUE_STATS ARP_MATCH_IP
    actions: output enqueue set_vlan_vid set_vlan_pcp strip_vlan mod_dl_src mod_dl_dst mod_nw_src mod_nw_dst mod_nw_tos mod_tp_src mod_tp_dst
     3(patch-int): addr:16:fc:f9:6b:6a:f3
         config:     0
         state:      0
         speed: 0 Mbps now, 0 Mbps max
     LOCAL(br-tun): addr:ea:0f:f5:22:6c:4a
         config:     PORT_DOWN
         state:      LINK_DOWN
         speed: 0 Mbps now, 0 Mbps max
    OFPT_GET_CONFIG_REPLY (xid=0x4): frags=normal miss_send_len=0
    [root@localhost ~(keystone_test)]#


References:

Lab-12:Using and Creating PyEZ tables

Parsing command response is a challenge when automating network elements. It was a big challenge when interfaces were cli due to complexity and variation in cli implementation among vendors. NETCONF together with Python xml libraries made life easier.  I wrote two lab-7 & lab-8 on how to parse command response  in Python. They are written for NETCONF xml response  using minidom and etree, xpath.

PyEZ table and view abstract xml parsing from user.  Under the hood it does xml parsing in xpath but as a user you don’t need to worry about it. A user simply provides the command and  the response fields they are interested in, PyEZ does the parsing and adds it in Python dictionary.  User data is formatted in yaml.
In this lab I will demonstrate below functions of PyEZ
1) How to use existing PyEZ tables. PyEZ comes with lots of pre-built tables check references links for latest tables
2) How to quickly create your own tables & views on the fly in the Python script
3) how to build external table and use it in Python script

Below construction of table & view

table name - user defined table name
rpc - rpc command, for example get-interface-information. you can get rpc command 
for a cli like this 'show interfaces | display xml rpc' 
args - default optional argument for the rpc command
args_key - optional key for the table. if this key is not set you need to specify
key name for get() like this portStatsTable(dev).get(interface_name'ge-0/0/1'). If 
key is set you can run get() like this portStatsTable(dev).get('ge-0/0/1')
item - This is the top level xpath expression in <rpc-reply>. PyEZ searches for this 
string when parsing command response
view - view table name

fields - key value pair of dictionary. Here you specify response fields you are 
interested in, you also need to create key for that field


Using pre-built tables

Let’s see how to use pre-built PyEZ table. I am interested in interface error stats so I will try PhyPortErrorTable. This table contains input,output received counts and input,output error counts.
Below is the snippet of yaml file for the table

PhyPortErrorTable:
  rpc: get-interface-information  
  args:                           
    extensive: True 
    interface_name: '[fgx]e*' 
  args_key: interface_name        
  item: physical-interface        
  view: PhyPortErrorView          

PhyPortErrorView:
  groups: 
    ts: traffic-statistics 
    rxerrs: input-error-list
    txerrs: output-error-list
 fields_ts:                        
    rx_bytes: { input-bytes: int }
    rx_packets: { input-packets: int }
 <truncated ....>
 fields_rxerrs:
    rx_err_input: { input-errors: int }
    rx_err_drops: { input-drops: int }
 <truncated .....>
fields_txerrs:
    tx_err_carrier-transitions: { carrier-transitions: int }
    tx_err_output: { output-errors: int }
<truncated ....>

Step-1: Start Python and import required packages

sjakhwal@rtxl3rld05:~$ python
Python 2.7.6 (default, Mar 22 2014, 22:59:56)
[GCC 4.8.2] on linux2
Type "help", "copyright", "credits" or "license" for more information.
>>> from jnpr.junos import Device
>>> from jnpr.junos.utils.config import Config
>>> from lxml import etree
>>> dev = Device(host='192.168.122.35',user='root',passwd='juniper1').open()
>>> dev.facts['model']
'FIREFLY-PERIMETER'
>>>

Step-2: Import PyEZ table and get command response. PyEZ keeps command response in a Python dictionary format, it makes name field as key automatically. You can see that interface_names  are keys in the dictionary

>>>from jnpr.junos.op.phyport import PhyPortErrorTable
>>> from pprint import pprint as pp
>>> phyErrors = PhyPortErrorTable(dev).get()
>>> phyErrors.keys()
[‘ge-0/0/0’, ‘ge-0/0/1’, ‘ge-0/0/2’]
>>>
>>> pp (phyErrors[‘ge-0/0/1’].items())
[(‘tx_err_resource’, 0),
(‘rx_err_drops’, 0),
(‘rx_packets’, 562159),
(‘rx_err_l2-channel’, 0),
(‘tx_err_collisions’, 0),
(‘tx_err_drops’, 0),
(‘tx_err_fifo’, 0),
(‘rx_err_frame’, 0),
(‘rx_err_runts’, 0),
(‘tx_bytes’, 84),
(‘tx_err_output’, 0),
(‘tx_err_aged’, 0),
(‘tx_err_hs-crc’, 0),
(‘rx_err_l2-mismatch’, 0),
(‘tx_err_carrier-transitions’, 1),
(‘rx_bytes’, 29229986),
(‘rx_err_fifo’, 0),
(‘rx_err_resource’, 0),
(‘rx_err_l3-incompletes’, 0),
(‘tx_err_mtu’, 0),
(‘rx_err_discards’, 0),
(‘rx_err_input’, 0),
(‘tx_packets’, 2)]
>>>
>>> pp (phyErrors[‘ge-0/0/1’].rx_bytes)
29229986
>>>
>>> for key in phyErrors.keys():
…   for phyError in phyErrors[key].items():
…     pp (phyError)

(‘tx_err_resource’, 0)
(‘rx_err_drops’, 0)
(‘rx_packets’, 783248)
(‘rx_err_l2-channel’, 0)
(‘tx_err_collisions’, 0)
(‘tx_err_drops’, 0)
(‘tx_err_fifo’, 0)
(‘rx_err_frame’, 0)
(‘rx_err_runts’, 0)
….
<truncated>

creating table and views on the fly

Now lets create our own table and views in the Python script. I am using same table (phyPortErrorStatsTable) but updated it to parse only ‘traffic-statistics’ & ‘input-error-list’.  I have also reduced the number of error counts.
Note:Be extra cautious about yaml format, make sure all fields are aligned properly otherwise loading will fail.

Step-1: You need to load two new packages for this. Import packages and create YAML string

>>>from jnpr.junos.factory.factory_loader import FactoryLoader
>>>import yaml
>>> PortErrorStatsTableString = """
... ---
... customPortErrorStatsTable:
...   rpc: get-interface-information
...   args:
...     extensive: True
...     interface_name: '[fgx]e*'
...   args_key: interface_name
...   item: physical-interface
...   view: customPhyPortErrorView
...
... customPhyPortErrorView:
...   groups:
...     ts: traffic-statistics
...     rxerrs: input-error-list
...   fields_ts:
...     rx_packets: { input-packets: int }
...     tx_packets: { output-packets: int }
...   fields_rxerrs:
...     rx_err_drops: { input-drops: int }
...     rx_err_discards: { input-discards: int }
... """

Step-2: Load YAML string and get command response. Remaining steps are same as using pre-built tables

>> globals().update(FactoryLoader().load(yaml.load(PortErrorStatsTableString)))
>>>
>>> customErrorsTable = customPortErrorStatsTable(dev).get()
>>> print customErrorsTable
customPortErrorStatsTable:192.168.122.35: 3 items
>>> print customErrorsTable.keys()
['ge-0/0/0', 'ge-0/0/1', 'ge-0/0/2']
>>> pp (customErrorsTable.items())
[('ge-0/0/0',
  [('rx_err_drops', 0),
   ('rx_packets', 792394),
   ('tx_packets', 19432),
   ('rx_err_discards', 0)]),
 ('ge-0/0/1',
  [('rx_err_drops', 0),
   ('rx_packets', 571240),
   ('tx_packets', 2),
   ('rx_err_discards', 0)]),
 ('ge-0/0/2',
  [('rx_err_drops', 0),
   ('rx_packets', 0),
   ('tx_packets', 0),
   ('rx_err_discards', 0)])]
>>>
>>> print customErrorsTable['ge-0/0/2'].tx_packets
0
>>>

Using table and views from external file

okay so the last part is to create external table file.
create a sub-directory myPyezTable and create .yml and .py file using below steps

Step-1: create portStats.py and put these 4 statements in the file

from jnpr.junos.factory import loadyaml
from os.path import splitext
_YAML_ = splitext(__file__)[0] + '.yml
globals().update(loadyaml(_YAML_))

Step-2: create portStats.yml file and add your  yaml table in it. Note both yml and py file names are same

---
customPortErrorStatsTable:
  rpc: get-interface-information
  args:
    extensive: True
    interface_name: '[fgx]e*'
  args_key: interface_name
  item: physical-interface
  view: customPhyPortErrorView
customPhyPortErrorView:
  groups:
    ts: traffic-statistics
    rxerrs: input-error-list
  fields_ts:
    rx_packets: { input-packets: int }
    tx_packets: { output-packets: int }
  fields_rxerrs:
    rx_err_drops: { input-drops: int }
    rx_err_discards: { input-discards: int }

Step-3: add _init.py file in the sub-directory. This is an empty file

Step-4: import your table. Remaining steps are same as using pre-build PyEZ tables

>>> from myPyezTable.portStats import customPortErrorStatsTable
>>> portErrors = customPortErrorStatsTable(dev).get()
>>> pp (portErrors.items())
[('ge-0/0/0',
  [('rx_err_drops', 0),
   ('rx_packets', 793354),
   ('tx_packets', 19525),
   ('rx_err_discards', 0)]),
 ('ge-0/0/1',
  [('rx_err_drops', 0),
   ('rx_packets', 572104),
   ('tx_packets', 2),
   ('rx_err_discards', 0)]),
 ('ge-0/0/2',
  [('rx_err_drops', 0),
   ('rx_packets', 0),
   ('tx_packets', 0),
   ('rx_err_discards', 0)])]
>>> pp (portErrors.keys())
['ge-0/0/0', 'ge-0/0/1', 'ge-0/0/2']
>>>

View of my sub-directory & external files

sjakhwal@rtxl3rld05:~/myPyezTable$ pwd
/home/sjakhwal/myPyezTable
sjakhwal@rtxl3rld05:~/myPyezTable$ ls
__init__.py  __init__.pyc  portStats.py  portStats.pyc  portStats.yml
sjakhwal@rtxl3rld05:~/myPyezTable$ cat __init__.py
sjakhwal@rtxl3rld05:~/myPyezTable$ cat portStats.py
from jnpr.junos.factory import loadyaml
from os.path import splitext
_YAML_ = splitext(__file__)[0] + '.yml'
globals().update(loadyaml(_YAML_))
sjakhwal@rtxl3rld05:~/myPyezTable$ cat portStats.yml
---
customPortErrorStatsTable:
  rpc: get-interface-information
  args:
    extensive: True
    interface_name: '[fgx]e*'
  args_key: interface_name
  item: physical-interface
  view: customPhyPortErrorView

customPhyPortErrorView:
  groups:
    ts: traffic-statistics
    rxerrs: input-error-list
  fields_ts:
    rx_packets: { input-packets: int }
    tx_packets: { output-packets: int }
  fields_rxerrs:
    rx_err_drops: { input-drops: int }
    rx_err_discards: { input-discards: int }


References:

Junos PyEZ Developer Guide


Lab-11:Loading configuration data using Juniper PyEZ

In this lab I will demonstrate how to load configuration data on Juniper srx using PyEZ API.I will show three different ways of loading configuration data 1) junos xml format file and string 2) junos set format command and string 3) text format command and string. I am using junos pdiff function to validate the result. pdiff shows the difference between committed and candidate datastore

Precondition:

  • Juniper srx with NETCONF protocol enabled
    • set system services netconf ssh
  • Juniper PyEZ installed
    • pip install junos-eznc

Procedure:

I am using python version 2.7 command line.

Step-1: create below 3 files we will be loading them using load API

filename:config_data_xml.xml
<configuration>
     <interfaces>
        <interface>
          <name>ge-0/0/2</name>
             <unit>
               <name>0</name>
                 <family>
                    <inet>
                       <address>
                         <name>192.168.1.1/24</name>
                       </address>
        
             </inet>
                  </family>
               </unit>
         </interface>
    </interfaces>
</configuration>


filename:config_data_set.set
set interfaces ge-0/0/2 unit 0 family inet address 192.168.3.1/24


filename:config_data_text.txt
interfaces ge-0/0/2 {
                    unit 0 {
                        family inet {
                                address 192.168.2.1/24
                         }
                    }
 }

Step-2: start Python and import packages. install Juniper eznc if not already done so (see precondition for installation command)

sjakhwal@rtxl3rld05:~/scripts/junos_config$ python
Python 2.7.6 (default, Mar 22 2014, 22:59:56)
[GCC 4.8.2] on linux2
Type "help", "copyright", "credits" or "license" for more information.
>>>
>>> from jnpr.junos import Device
>>> from jnpr.junos.utils.config import Config
>>> from lxml import etree

Step-3: Connect to Juniper srx,print facts and bind config to device

>>>dev = Device(host='192.168.122.35',user='root',passwd='juniper1') 
>>>dev.open() Device(192.168.122.35)
>>>dev.facts['model'] 'FIREFLY-PERIMETER'
>>>config = Config(dev)

Step-4: Set file path for xml file, load file and validate using pdiff API. pdiff print show that a new route has been added to candidate datastore

>>> config_file_path = "/home/sjakhwal/scripts/junos_config/config_data_xml.xml"
>>> print etree.tostring(config.load(path=config_file_path,merge=True,format='xml'))
<load-configuration-results>
<ok/>
</load-configuration-results>
>>> config.pdiff()
[edit interfaces]
+   ge-0/0/2 {
+       unit 0 {
+           family inet {
+               address 192.168.1.1/24;
+           }
+       }
+   }

Step-5: Same as step-4 but this time using Junos set format file. Set file path for Junos set  file, load file and validate using pdiff API. pdiff print show that new route 192.168.3.1 has been added in candidate datastore

## load junos set format file
>>> config_file_path = "/home/sjakhwal/scripts/junos_config/config_data_set.set"
>>> print etree.tostring(config.load(path=config_file_path,merge=True,format='set'))
<load-configuration-results>
<ok/>
</load-configuration-results>
>>> config.pdiff()
[edit interfaces]
+   ge-0/0/2 {
+       unit 0 {
+           family inet {
+               address 192.168.1.1/24;
+               address 192.168.3.1/24;
+           }
+       }
+   }

Step-6: Set file path for Junos text  file, load file and validate using pdiff API

>>>config_file_path = "/home/sjakhwal/scripts/junos_config/config_data_text.txt"
>>> print etree.tostring(config.load(path=config_file_path,merge=True,format='text'))
<load-configuration-results>
<ok/>
</load-configuration-results>
>>> config.pdiff()
[edit interfaces]
+   ge-0/0/2 {
+       unit 0 {
+           family inet {
+               address 192.168.1.1/24;
+               address 192.168.3.1/24;
+               address 192.168.2.1/24;
+           }
+       }
+   }

Step-7: Loading configuration data using Python string. You can create configuration data on the fly using Python string and push it to device. Create junos xml format configuration data string and load it. pdiff print show that new route has been added under interface ge-0/0/3

> config_data_xml = """
...   <configuration>
      <interfaces>
...       <interfaces>
...          <interface>
...                     <name>ge-0/0/3</name>
...                     <unit>
...                         <name>0</name>
...                         <family>
...                             <inet>
...                                 <address>
...                                     <name>192.168.1.1/24</name>
...                                 </address>
...                             </inet>
                    </unit>
...                         </family>
...                     </unit>
...                 </interface>
...       </interfaces>
... </configuration>
>>> print etree.tostring(config.load(config_data_xml,formal='xml'))
<load-configuration-results>
<ok/>
</load-configuration-results>
>>> config.pdiff()
[edit interfaces]
+   ge-0/0/2 {
+       unit 0 {
+           family inet {
+               address 192.168.1.1/24;
+               address 192.168.3.1/24;
+               address 192.168.2.1/24;
+           }
+       }
+   }
[edit interfaces ge-0/0/3 unit 0 family inet]
        address 10.0.0.2/24 { ... }
+       address 192.168.1.1/24;

Step-8: same step as above but this time create configuration string for junos ‘set’ format. Create Junos set command string, load it and validate using pdiff API

>>> config_data_set = """
...  set interfaces ge-0/0/3 unit 0 family inet address 192.168.2.1/24
... """
>>> print etree.tostring(config.load(config_data_set,formal='set'))
<load-configuration-results>
<ok/>
</load-configuration-results>
>>> config.pdiff()
[edit interfaces]
+   ge-0/0/2 {
+       unit 0 {
+           family inet {
+               address 192.168.1.1/24;
+               address 192.168.3.1/24;
+               address 192.168.2.1/24;
+           }
+       }
+   }
[edit interfaces ge-0/0/3 unit 0 family inet]
        address 10.0.0.2/24 { ... }
+       address 192.168.1.1/24;
+       address 192.168.2.1/24;

Step-9: Create test format Junos string, load it and validate using pdiff

>> config_data_text = """
...  interfaces ge-0/0/3 {
...                     unit 0 {
...                         family inet {
...                                 address 192.168.4.1/24
...                          }
...                     }
...  }
... """>>> print etree.tostring(config.load(config_data_text,format='text'))
<load-configuration-results>
<ok/>
</load-configuration-results>
>>> config.pdiff()
[edit interfaces]
+   ge-0/0/2 {
+       unit 0 {
+           family inet {
+               address 192.168.1.1/24;
+               address 192.168.3.1/24;
+               address 192.168.2.1/24;
+           }
+       }
+   }
[edit interfaces ge-0/0/3 unit 0 family inet]
        address 10.0.0.2/24 { ... }
+       address 192.168.1.1/24;
+       address 192.168.2.1/24;
+       address 192.168.4.1/24;
To verify the syntax of the configuration without actually committing it, you can call
the commit_check() method in place of the commit() method.
>>>config.commit_check()

Note: I encountered RPCtimeout error on commit_check. NETCONF default RPC timeout is 30 sec.
after increasing it to 300 sec command  completed successfully
>>>dev.timeout= 300  //300 seconds
>>> config.commit_check()
True
>>>

References:


Lab-10:Python for network automation -using Jinja2 template and YAML file

Jinja2 is a powerful templating language for Python. If you are in network automation business you are going to love it I guarantee it. Using Jinja2 you can build a template which uses variables instead of hard coded values, Jinja2 then automagically renders template using variable values. Variable values either comes from Python dictionary or yaml file. Jinja2 also allows you to add control statements like ‘for’ loop & ‘If’ statement to create logic in template file.

Some common Jinja2 statements:

Variable substitution:

  • Jinja2 variable substituting is done by enclosing it in ‘{{‘
    • example: {{ interface }}

For loop:

  • for statement begins with {% for statement %} and end with {% end %}
    • example: {% for interface in interfaces %}  … {% endfor %}

 If statement:

  • If statement begins with {% if statement %} and end with {% endif %}
    • example: {% if interface == ‘ge-0/0/2’  %}  …  {% endif %}

Comment:

  • comment starts with ‘{#’ and ends with ‘#}
    • example: {# set description only for interface ge-0/0/2 #}


 Pre-condition:

  • Install jinja2
    • pip install jinja2

Procedure:

  • Step-1: Create a Jinja2 template file, interfaces.j2. In this template interface name and description tags are created as variable and a for loop added to iterate thru multiple interfaces. I have created xml format file but it can be any format
<interfaces>
 {% for interface in interfaces %}
      <interface>{{interface}} 
          <description> {{description}} </description>
      </interface>
 {% endfor %}
</interfaces>
  • Step-2: Import packages, set environment and load jinja2 template by using get_template API. Here I am using ‘interfaces.j2’ template created in step-1

sjakhwal@rtxl3rld05:~$ python
Python 2.7.6 (default, Mar 22 2014, 22:59:56)
[GCC 4.8.2] on linux2
Type “help”, “copyright”, “credits” or “license” for more information.
>>> import jinja2
>>> import yaml
>>> import os
>>> from lxml import etree
>>> templateFilePath = jinja2.FileSystemLoader(os.getcwd())
>>> jinjaEnv = jinja2.Environment(loader=templateFilePath,trim_blocks=True,lstrip_blocks=True)
>>> jTemplate = jinjaEnv.get_template(‘interfaces.j2’)

  • Step-3: Build variable dictionary in python. Here I am creating a dictionary for interfaces and description

config = {
‘interfaces’: [‘ge-0/0/1′,’ge-0/0/2′,’ge-0/0/3’],
‘description’: ‘interface configured using jinja2 template’
}

>>> print config
{‘interfaces’: [‘ge-0/0/1’, ‘ge-0/0/2’, ‘ge-0/0/3’], ‘description’: ‘interface configured using jinja2 template’}

  • Step-4: Last step is to render jinja2 template using dictionary . you can store new configuration to a file or push it to your device by writing simple Python code.

> print jTemplate.render(config)
<interfaces>
<nterface>ge-0/0/1
<description> interface configured using jinja2 template </description>
</interface>
<nterface>ge-0/0/2
<description> interface configured using jinja2 template </description>
</interface>
<nterface>ge-0/0/3
<description> interface configured using jinja2 template </description>
</interface>
</interfaces>

  • This is another way of achieving same result. Here instead of building dictionary of variables you pass them while rendering template. Note: This could be an issue when you have too many variables to pass

>> print jTemplate.render(interfaces = {‘ge-0/0/1′,’ge-0/0/2′},description=’interface configured using jinja2 template’)
<interfaces>
<nterface>ge-0/0/2
<description> interface configured using jinja2 template </description>
</interface>
<nterface>ge-0/0/1
<description> interface configured using jinja2 template </description>
</interface>
</interfaces>

  • Using yaml file for variable values is a clean way of separating variables from Python code. User can change variable values without understanding of Python code.
  • Create yaml file, filename:interface.yaml. Yaml file always begins with ‘—‘ and ‘-‘ represents list element
  • Here I am creating values for two variables (interfaces and description) for jinja2 template ‘interfaces.j2’
---
interfaces:
- ge-0/0/1
- ge-0/0/2
- ge-0/0/3
description:
 "configured by using jinja2 & yaml"
  • Read yaml file in your Python

>>>templateVars = yaml.load(open(‘interfaces.yaml’).read())

  • Render jinja2 template using yaml file.

>>> templateVars = yaml.load(open(‘interfaces.yaml’).read())
>>> print jTemplate.render(templateVars)
<interfaces>
 <nterface>ge-0/0/1
 <description> configured by using jinja2 & yaml </description>
 </interface>
 <nterface>ge-0/0/2
 <description> configured by using jinja2 & yaml </description>
 </interface>
 <nterface>ge-0/0/3
 <description> configured by using jinja2 & yaml </description>
 </interface>
</interfaces>
>>>

  • Now lets try If control statement. Update ‘interfaces.j2’ file to add ‘if’ statement and comment statement. I added logic  to set description  only for interface ge-0/0/2

<interfaces>
 {% for interface in interfaces %}
{# set description only for interface ge-0/0/2 #}
 {% if interface == ‘ge-0/0/2’ %}
 <nterface>{{interface}}
 <description> {{description}} </description>
 </interface>
 {% endif %}
 {% endfor %}
</interfaces>

  • Render template and you see only ge-0/0/2 printed

>>> jTemplate = jinjaEnv.get_template(‘interfaces.j2’)
>>> print jTemplate.render(templateVars)
<interfaces>
<nterface>ge-0/0/2
<description> configured by using jinja2 & yaml </description>
</interface>
</interfaces>
>>>

  • There is a shortcut if you need to create template on the fly inside Python code. Here I am building same template by using jinja2 Template API

>>> from jinja2 import Template

>>> template = Template(‘<interfaces>{% for interface in interfaces %} <interface> \
… {{interface}} <description>{{description}}</description> </interface> {% endfor %} </interfaces>’)
>>> print template.render(templateVars)
<interfaces> <interface> ge-0/0/1 <description>configured by using jinja2 & yaml</description> </interface> <interface> ge-0/0/2 <description>configured by using jinja2 & yaml</description> </interface> <interface> ge-0/0/3 <description>configured by using jinja2 & yaml</description> </interface> </interfaces>
>>>


References:

  1. http://jinja.pocoo.org/docs/dev/


Lab-8:Python for network automation – XML parsing

continuing from Lab-7 below is an example of XML parsing using etree.

Precondition:

  • Juniper srx with NETCONF enabled
    • set system services netconf ssh
  • NETCONF ncclient installed
    • sudo pip install ncclient

Procedure:

  • This script follows these steps
    • connect to Juniper srx using NETCONF
    • get interface counts for interface ge-0/0/0 using this command ‘show interface ge-0/0/0 detail statistics’
    • search for stats group ‘traffic-statistics’, ‘input-error-list’, ‘output-error-list’ and print individual stats under the group also store them in Python dictionary
  •  Python file (get_interface_stats.py) located here


Output:

sjakhwal@rtxl3rld05:~/scripts$ ./get_interface_statistics.py
================= Traffic Statistics ================
input-bytes =
32690246
input-bps =
200
output-bytes =
4419133
output-bps =
0
input-packets =
615902
input-pps =
0
output-packets =
16620
output-pps =
0
================ Input Error Statistics =============
input-errors =
0
input-drops =
0
framing-errors =
0
input-runts =
0
input-discards =
0
input-l3-incompletes =
0
input-l2-channel-errors =
0
input-l2-mismatch-timeouts =
0
input-fifo-errors =
0
input-resource-errors =
0
================ Output Error Statistics ===========
carrier-transitions =
1
output-errors =
0
output-collisions =
0
output-drops =
0
aged-packets =
0
mtu-errors =
0
hs-link-crc-errors =
0
output-fifo-errors =
0
output-resource-errors =
0
sjakhwal@rtxl3rld05:~/scripts

Lab-7:Python for network automation – XML parsing

Knowledge to XML parsing is important for network automation, these days  many modern interfaces generate XML formatted output. I have written a small Python script which parses XML using Minidom and creates Python dictionary. You can download script (parse_route_table.py) from here.

Pre-condition:

  • Juniper srx with NETCONF enabled
    • set system services netconf ssh
  • NETCONF ncclient installed
    • sudo pip install ncclient

Procedure:

Script follows these steps

  • Connect to srx using NETCONF
  • Generate ‘show route | display xml’ in xml format
  • Parse xml and generate a Python dictionary for destination and outgoing interface.

Output

sjakhwal@rtxl3rld05:~/scripts$ python parse_routing_table.py
=== Route table name =inet.0, Number of active routes =9 ====
destination-ip=0.0.0.0/0,via=ge-0/0/0.0
destination-ip=11.11.11.0/24,via=ge-0/0/1.0
destination-ip=11.11.11.1/32,via=ge-0/0/1.0
destination-ip=192.168.47.5/32,via=lo0.0
destination-ip=192.168.47.6/32,via=lo0.0
destination-ip=192.168.47.7/32,via=lo0.0
destination-ip=192.168.47.8/32,via=lo0.0
destination-ip=192.168.122.0/24,via=ge-0/0/0.0
destination-ip=192.168.122.35/32,via=ge-0/0/0.0


Note: Below sample XML
root> show route | display xml
<rpc-reply xmlns:junos=”http://xml.juniper.net/junos/12.1X47/junos”&gt;
<route-information xmlns=”http://xml.juniper.net/junos/12.1X47/junos-routing”&gt;
<!– keepalive –>
<route-table>
<table-name>inet.0</table-name>
<destination-count>9</destination-count>
<total-route-count>9</total-route-count>
<active-route-count>9</active-route-count>
<holddown-route-count>0</holddown-route-count>
<hidden-route-count>0</hidden-route-count>
<rt junos:style=”brief”>
<rt-destination>0.0.0.0/0</rt-destination>
<rt-entry>
<active-tag>*</active-tag>
<current-active/>
<last-active/>
<protocol-name>Access-internal</protocol-name>
<preference>12</preference>
<age junos:seconds=”1096554″>1w5d 16:35:54</age>
<nh>
<selected-next-hop/>
<to>192.168.122.1</to>
<via>ge-0/0/0.0</via>
</nh>
</rt-entry>
</rt>
<rt junos:style=”brief”>
<rt-destination>11.11.11.0/24</rt-destination>
<rt-entry>
<active-tag>*</active-tag>
<current-active/>
<last-active/>
<protocol-name>Direct</protocol-name>
<preference>0</preference>
<age junos:seconds=”686008″>1w0d 22:33:28</age>
<nh>
<selected-next-hop/>
<via>ge-0/0/1.0</via>
</nh>
</rt-entry>
</rt>
<rt junos:style=”brief”>
<rt-destination>11.11.11.1/32</rt-destination>
<rt-entry>
<active-tag>*</active-tag>
<current-active/>
<last-active/>
<protocol-name>Local</protocol-name>
<preference>0</preference>
<age junos:seconds=”686008″>1w0d 22:33:28</age>
<nh-type>Local</nh-type>
<nh>
<nh-local-interface>ge-0/0/1.0</nh-local-interface>
</nh>
</rt-entry>
</rt>
<rt junos:style=”brief”>
<rt-destination>192.168.47.5/32</rt-destination>
<rt-entry>
<active-tag>*</active-tag>
<current-active/>
<last-active/>
<protocol-name>Direct</protocol-name>
<preference>0</preference>
<age junos:seconds=”1096716″>1w5d 16:38:36</age>
<nh>
<selected-next-hop/>
<via>lo0.0</via>
</nh>
</rt-entry>
</rt>
<rt junos:style=”brief”>
<rt-destination>192.168.47.6/32</rt-destination>
<rt-entry>
<active-tag>*</active-tag>
<current-active/>
<last-active/>
<protocol-name>Direct</protocol-name>
<preference>0</preference>
<age junos:seconds=”1096716″>1w5d 16:38:36</age>
<nh>
<selected-next-hop/>
<via>lo0.0</via>
</nh>
</rt-entry>
</rt>
<rt junos:style=”brief”>
<rt-destination>192.168.47.7/32</rt-destination>
<rt-entry>
<active-tag>*</active-tag>
<current-active/>
<last-active/>
<protocol-name>Direct</protocol-name>
<preference>0</preference>
<age junos:seconds=”1096716″>1w5d 16:38:36</age>
<nh>
<selected-next-hop/>
<via>lo0.0</via>
</nh>
</rt-entry>
</rt>
<rt junos:style=”brief”>
<rt-destination>192.168.47.8/32</rt-destination>
<rt-entry>
<active-tag>*</active-tag>
<current-active/>
<last-active/>
<protocol-name>Direct</protocol-name>
<preference>0</preference>
<age junos:seconds=”1096716″>1w5d 16:38:36</age>
<nh>
<selected-next-hop/>
<via>lo0.0</via>
</nh>
</rt-entry>
</rt>
<rt junos:style=”brief”>
<rt-destination>192.168.122.0/24</rt-destination>
<rt-entry>
<active-tag>*</active-tag>
<current-active/>
<last-active/>
<protocol-name>Direct</protocol-name>
<preference>0</preference>
<age junos:seconds=”1096554″>1w5d 16:35:54</age>
<nh>
<selected-next-hop/>
<via>ge-0/0/0.0</via>
</nh>
</rt-entry>
</rt>
<rt junos:style=”brief”>
<rt-destination>192.168.122.35/32</rt-destination>
<rt-entry>
<active-tag>*</active-tag>
<current-active/>
<last-active/>
<protocol-name>Local</protocol-name>
<preference>0</preference>
<age junos:seconds=”1096554″>1w5d 16:35:54</age>
<nh-type>Local</nh-type>
<nh>
<nh-local-interface>ge-0/0/0.0</nh-local-interface>
</nh>
</rt-entry>
</rt>
</route-table>
</route-information>
<cli>
<banner></banner>
</cli>
</rpc-reply>

Lab-6:Render CLI from Confd

In this lab I will demonstrate how to render cli interface from Confd. Confd is a configuration management sw for network devices. It provides capability to render cli, netconf, REST API, Web gui and various other management interfaces from YANG model. Thanks to Cisco Confd is available for free. In the free version you can render cli and NETCONF interfaces

I will be using YANG file provided in Confd documentation. But if you like you can create your own YANG file

Note: The YANG file I am using is called ‘links.yang’, you can download it from links. This file provides YANG model to create links with mac address. Change file extension to ‘.yang’

Pre-condition:

  • Download Confd sw. Try this link https://developer.cisco.com/site/confD/downloads/
  • Unzip & un-tar files
    • unzip confd-basic-6.1.linux.x86_64.zip
    • tar -xvf confd-basic-6.1.doc.tar.gz
  • Execute installer. Executable located in ../confd/bin. Installer set the path in confd.conf file which is located under ../confd/etc
    • sh confd-basic-6.1.linux.x86_64.installer.bin confd


Procedure:

  • Create a YANG file and put it under directory ../confd/etc/. In my case I have copied ‘links.yang’
  • Compile YANG file. It will create .fxs file
    • ../confd/bin/confdc –c <YANG file name>

../confd/bin/confdc –c links.yang

  • Launch Confd
    • ../confd/bin/confd –foreground –verbose -c ./confd.conf.

look for below message on the screen. This is the port# you will use to access Confd cli

<INFO> 10-Mar-2016::15:28:38.842 rtxl3rld05 confd[14486]: – Starting to listen for Internal IPC on 127.0.0.1:4565

  • In the second terminal window launch Confd
    • ../confd/bin/confd_cli –port 4565 –noaaa
Welcome to ConfD Basic
rtxl3rld05# show
-----------------^
syntax error: expecting
cli           - Display cli settings
confd-state   - Display ConfD status information
configuration - Display configuration changes
history       - Display CLI command history
jobs           - Display background jobs
nacm           - Access control
netconf-state - Statistics about NETCONF
notification   - Display notifications
parser         - Display parser information
running-config - Display current configuration
rtxl3rld05# config
rtxl3rld05(config)# config ?
Possible completions:
defaultLink linkLimitations links queueDisciplines
rtxl3rld05(config)# config link
Possible completions:
linkLimitations links
rtxl3rld05(config)# config links ?
Possible completions:
link
rtxl3rld05(config)# config links link ?
Possible completions:
<name:string> range
rtxl3rld05(config)# config links link mylink ?
Possible completions:
addr brd flags mtu <cr>
rtxl3rld05(config)# config links link mylink addr ?
Possible completions:
<string>
rtxl3rld05(config)# config links link mylink addr 01:01:01:01:01:01
Value for 'brd' (<string>): link
Error: bad value: "link" is an invalid value.
Value for 'brd' (<string>): 01:01:01:01:01:01
rtxl3rld05(config-link-mylink)# do show
----------------------------------------^
syntax error: expecting
cli           - Display cli settings
confd-state   - Display ConfD status information
configuration - Display configuration changes
history       - Display CLI command history
jobs           - Display background jobs
nacm           - Access control
netconf-state - Statistics about NETCONF
notification   - Display notifications
parser         - Display parser information
running-config - Display current configuration
 rtxl3rld05(config-link-mylink)# show
-------------------------------------^
syntax error: expecting
configuration     - Show a parameter
full-configuration - Show a parameter
history           - Display CLI command history
parser             - Display parser information
rtxl3rld05(config-link-mylink)#
rtxl3rld05(config-link-mylink)# exit
rtxl3rld05(config)# show ?
Possible completions:
configuration       Show a parameter
full-configuration   Show a parameter
history             Display CLI command history
parser               Display parser information
rtxl3rld05(config)# show configuration
config links link mylink
addr 01:01:01:01:01:01
brd 01:01:01:01:01:01
!
rtxl3rld05(config)#

Lab-5:Python for network automation – NETCONF client

In this lab I will demonstrate how to create NETCONF connection using ncclient package and Juniper PyEZ NETCONF clients

Component required:

NETCONF capable device. I am using Juniper virtual SRX

Pre-condition:

  • Install ncclient package
    • pip install ncclient
  • Install Juniper PyEZ package
    • pip install junos-eznc
  • Enable NETCONF on device. In my case it is srx
    • configure>edit system services netconf ssh

Procedure:

NETCONF connection using Juniper PyEZ NETCONF client

root@rtxl:/home/sjakhwal/scripts# python

Python 2.7.6 (default, Mar 22 2014, 22:59:56)
[GCC 4.8.2] on linux2
Type “help”, “copyright”, “credits” or “license” for more information.
>>>
>>> import sys
>>> from jnpr.junos import Device
>>> import json
>>>from jnpr.junos import Device
>>>from lxml import etree
>>>from jnpr.junos.utils.config import Config

>>> dev = Device(host=’192.168.122.35′,user=’root’,passwd=’juniper1′)
>>> dev.open()

Device(192.168.122.35)

>>> print dev.facts

{'domain': None, 'hostname': '', 'ifd_style': 'CLASSIC', 'version_info': junos.version_info(major=(12, 1), type=X, minor=(47, 'D', 20), build=7), '2RE': False, 'serialnumber': 'f9bf7cca7bfa', 'fqdn': '', 'virtual'

>>> dir(dev)

['ON_JUNOS', 'Template', '__class__', '__delattr__', '__dict__', '__doc__', '__enter__', '__exit__', '__format__', '__getattribute__', '__hash__', '__init__', '__module__', '__new__', '__reduce__', '__reduce_ex__', '__repr__', '__setattr__', '__sizeof__', '__str__', '__subclasshook__', '__weakref__', '_auth_password', '_auth_user', '_auto_probe', '_conf_auth_user', '_conf_ssh_private_key_file', '_conn', '_facts', '_gather_facts', '_hostname', '_j2ldr', '_manages', '_nc_transform', '_norm_transform', '_normalize', '_port', '_ssh_config', '_ssh_private_key_file', '_sshconf_lkup', '_sshconf_path', 'auto_probe', 'bind', 'cli', 'close', 'connected', 'display_xml_rpc', 'execute', 'facts', 'facts_refresh', 'hostname', 'logfile', 'manages', 'open', 'password', 'probe', 'rpc', 'timeout', 'transform', 'user']

>> print dev.hostname

192.168.122.35

>> print json.dumps(dev.facts)

{"domain": null, "hostname": "", "ifd_style": "CLASSIC", "version_info": {"major": [12, 1], "type": "X", "build": 7, "minor": [47, "D", 20]}, "2RE": false, "serialnumber": "f9bf7cca7bfa", "fqdn": "", "virtual": true, "switch_style": "NONE", "version

>>>print dev.cli(‘show route’)

/usr/local/lib/python2.7/dist-packages/jnpr/junos/device.py:652: RuntimeWarning: CLI command is for debug use only! warnings.warn("CLI command is for debug use only!", RuntimeWarning) inet.0: 9 destinations, 9 routes (9 active, 0 holddown, 0 hidden) + = Active Route, - = Last Active, * = Both
0.0.0.0/0         *[Access-internal/12] 6d 23:51:27
> to 192.168.122.1 via ge-0/0/0.0 11.11.11.0/24     
*[Direct/0] 2d 05:49:01 > via ge-0/0/1.0

>>> print dev.display_xml_rpc(‘show route’,format=’text’)

<get-route-information> </get-route-information>

>>>print etree.tostring(dev.rpc.get_route_information({‘format’:’xml’}))

 <route-information>
 <!-- keepalive -->
 <route-table>
 <table-name>inet.0</table-name>
 <destination-count>9</destination-count>
 <total-route-count>9</total-route-count>
 <active-route-count>9</active-route-count>
 <holddown-route-count>0</holddown-route-count>
 <hidden-route-count>0</hidden-route-count>
 <rt style="brief">
 <rt-destination>0.0.0.0/0</rt-destination>
 <rt-entry>
 <active-tag>*</active-tag>
 <current-active/>
 <last-active/>
 <protocol-name>Access-internal</protocol-name>
 <preference>12</preference>
 <age seconds="660641">1w0d 15:30:41</age>
 <nh>
 <selected-next-hop/>
 <to>192.168.122.1</to>
 <via>ge-0/0/0.0</via>
 </nh>
 </rt-entry>
 </rt>
 <rt style="brief">
…..<truncated>…

>>> print dev.display_xml_rpc(‘show interfaces’)

<Element get-interface-information at 0x7fa541ade7a0>

>>> print etree.tostring(dev.rpc.get_interface_information(terse=True))

<interface-information style="terse"> <physical-interface> 
<name> ge-0/0/0 </name> <admin-status> up </admin-status> 
<oper-status>up </oper-status> <logical-interface> 
<name> ge-0/0/0.0
….. <truncated>….

>>>print etree.tostring(dev.rpc.get_interface_information   (interface_name=’ge-0/0/0′))

<interface-information style="normal"> <physical-interface> <name> ge-0/0/0 
</name> <admin-status format="Enabled"> up </admin-status> <oper-status> up 
</oper-status> 
<local-index> 134 </local-index> 
<snmp-index> 507 </snmp-index> 
<link-level-type>


 NETCONF connection using ncclient NETCONF client

Here is another way to create NETCONF connection to your device if it doesn’t provide Python library like Juniper does

sjakhwal@rtxl3rld05:~$ python

Python 2.7.6 (default, Mar 22 2014, 22:59:56)
[GCC 4.8.2] on linux2
Type "help", "copyright", "credits" or "license" for more information.

>>> from ncclient import manager

>>> dev = manager.connect(host=’192.168.122.35′,username=’root’,password=’juniper1′,hostket_verify=False,timeout=10)

>> dir(dev)

['_Manager__set_async_mode', '_Manager__set_raise_mode', 
'_Manager__set_timeout', '__class__', '__delattr__', '__dict__', '__doc__', 
'__enter__', '__exit__', '__format__', '__getattr__', '__getattribute__', 
'__hash__', '__init__', '__metaclass__', '__module__', '__new__', '__reduce__', 
'__reduce_ex__', '__repr__', '__setattr__', '__sizeof__', '__str__', 
'__subclasshook__', '__weakref__', '_async_mode', '_device_handler', 
'_raise_mode', '_session', '_timeout', 'async_mode', 'channel_id', 'channel_name', 
'client_capabilities', 'close_session', 'command', 'commit', 
'compare_configuration', 'connected', 'copy_config', 'delete_config', 
'discard_changes', 'dispatch', 'edit_config', 'execute', 'get', 'get_config', 
'get_configuration', 'get_schema', 'halt', 'kill_session', 'load_configuration', 'lock',
'locked', 'poweroff_machine', 'raise_mode', 'reboot', 'reboot_machine', 'rpc', 'scp',
'server_capabilities', 'session', 'session_id', 'timeout', 'unlock', 'validate']

>>> dev.command(command=’show route’,format=’xml’)

<ncclient.xml_.NCElement object at 0x7fdff06d6c90>

>>> print dev.command(command=’show route’,format=’xml’)

<rpc-reply message-id="urn:uuid:896eb964-e7a2-11e5-a0a3-6431501eb7ad">
<route-information>
<!-- keepalive -->
<route-table>
<table-name>inet.0</table-name>
<destination-count>9</destination-count>
<total-route-count>9</total-route-count>
<active-route-count>9</active-route-count>
<holddown-route-count>0</holddown-route-count>
<hidden-route-count>0</hidden-route-count>
<rt style="brief">
<rt-destination>0.0.0.0/0</rt-destination>
<rt-entry>
<active-tag>*</active-tag>
<current-active/>
<last-active/>
<protocol-name>Access-internal</protocol-name>
<preference>12</preference>
<age seconds="748256">1w1d 15:50:56</age>
<nh>
<selected-next-hop/>
<to>192.168.122.1</to>
<via>ge-0/0/0.0</via>
</nh>
</rt-entry>
</rt>

>>> print dev.get_configuration(‘running’)

<rpc-reply message-id="urn:uuid:ddd4e5b4-e7a2-11e5-a0a3-6431501eb7ad">
<configuration changed-seconds="1457375295" changed-localtime="2016-03-07 18:28:15 UTC">
<version>12.1X47-D20.7</version>
<system>
<root-authentication>
<encrypted-password>$1$KhbpR2sm$x9rV5uZSS/Q1a4YRculZ//</encrypted-password>
 </root-authentication>
<login>
<user>
 <name>admin</name>
<uid>2000</uid>
 <class>super-user</class>
<authentication>
<encrypted-password>$1$5QcrZTKt$fqisDA5ZAXQiBOeTN4fH6.</encrypted-password>
</authentication>
</user>
</login>
<services>
<ssh>
</ssh>