Postman is an excellent tool to test REST API. I recently worked in a project to automate REST API testing using Postman. My project involved network elements (ROADM, Transponders etc) and SDN controller. We automated northbound REST API of SDN controller
In this lab I will go over these Postman concept. I am assuming you know the basic operations of Postman in case you don’t you can learn it here
- Collections and folders
- Environment
- Pre-request script
- Request chaining
- Request response parsing
- Sharing collection with team members
- API execution from GUI
- Executing collection using command line tool Newman
Prerequisite:
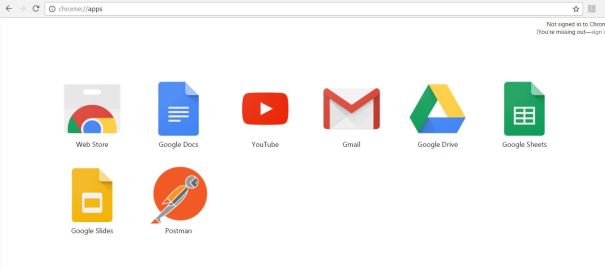
You can install Postman using instructions here. I am using Postman for Chrome option. In my case Postman show up in Chrome app store at chrome://apps. It will be good idea if you sign up using Google account that way your work will be saved automatically
Postman provide a command line tool called Newman. Using Newman you can integrate Postman with your automation framework.
Newman require Nodejs I followed procedure here to download Nodejs. If you are not interested in command line execution option skip this part.
Login as root and try below commands
#curl --silent --location https://rpm.nodesource.com/setup_6.x | bash -
#yum -y install nodejs
#node -v
v6.10.0
Install Newman using npm. Npm is already installed as part of NodeJS in above step.
#npm install newman --global;
#newman -v
3.5.0
Postman collections and folders
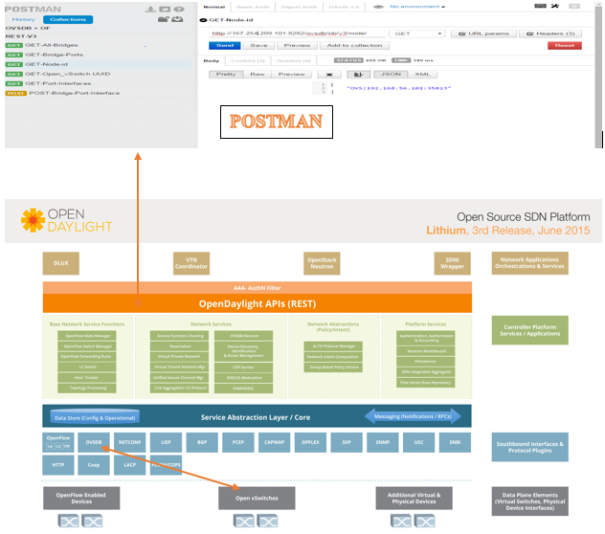
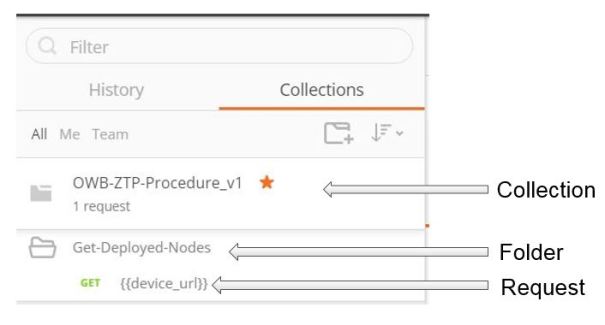
Postman collections and folders are a way to arrange your RESP API requests. A collection can contain multiple folders. In my project I have one collection with 15 folders. I found it cleaner to arrange APIs request like this. My collection contains a detail description what it is about and I have versioned it as v1. This is how my collection, folders and requests looks like
Environment
Environment consists of variables which can be referenced in pre-request script, request body and Tests. It is a way to make your request data driven. It avoids hard coding in your request body, easy to update request by changing environment variables.
It is a good way to test your collection against different environments. You can either use global environment which is pre-provisioned or create your own custom environment. In my case I have created custom environment. My goal is to create multiple of such environments with different data so I can run my collection against them.
Environment variables can be referenced in request body by enclosing it in curly brackets like this {{env_variable}}.
{input:
{ipv4-address:[{{xpdr_node_ip}}]
}
}
in case of pre-request and tests you can process environment variables. Postman provides methods to get and set environment variables.
This is how to get and set environment variables using getEnvironmentVariable and setEnvironmentVariable
var xpdr_node_ip = postman.getEnvironmentVariable("xpdr_node_ip");
postman.setEnvironmentVariable("rdm_node_num",node-number);
If you are using Globals environment use these methods
var xpdr_node_ip = postman.getGlobalsVariable("xpdr_node_ip");
postman.setGlobalVariable("rdm_node_num",node-number)
you can check environment variables by clicking eye icon on upper right side

Pre-request script

Pre-request script allows you to execute a piece of code before sending request. This can be a very useful feature if you need to calculate and pass a variable to request body. This was the case for me.
I wrote this code in my request pre-request script. This code gets variable from environment does some calculation and set another environment variable which gets referenced in request body
This code is part of pre-request script, it is setting environment variable ‘interconnect_port’
try {
  var rdm_shelf_num = postman.getEnvironmentVariable("rdm_shelf_num");
  var base_port_num = postman.getEnvironmentVariable("base_port_num");
  var rdm_interconnect_port = Number(rdm_shelf_num) + Number(base_port_num);
  postman.setEnvironmentVariable("interconnect_port",rdm_interconnect_port);
} catch(e) {
  console.log(e);
}
This is how variable ‘interconnect_port’ referenced in request body
"circuit-packs": [
        {
          "circuit-pack-name": "1/0/P{{interconnect_port}}",
          "circuit-pack-type": "port",
          "vendor": "OPLINK",
Tests
Tests is post request operation mainly to parse request response body and set pass/fail criteria for your request.
In my requests I have used Postman built in validation and parsing methods. In the above code snippets test checks for response code =200 (responseCode == 200) if response code is not 200 test fail. I also used environment variable compare against response body and if response body does match test fail.
You can write Javascript code in tests to do parsing of response body. Like Javascript you can use console.log to debug your script. On Chrome press F12 to open console log
Request chaining
Request chaining allows you to tie two request using environment variables. It is a way to set environment variable by one request and used by another request. For example perform GET request to fetch some data parse it and set an environment variable. This variable can then be used by another POST request.
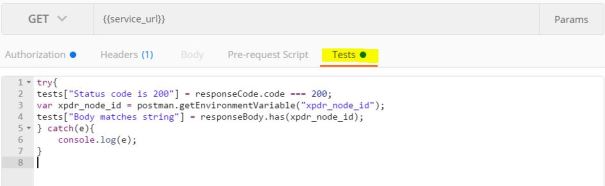
Here is GET request tests script looks like. This code parses the response body and sets environment variable rdm_node_num
try {
  tests["Status code is 200"] = responseCode.code === 200;
  var jsonData = JSON.parse(responseBody);
  postman.setEnvironmentVariable("rdm_node_num",jsonData.network.nodes[0].ids[0]['node-number']);
} catch(e){
  colsole.log(e);
}
In the next POST request I referenced this variable inside request body
        "ids": [
          {
              "node-number": "{{rdm_node_num}}",
              "node-id": "{{rdm_node_id}}",
Collection sharing
You can share your collection with your team members very easily. I shared collection with team members using collection link
Export collection and environment
To share collection using link you need to first create collection link. Click on your collection and then three dots. Click on share and choose ‘Collection Link’ and then ‘Get Link’ button

Next is to download your environment and save it your disk. Click on gear icon  and ‘Manage Environments’

Give collection link and environment copy to team members
Import collection and environment
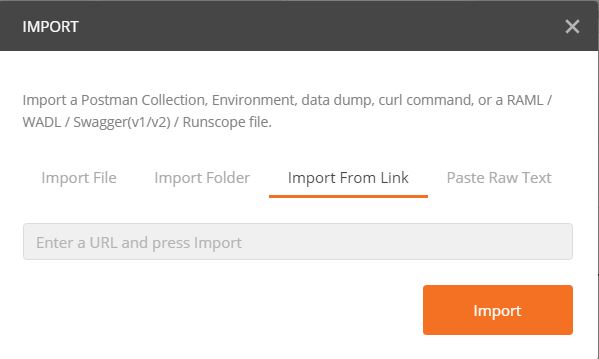
Team members needs to do this to import collection and environment. Click on ‘Import’ button on upper left hand side of GUI and ‘Import from Link’. Cut and paste the link you created earlier.
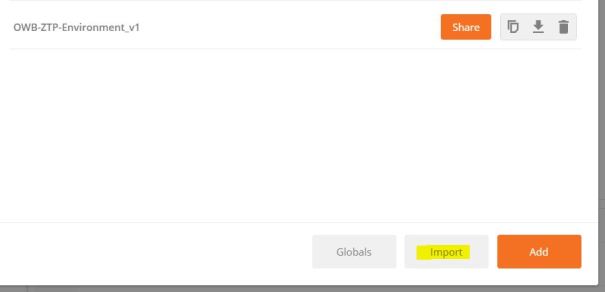
To import environment, clink on gear icon on upper right hand side of GUI. Click on ‘Manage Environments’ and then ‘Import’. Choose the environment file from disk
API execution from GUI
You can execute your requests two ways from GUI
- One request at a time – Select request and click on ‘Send’ button. It is not efficient if you have 100’s of request
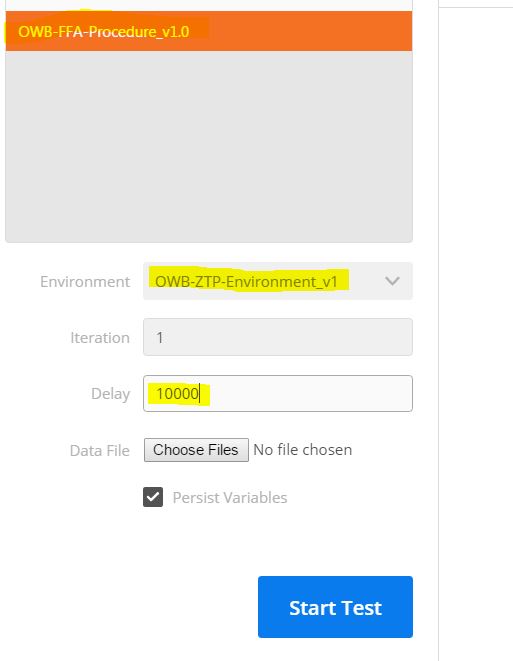
- Using ‘Runner’ APP – Select collection and folder. Make sure you select the right environment and click ‘Start Test’. I have selected delay of 10 seconds between, this will add 10 sec delay between requests
Command line tool
Postman provides a tool called Newman to execute your collection or folder from command line. You need to export your collection and environment to your machine.
Refer to prerequisite to install Newman and nodejs in your machine.
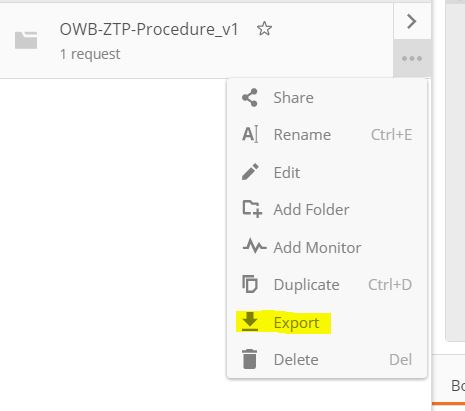
Export your collection and save it to your machine. Click on collection and three dots
Export your environment and save it to your machine. Go to manage environment and click on down arrow button
Execute collection and folder. In below case I am running a folder inside collection ‘OWB-ZTP-Procedure_v1.postman_collection_v2.json’
newman run OWB-ZTP-Procedure_v1.postman_collection_v2.json --folder Get-Planned-Nodes -e OWB-ZTP-Environment_v1.postman_environment.json -k --delay-request 1000
Flag k – is to self sign the SSL certificate. –delay-request is to add 1 sec delay between two request
After execution you get the report like this
                          │ executed │   failed │
├─────────────────────────┼──────────┼──────────┤
│              iterations │        1 │        0 │
├─────────────────────────┼──────────┼──────────┤
│                requests │        4 │        0 │
├─────────────────────────┼──────────┼──────────┤
│            test-scripts │        4 │        0 │
├─────────────────────────┼──────────┼──────────┤
│      prerequest-scripts │        0 │        0 │
├─────────────────────────┼──────────┼──────────┤
│              assertions │        8 │        0 │
├─────────────────────────┴──────────┴──────────┤
│ total run duration: 4.8s                      │
├───────────────────────────────────────────────┤
│ total data received: 28.84KB (approx)         │
├───────────────────────────────────────────────┤
│ average response time: 141ms                  │
└───────────────────────────────────────────────
Newman can be used within JavaScript project as a NodeJS module. What you can do in Newman cli it is available for API programming
Here is the sample code to execute what we did using cli
var newman = require('/usr/lib/node_modules/newman')

// call newman.run to pass `options` object and wait for callback
newman.run({
 collection: require('./OWB-ZTP-Procedure_v1.0.postman_collection_v2.json'),
 environment: './OWB-ZTP-Environment_v1.postman_environment.json',
 folder: 'Get-Planned-Nodes',
 insecure: true,
 delayRequest: 1000
}, function (err, summary) {
 if (err) { throw err; }
 console.log('==== collection run complete! ====');
 console.log(summary.run.stats)
});
Save above code in a file (newman_nodejs_test.js) and execute it using node
$node newman_nodejs_test.js
==== collection run complete! ====
{ iterations: { total: 1, pending: 0, failed: 0 },
  items: { total: 4, pending: 0, failed: 0 },
  scripts: { total: 4, pending: 0, failed: 0 },
  prerequests: { total: 4, pending: 0, failed: 0 },
  requests: { total: 4, pending: 0, failed: 0 },
  tests: { total: 4, pending: 0, failed: 0 },
  assertions: { total: 8, pending: 0, failed: 0 },
  testScripts: { total: 4, pending: 0, failed: 0 },
  prerequestScripts: { total: 0, pending: 0, failed: 0 } }