In this lab I will show how to setup Azure IoT hub, setup IoT device and send telemetry from device to cloud. We will use Ubuntu 16.04 VM to simulate IoT device and connect it to Azure IoT hub. We will use free Azure cloud account.
You can read more about Azure IoT hub here
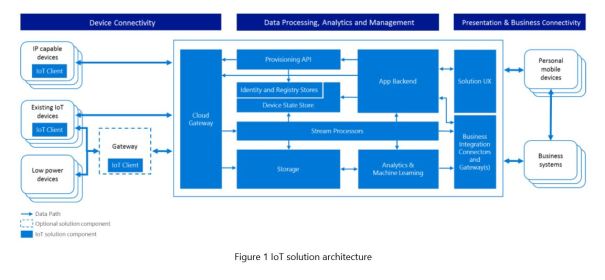
Devices can be connected directly or indirectly via a gateway, and both may implement edge intelligence with different levels of processing capabilities. A cloud gateway provides endpoints for device connectivity and facilitates bidirectional communication with the backend system.
The back end comprises multiple components to provide device registration and discovery, data collection, transformation, and analytics, as well as business logic and visualizations.
Prerequisite:
- Azure cloud account. I have setup a free subscription account. Follow instruction in this link to setup free Azure account
- A VM with Ubuntu 16.04 and Python 2.7 to simulate IoT device
- A Windows 10 laptop
Procedure:
We will follow these steps:
- Build device SDK for Python in Ubuntu VM
- Create device identity in Azure IoT hub
- Download and execute Python script to simulate temp + humidity sensor
- Create Web App to monitor device to cloud messages
Lots to do so let’s get started
Step-1: Build device SDK for Python in Ubuntu VM
I am using Ubuntu 16.04 VM to simulate IoT device. In this step we will download IoT device SDK from git and build it in VM. This SDK will be consumed by our temp+humidity sensor application in step-3. There are two ways to setup SDK as outline in this link
- Install the Python modules using PyPI wheels from PyPI. This procedure didn’t work for me I get this error while running script which I couldn’t resolve

2. Build the Azure IoT Hub SDKs for Python on Linux. This procedure worked for me. I have Python 2.7 installed in Ubuntu 16.04 VM
#Clone the Azure IoT Python SDK Repository
$git clone --recursive https://github.com/Azure/azure-iot-sdk-python.git

#For Ubuntu, you can use apt-get to install the right packages:
$sudo apt-get update
$sudo apt-get install -y git cmake build-essential curl libcurl4-openssl-dev libssl-dev uuid-dev

#Verify that CMake is at least version 2.8.12:
$cmake --version

#Verify that gcc is at least version 4.4.7:
$gcc --version

#Clone the Azure IoT Python SDK Repository
$git clone --recursive https://github.com/Azure/azure-iot-sdk-python.git

#Open a shell and navigate to the folder build_all/linux in your local copy of the repository

Run the ./setup.sh script to install the prerequisite packages and the dependent libraries
Run the ./build.sh script.

After a successful build, the iothub_client.so Python extension module is copied to the device/samples and service/samples folders.
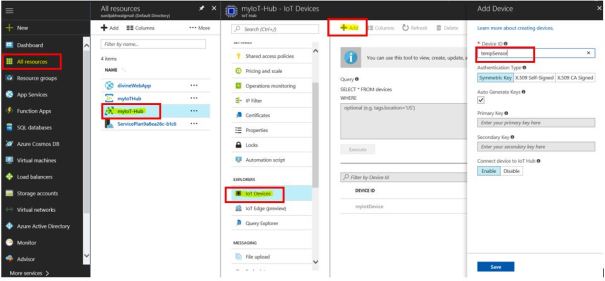
Step-2: Create device identity in Azure IoT hub
Before your IoT device talk to IoT hub it needs to be registered. Device needs to be assigned a unique ID. A connection string will be auto-generated which will be used by device to connect to IoT hub.
To register device into IoT hub
- Login to Azure portal (https://portal.azure.com)
- Click on All resources -> Your IoT hub -> IoT Devices -> Add. Give unique ID to device and click on Save button
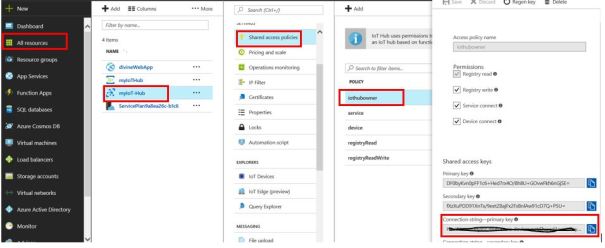
Below two steps are to find device and IoT hub connection string. In Azure communication to device or cloud happens using connection string
How to find IoT hub connection string
- Login to Azure portal (https://portal.azure.com)
- Click on All Resources -> IoT hub -> Shared access policies -> iothubowner .
Your IoT hub connection string will be located under Connection string – Primary key. Copy and paste this string in a notepad we will need it in later steps
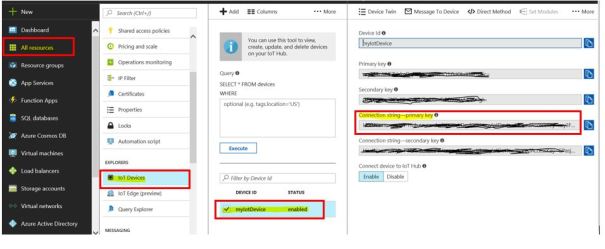
How to find device connection string
- Login to Azure portal (https://portal.azure.com)
- Click on All Resources -> IoT hub -> IoT Devices -> IoT device ID. Connection string will be under ‘Connection string – Primary key’. Copy and paste this string to notepad we will need it in later steps
Step-3: Execute Python script to simulate temp + humidity sensor
As part of Step-1 an application script to simulate temp + humidity sensor is also installed in your VM. Login to your Ubuntu VM. Go to directory /home/<username>/azure-iot-sdk-python/device/samples. Open script ‘iothub_client_sample.py’ and make below two changes:
- PROTOCOL = IotHubTransportProvider.AMQP
- CONNECTION_STRING = <your device connection string>
Note: device connection string was identified in Step-2

We will be using AMQP protocol. Azure IoT hub allows devices to use following protocols: MQTT, MQTT over WebSockets, AMQP, AMQP over WebSockets and HTTP. This link contains supported protocols and port numbers
Execute Python script:
$python iothub_client_sample.py
Monitor device to cloud messages using device explorer
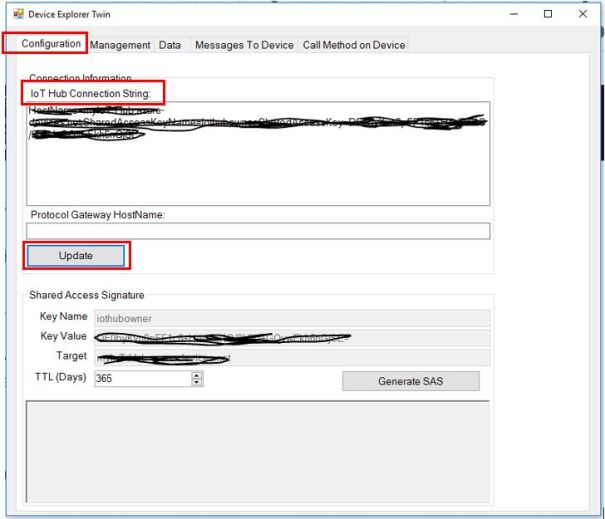
- Download device explorer from here Downloads . Device explorer allows you to monitor device to cloud messages, send message to device and also register device to IoT hub
- Enter your IoT hub connection string and click Update
3. Under Data select Device ID and click on Monitor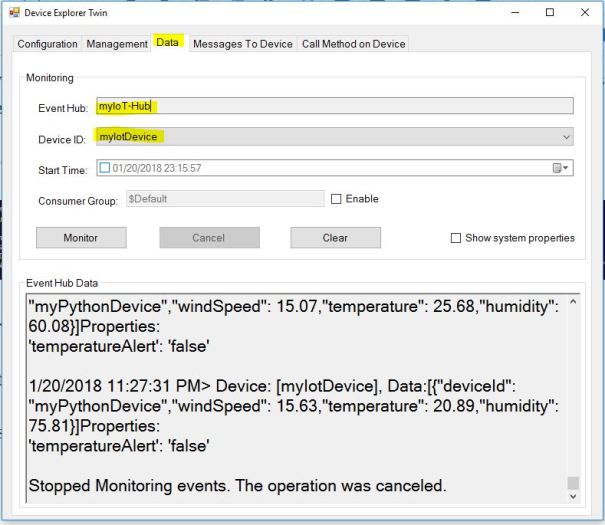
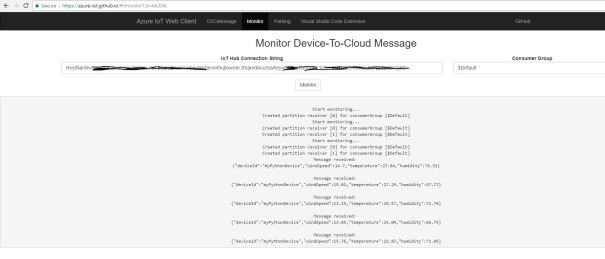
Azure IoT web client
You can also monitor device to cloud messages and send messages to device using Azure IoT web client. Enter this url in your browser https://azure-iot.github.io/#/monitor?_k=bk33tk. Enter IoT hub connection string and click Monitor
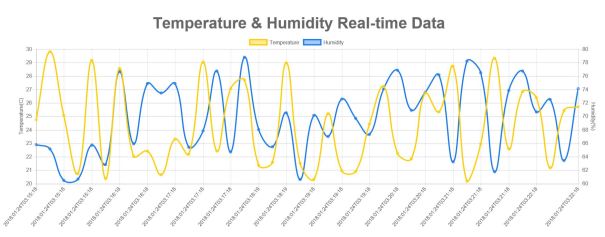
Step-4: Create Web App to monitor device to cloud messages
Follow instructions to deploy web app, link. Once web app installed you can visualize temperature and humidity data in graph
Note: If you are new to Git on Windows you can download Git bash tool from here to run Git commands in Windows
iothub-explorer
iothub-explorer is a command line tool. It is a very versatile tool to create device identity in iot hub, simulate IoT device, send D2C messages or C2D messages and monitor D2C or C2D messages
Install iothub-explorer
I have installed it in my Ubuntu 16.04 VM
$sudo apt-get install npm
$sudo apt-get install nodejs-legacy
$sudo npm install -g iothub-explorer
$iothub-explorer -V
1.1.20
Monitor D2C messages
Open two terminals in Ubuntu VM in one terminal execute temp + humidity sensor script (Step-3) and in second terminal execute iothub-explorer to monitor D2C messages
$iothub-explorer monitor-events <device-id> –login <iot hub connection string>
$iothub-explorer monitor-events myIotDevice --login "HostName=myIoT-Hub.azure-devices.net;SharedAccessKeyName=iothubowner;SharedAccessKey=xxxxx="

Monitoring events from device myIotDevice...
==== From: myIotDevice ====
{
  "deviceId": "myPythonDevice",
  "windSpeed": 15.18,
  "temperature": 26.57,
  "humidity": 71.8
}
---- application properties ----
{
  "temperatureAlert": "false"
}
Create device identity in iot hub
$iothub-explorer create <device-id> –login <iot hub connection string>
$iothub-explorer create myIotDevice_1 --login "HostName=myIoT-Hub.azure-devices.net;SharedAccessKeyName=iothubowner;SharedAccessKey=xxxxxx="
Monitor D2C messages with simulated device in iothub-explorer
Open two terminals in one terminal simulate iot device and send D2C messages to and in second terminal monitor D2C messages
Simulate iot device and send messages to iot hub
$ iothub-explorer simulate-device myIotDevice --login "HostName=myIoT-Hub.azure-devices.net;SharedAccessKeyName=iothubowner;SharedAccessKey=xxxxxx=" --send "Hello Cloud!"
Message #0 sent successfully
Message #1 sent successfully
Message #2 sent successfully
Message #3 sent successfully
Message #4 sent successfully
Message #5 sent successfully
Monitor D2C messages in second terminal
$ iothub-explorer monitor-events myIotDevice --login "HostName=myIoT-Hub.azure-devices.net;SharedAccessKeyName=iothubowner;SharedAccessKey=xxxxxx="

Monitoring events from device myIotDevice...
==== From: myIotDevice ====
Hello Cloud!
====================
==== From: myIotDevice ====
Hello Cloud!
====================
==== From: myIotDevice ====
Hello Cloud!
====================
==== From: myIotDevice ====
Hello Cloud!
====================
==== From: myIotDevice ====
Hello Cloud!
====================
==== From: myIotDevice ====
Hello Cloud!
====================
Send C2D messages and monitor using iothub-explorer
Open two terminals in one terminal send C2D messages and in second terminal monitor messages
Send C2D messages
$iothub-explorer send myIotDevice --login "HostName=myIoT-Hub.azure-devices.net;SharedAccessKeyName=iothubowner;SharedAccessKey=xxxxxxx" "Hello Iot Device!"
Message sent with id: d15b5000-d20d-46e9-ac11-1de7861ef3ea
Monitor C2D messages in second terminal
$ iothub-explorer simulate-device myIotDevice --login "HostName=myIoT-Hub.azure-devices.net;SharedAccessKeyName=iothubowner;SharedAccessKey=xxxxxx=" --receive

==================
Message received:
Hello Iot Device!
==================
$ iothub-explorer help

  Usage: iothub-explorer [options] <command> [command-options] [command-args]


  Options:

    -V, --version  output the version number
    -h, --help     output usage information


  Commands:

    login                                                                          start a session on your IoT hub
    logout                                                                         terminate the current session on your IoT hub
    list                                                                           list the device identities currently in your IoT hub device registry
    create <device-id|device-json>                                                 create a device identity in your IoT hub device registry
    delete <device-id>                                                             delete a device identity from your IoT hub device registry
    get <device-id>                                                                get a device identity from your IoT hub device registry
    import-devices                                                                 import device identities in bulk: local file -> Azure blob storage -> IoT hub
    export-devices                                                                 export device identities in bulk: IoT hub -> Azure blob storage -> local file
    send <device-id> <message>                                                     send a message to the device (cloud-to-device/C2D)
    monitor-feedback                                                               monitor feedback sent by devices to acknowledge cloud-to-device (C2D) messages
    monitor-events [device-id]                                                     listen to events coming from devices (or one in particular)
    monitor-uploads                                                                monitor the file upload notifications endpoint
    monitor-ops                                                                    listen to the operations monitoring endpoint of your IoT hub instance
    sas-token <device-id>                                                          generate a SAS Token for the given device
    simulate-device <device-id>                                                    simulate a device with the specified id
    get-twin <device-id>                                                           get the twin of a device
    update-twin <device-id> <twin-json>                                            update the twin of a device and return it.
    query-twin <sql-query>                                                         get twin data matching the sql-query argument
    query-job [job-type] [job-status]                                              get scheduled job data matching the sql-query argument
    device-method <device-id> <method-name> [method-payload] [timeout-in-seconds]  executes a device method on the specified device
    help [cmd]
Individual command help
$ iothub-explorer help simulate-device

  Usage: iothub-explorer-simulate-device [options]

  Simulate a device.


  Options:

    -V, --version                                          output the version number
    --device-connection-string <device-connection-string>  connection string to use for the device
    -l, --login <iothub-connection-string>                 use the connection string provided as argument to use to authenticate with your IoT Hub instance
    --protocol <amqp|amqp-ws|http|mqtt|mqtt-ws>            protocol used to send and receive messages (defaults to amqp)
    --send [message]                                       send a test message as a device. If the message is not specified, a default message will be used
    --send-interval <interval-in-milliseconds>             interval to use between each message being sent (defaults to 1000ms)
    --send-count <message-count>                           number of messages to send
    --receive                                              Receive cloud-to-device (C2D) messages as a device
    -v, --verbose                                          shows all the information contained in the message received, including annotations and properties
    --receive-count <message-count>                        number of C2D messages to receive
    --settle <complete|abandon|reject>                     indicate how the received C2D messages should be settled (defaults to 'complete')
    --upload-file <file-path>                              upload a file from the simulated device
    -h, --help
