For a long time I wanted to deploy Openstack in a Virtual box this became true after I purchased a new laptop with sufficient RAM
Precondition:
My laptop has Windows 7 64-bit, 16 GB RAM.
Download CentOS 7 virtual box image from this link. I downloaded 7.1-1511. Images come with usrname:osboxes, password:osboxes.org and root passward:oxboxes.org
Download virtualBox from this link.Start VirtualBox with CentOS image, I have given it 4 GB RAM
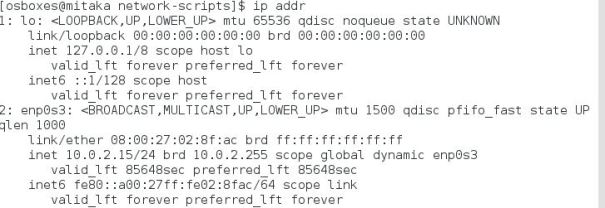
I have not changed network setting in VirtualBox, it is using default NAT mode. My VM came up with interface enp0s3 and IP address 10.0.2.15.
Make sure you can ping internet using domain name.
Follow below steps to prepare machine for Openstack deployment
Install yum-utils on both nodes
$yum install -y yum-utils
Set SELINUX in permissive mode on both nodes , edit file /etc/selinux/config
In this lab I will deploy Openstack Mitaka release using packstack.I am using CentOS 7. This is a two machine setup, one machine acting as controller/network node and another as compute node. Try this link to check my openstack liberty lab
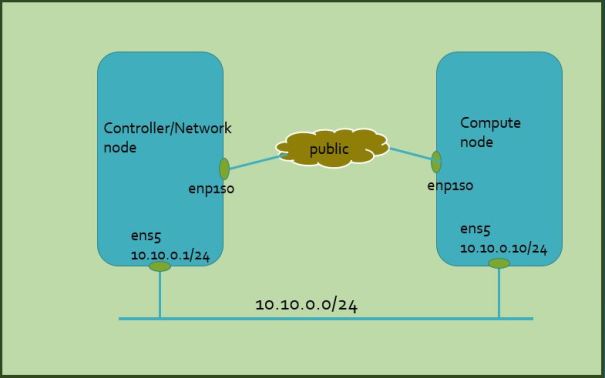
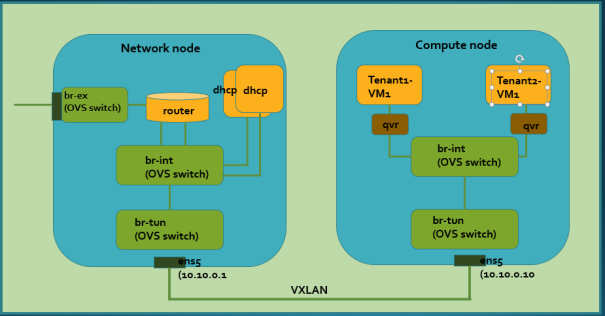
This is the physical connection picture. Both machines are connected to public network through enp1s0 and to each other through ens5 interface
Here is my CentOS version. I have installed CentOS fresh on both machines
$packstack --answer-file multi-node-mitaka.txt
##It takes about 15-20 min, on successful installation you will see this message
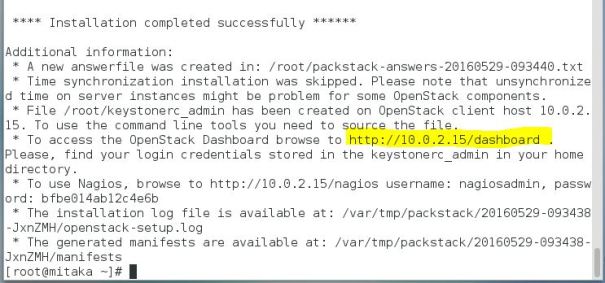
**** Installation completed successfully ******
Additional information:
* Time synchronization installation was skipped. Please note that unsynchronized time on server instances might be problem for some OpenStack components.
* File /root/keystonerc_admin has been created on OpenStack client host 10.10.0.1. To use the command line tools you need to source the file.
* To access the OpenStack Dashboard browse to http://10.10.0.1/dashboard .
Please, find your login credentials stored in the keystonerc_admin in your home directory.
* To use Nagios, browse to http://10.10.0.1/nagios username: nagiosadmin, password: f96c84b4884d45a4
* The installation log file is available at: /var/tmp/packstack/20160516-184147-03uUsE/openstack-setup.log
* The generated manifests are available at: /var/tmp/packstack/20160516-184147-03uUsE/manifests
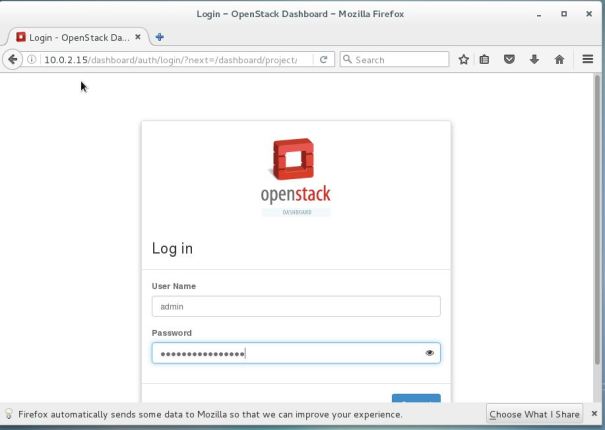
On you browser point to http://10.10.0.1/dashboard, login to Horizon GUI using username ‘admin’ and password from file ‘keystaonerc_admin’ (packstack creates this file in the directory from where you started the packstack in my case under /root). First thing you need to do is delete router and network, we will create router and network from scratch.
On the terminal try below commands. I ran these commands from /root directory. Packstack created two resource files keystonetc_admin and keystonerc_demo
#source admin resource file
. keystonerc_admin
#create new flavor
nova flavor-create m2.nano auto 128 1 1
#create public network
neutron net-create public --router:external=True
#create public subnet
neutron subnet-create --disable-dhcp public 172.254.209.0/24 \
--name public_subnet --allocation-pool start=172.254.209.87,end=172.254.209.95 --gateway-ip 172.254.209.126
#create public router
neutron router-create pub_router
#add router interface to public network
neutron router-gateway-set pub_router public
#create Tenant1
keystone tenant-create --name Tenant1
#source demo resource file
. keystonerc_demo
#create Tenant1 network
neutron net-create Tenant1_net
#create Tenant1 subnet
neutron subnet-create --name Tenant1_subnet \
--dns-nameserver 8.8.8.8 Tenant1_net 192.168.11.0/24
#genrate ssh keypair
ssh-keygen -f tenant1_rsa -t rsa -b 2048 -N ''
#add keypair
nova keypair-add --pub-key tenant1_rsa.pub tenant1
#create a new security group
neutron security-group-create mysec
#set rule to allow ssh & icmp
neutron security-group-rule-create --protocol icmp mysec
neutron security-group-rule-create --protocol tcp \
--port-range-min 22 --port-range-max 22 mysec
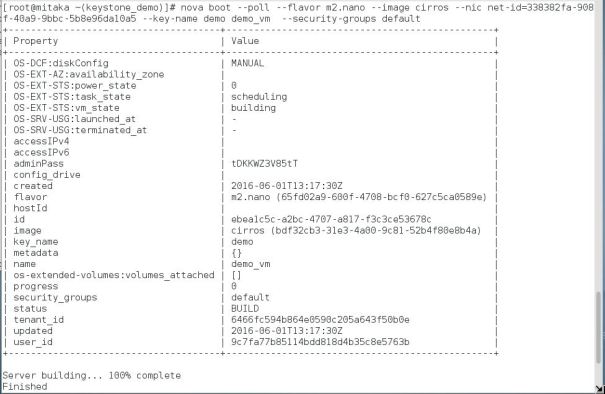
#create a new instance, net-id is Tenant1 net-id
nova boot --poll --flavor m2.nano --image cirros \
--nic net-id=535659e3-2c4d-4ccd-a05f-6b03cd29e9b0 --key-name tenant1 Tenant1_VM1 --security-groups mysec
#check if Tenant1 instance is running
[root@controller ~(keystone_demo)]# nova list
+--------------------------------------+-------------+--------+------------+-------------+--------------------------+
| ID | Name | Status | Task State | Power State | Networks |
+--------------------------------------+-------------+--------+------------+-------------+--------------------------+
| 7f95ec40-3945-445b-aeba-fcdbf5f8b99e | Tenant1_VM1 | ACTIVE | - | Running | Tenant1_net=192.168.11.3 |
+--------------------------------------+-------------+--------+------------+-------------+--------------------------+
[root@controller ~(keystone_demo)]#
Observations:
When I tried packstack with ceilometer disabled (CONFIG_CEILOMETER_INSTALL=n) it failed with this error but after changing CONFIG_CEILOMETER_INSTALL=y things worked fine (default is ‘y’). This is a known issue in Mitaka
167.254.209.85_mariadb.pp:                        [ ERROR ]
Applying Puppet manifests                         [ ERROR ]

ERROR : Error appeared during Puppet run: 167.254.209.85_mariadb.pp
Error: Could not find data item CONFIG_GNOCCHI_DB_PW in any Hiera data file and no default supplied at /var/tmp/packstack/45cb2ad222434ebe94634bcedb3510b5/manifests/167.254.209.85_mariadb.pp:121 on node controller.cloud.net
This is a short lab to demonstrate how to clean up Openstack configuration using cli commands.
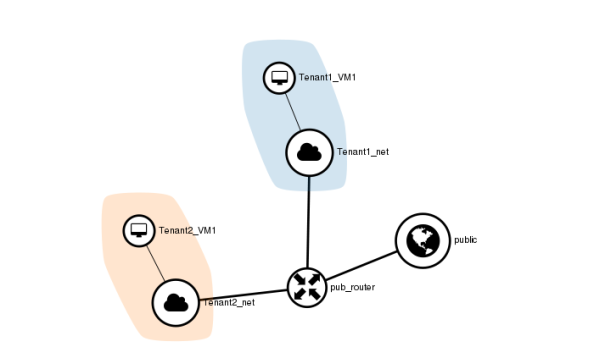
I have setup Openstack with two tenants, one instance in each tenant. Tenant subnet and network, a public router with gateway and tenant interfaces connected to router. There is a sequence you need to follow i.e. you can not delete subnet & router before deleting instance. This sequence works for me
Delete instances
Delete router interfaces
Clear router gateway
Delete router
Delete tenant subnets
Delete tenant networks
Delete instances.
[root@localhost ~(keystone_admin)]# nova delete Tenant1_VM1
[root@localhost ~(keystone_admin)]# nova delete Tenant2_VM1
Delete router interfaces. This step will delete router interfaces towards tenants, you need to specify router-id and interface subnet-id to delete router interfaces. In my case I have two interfaces on router, one for each tenant
[root@localhost ~(keystone_admin)]# neutron help | grep gateway
  gateway-device-create             Create a network gateway device.
  gateway-device-delete             Delete a given network gateway device.
  gateway-device-list               List network gateway devices for a given tenant.
  gateway-device-show               Show information for a given network gateway device.
  gateway-device-update             Update a network gateway device.
  net-gateway-connect               Add an internal network interface to a router.
  net-gateway-create                Create a network gateway.
  net-gateway-delete                Delete a given network gateway.
  net-gateway-disconnect            Remove a network from a network gateway.
  net-gateway-list                  List network gateways for a given tenant.
  net-gateway-show                  Show information of a given network gateway.
  net-gateway-update                Update the name for a network gateway.
  router-gateway-clear              Remove an external network gateway from a router.
  router-gateway-set                Set the external network gateway for a router.
[root@localhost ~(keystone_admin)]# neutron router-gateway-clear help
Unable to find router with name 'help'
[root@localhost ~(keystone_admin)]# neutron help router-gateway-clear
usage: neutron router-gateway-clear [-h] [--request-format {json,xml}] ROUTER

Remove an external network gateway from a router.

positional arguments:
  ROUTER                ID or name of the router.

optional arguments:
  -h, --help            show this help message and exit
  --request-format {json,xml}
                        The XML or JSON request format.
[root@localhost ~(keystone_admin)]# neutron router-gateway-clear pub_router
Removed gateway from router pub_router
[root@localhost ~(keystone_admin)]# neutron router-list
+--------------------------------------+------------+-----------------------+-------------+-------+
| id                                   | name       | external_gateway_info | distributed | ha    |
+--------------------------------------+------------+-----------------------+-------------+-------+
| ee34dbdc-2368-4cb9-ba50-8f13e00ae389 | pub_router | null                  | False       | False |
+--------------------------------------+------------+-----------------------+-------------+-------+
[root@localhost ~(keystone_admin)]#
[root@localhost ~(keystone_admin)]# neutron subnet-list
+--------------------------------------+----------------+------------------+------------------------------------------------------+
| id                                   | name           | cidr             | allocation_pools                                     |
+--------------------------------------+----------------+------------------+------------------------------------------------------+
| c8a1061a-1ed9-43c8-a18f-684307644d68 | private_subnet | 10.0.0.0/24      | {"start": "10.0.0.2", "end": "10.0.0.254"}           |
| 684fa6ab-4fb9-406a-9264-2c53afa8d9ff | public_subnet  | 167.254.209.0/24 | {"start": "167.254.209.87", "end": "167.254.209.95"} |
| 395d7a7d-7479-4b6e-b184-c9638ff19beb | Tenant1_subnet | 192.168.11.0/24  | {"start": "192.168.11.2", "end": "192.168.11.254"}   |
| 2c3446dd-5c59-43a7-a067-4cb0f18511e6 | Tenant2_subnet | 192.168.12.0/24  | {"start": "192.168.12.2", "end": "192.168.12.254"}   |
+--------------------------------------+----------------+------------------+------------------------------------------------------+
[root@localhost ~(keystone_admin)]# neutron help | grep subnet
  subnet-create                     Create a subnet for a given tenant.
  subnet-delete                     Delete a given subnet.
  subnet-list                       List subnets that belong to a given tenant.
  subnet-show                       Show information of a given subnet.
  subnet-update                     Update subnet's information.
  subnetpool-create                 Create a subnetpool for a given tenant.
  subnetpool-delete                 Delete a given subnetpool.
  subnetpool-list                   List subnetpools that belong to a given tenant.
  subnetpool-show                   Show information of a given subnetpool.
  subnetpool-update                 Update subnetpool's information.
[root@localhost ~(keystone_admin)]# neutron subnet delete private_subnet
Unknown command [u'subnet', u'delete', u'private_subnet']
[root@localhost ~(keystone_admin)]# neutron subnet-delete private_subnet
Deleted subnet: private_subnet
[root@localhost ~(keystone_admin)]# neutron subnet-delete public_subnet
Deleted subnet: public_subnet
[root@localhost ~(keystone_admin)]# neutron subnet-delete Tenant1_subnet
Deleted subnet: Tenant1_subnet
[root@localhost ~(keystone_admin)]# neutron subnet-delete Tenant2_subnet
Deleted subnet: Tenant2_subnet
[root@localhost ~(keystone_admin)]# neutron subnet-list

[root@localhost ~(keystone_admin)]#


[root@localhost ~(keystone_admin)]# neutron net-list
+--------------------------------------+-------------+---------+
| id                                   | name        | subnets |
+--------------------------------------+-------------+---------+
| c44c3620-122a-450f-99ab-839c7798084d | Tenant1_net |         |
| a289276d-15eb-4397-af1a-67313eb9fa99 | private     |         |
| 3ac45bab-e08b-47ff-b01e-5b0ddb9127ca | public      |         |
| ff9c3eb7-f88f-42bb-af5f-ea810dad7505 | Tenant2_net |         |
+--------------------------------------+-------------+---------+
[root@localhost ~(keystone_admin)]# neutron net-delete Tenant1_net
Deleted network: Tenant1_net
[root@localhost ~(keystone_admin)]# neutron net-delete Tenant2_net
Deleted network: Tenant2_net
[root@localhost ~(keystone_admin)]# neutron net-delete private
Deleted network: private
[root@localhost ~(keystone_admin)]# neutron net-delete public
Deleted network: public
[root@localhost ~(keystone_admin)]# neutron net-list

[root@localhost ~(keystone_admin)]#
Delete nova flavor and security group
[root@localhost ~(keystone_admin)]# nova flavor-list
+--------------------------------------+---------+-----------+------+-----------+------+-------+-------------+-----------+
| ID                                   | Name    | Memory_MB | Disk | Ephemeral | Swap | VCPUs | RXTX_Factor | Is_Public |
+--------------------------------------+---------+-----------+------+-----------+------+-------+-------------+-----------+
| 81a85a3e-d809-4619-8ff7-f589936b1d20 | m2.nano | 128       | 1    | 0         |      | 1     | 1.0         | True      |
+--------------------------------------+---------+-----------+------+-----------+------+-------+-------------+-----------+
[root@localhost ~(keystone_admin)]# nova help | grep flavor
    flavor-access-add           Add flavor access for the given tenant.
    flavor-access-list          Print access information about the given
                                flavor.
    flavor-access-remove        Remove flavor access for the given tenant.
    flavor-create               Create a new flavor
    flavor-delete               Delete a specific flavor
    flavor-key                  Set or unset extra_spec for a flavor.
    flavor-list                 Print a list of available 'flavors' (sizes of
    flavor-show                 Show details about the given flavor.
[root@localhost ~(keystone_admin)]# nova flavor-delete m2.nano
+--------------------------------------+---------+-----------+------+-----------+------+-------+-------------+-----------+
| ID                                   | Name    | Memory_MB | Disk | Ephemeral | Swap | VCPUs | RXTX_Factor | Is_Public |
+--------------------------------------+---------+-----------+------+-----------+------+-------+-------------+-----------+
| 81a85a3e-d809-4619-8ff7-f589936b1d20 | m2.nano | 128       | 1    | 0         |      | 1     | 1.0         | True      |
+--------------------------------------+---------+-----------+------+-----------+------+-------+-------------+-----------+
[root@localhost ~(keystone_admin)]#


[root@localhost ~(keystone_admin)]# neutron security-group-list
+--------------------------------------+---------+----------------------------------------------------------------------+
| id                                   | name    | security_group_rules                                                 |
+--------------------------------------+---------+----------------------------------------------------------------------+
| 0d4b02eb-c67c-49eb-b45f-d7038482f02f | default | egress, IPv4                                                         |
|                                      |         | egress, IPv6                                                         |
|                                      |         | ingress, IPv4, remote_group_id: 0d4b02eb-c67c-49eb-b45f-d7038482f02f |
|                                      |         | ingress, IPv6, remote_group_id: 0d4b02eb-c67c-49eb-b45f-d7038482f02f |
| 0db6e683-2aaf-4a8f-9513-e3e86e006457 | mysec   | egress, IPv4                                                         |
|                                      |         | egress, IPv6                                                         |
|                                      |         | ingress, IPv4, 22/tcp                                                |
|                                      |         | ingress, IPv4, icmp                                                  |
| 6af71703-55ac-4abc-9188-d212f12a8267 | default | egress, IPv4                                                         |
|                                      |         | egress, IPv6                                                         |
|                                      |         | ingress, IPv4, remote_group_id: 6af71703-55ac-4abc-9188-d212f12a8267 |
|                                      |         | ingress, IPv6, remote_group_id: 6af71703-55ac-4abc-9188-d212f12a8267 |
| ce23d4c6-23c7-4569-abb3-2da61db2ad9f | default | egress, IPv4                                                         |
|                                      |         | egress, IPv6                                                         |
|                                      |         | ingress, IPv4, remote_group_id: ce23d4c6-23c7-4569-abb3-2da61db2ad9f |
|                                      |         | ingress, IPv6, remote_group_id: ce23d4c6-23c7-4569-abb3-2da61db2ad9f |
+--------------------------------------+---------+----------------------------------------------------------------------+
[root@localhost ~(keystone_admin)]# neutron help | grep security-group
  security-group-create             Create a security group.
  security-group-delete             Delete a given security group.
  security-group-list               List security groups that belong to a given tenant.
  security-group-rule-create        Create a security group rule.
  security-group-rule-delete        Delete a given security group rule.
  security-group-rule-list          List security group rules that belong to a given tenant.
  security-group-rule-show          Show information of a given security group rule.
  security-group-show               Show information of a given security group.
  security-group-update             Update a given security group.
[root@localhost ~(keystone_admin)]# neutron security-group-delete mysec
Deleted security_group: mysec
[root@localhost ~(keystone_admin)]# neutron security-group-list
+--------------------------------------+---------+----------------------------------------------------------------------+
| id                                   | name    | security_group_rules                                                 |
+--------------------------------------+---------+----------------------------------------------------------------------+
| 0d4b02eb-c67c-49eb-b45f-d7038482f02f | default | egress, IPv4                                                         |
|                                      |         | egress, IPv6                                                         |
|                                      |         | ingress, IPv4, remote_group_id: 0d4b02eb-c67c-49eb-b45f-d7038482f02f |
|                                      |         | ingress, IPv6, remote_group_id: 0d4b02eb-c67c-49eb-b45f-d7038482f02f |
| 6af71703-55ac-4abc-9188-d212f12a8267 | default | egress, IPv4                                                         |
|                                      |         | egress, IPv6                                                         |
|                                      |         | ingress, IPv4, remote_group_id: 6af71703-55ac-4abc-9188-d212f12a8267 |
|                                      |         | ingress, IPv6, remote_group_id: 6af71703-55ac-4abc-9188-d212f12a8267 |
| ce23d4c6-23c7-4569-abb3-2da61db2ad9f | default | egress, IPv4                                                         |
|                                      |         | egress, IPv6                                                         |
|                                      |         | ingress, IPv4, remote_group_id: ce23d4c6-23c7-4569-abb3-2da61db2ad9f |
|                                      |         | ingress, IPv6, remote_group_id: ce23d4c6-23c7-4569-abb3-2da61db2ad9f |
+--------------------------------------+---------+----------------------------------------------------------------------+
[root@localhost ~(keystone_admin)]#
This completes clean up, let’s do final check
[root@localhost ~(keystone_admin)]# nova list
+----+------+--------+------------+-------------+----------+
| ID | Name | Status | Task State | Power State | Networks |
+----+------+--------+------------+-------------+----------+
+----+------+--------+------------+-------------+----------+
[root@localhost ~(keystone_admin)]# neutron net-list

[root@localhost ~(keystone_admin)]# neutron subnet-list

[root@localhost ~(keystone_admin)]# ip netns
[root@localhost ~(keystone_admin)]# nova flavor-list
+----+------+-----------+------+-----------+------+-------+-------------+-----------+
| ID | Name | Memory_MB | Disk | Ephemeral | Swap | VCPUs | RXTX_Factor | Is_Public |
+----+------+-----------+------+-----------+------+-------+-------------+-----------+
+----+------+-----------+------+-----------+------+-------+-------------+-----------+
[root@localhost ~(keystone_admin)]# neutron router-list

[root@localhost ~(keystone_admin)]#
How about OVS bridge & flows.
OVS bridges (br-int,br-tun & br-ex) are still there as these are not provisioned by Openstack cli. Flows related to instance vlan-id add/strip, vxlan add/stip are deleted but default flows remained in the bridge
While I was working on Lab-19 I came across neutron issues. I learned a lot while debugging and resolving these issues. In this lab I will show in detail how I resolved issues
Issue-1:
Immediately after installing I checked the status of Openstack and found neutron-l3-agent ‘inactive’. I know l3 is a required agent for router function so definitely needs to be active. Try below command to make it active. Note:it is good practice to check agent status
[root@localhost ~(keystone_admin)]# openstack-status
== Nova services ==
openstack-nova-api:                     active
openstack-nova-compute:                 inactive  (disabled on boot)
openstack-nova-network:                 inactive  (disabled on boot)
openstack-nova-scheduler:               active
openstack-nova-cert:                    active
openstack-nova-conductor:               active
openstack-nova-console:                 inactive  (disabled on boot)
openstack-nova-consoleauth:             active
openstack-nova-xvpvncproxy:             inactive  (disabled on boot)
== Glance services ==
openstack-glance-api:                   active
openstack-glance-registry:              active
== Keystone service ==
openstack-keystone:                     inactive  (disabled on boot)
== Horizon service ==
openstack-dashboard:                    active
== neutron services ==
neutron-server:                         active
neutron-dhcp-agent:                     active
neutron-l3-agent:                       inactive    (disabled on boot)
neutron-metadata-agent:                 active
neutron-lbaas-agent:                    active
neutron-openvswitch-agent:              active
== Swift services ==
openstack-swift-proxy:                  active
openstack-swift-account:                active
openstack-swift-container:              active
openstack-swift-object:                 active
== Support services ==
mysqld:                                 inactive  (disabled on boot)
openvswitch:                            active
dbus:                                   active
rabbitmq-server:                        active
memcached:                              active
== Keystone users ==

[root@localhost network-scripts(keystone_admin)]# service neutron-l3-agent start
Note: I am not sure why l3-agent shows ‘diabled on boot’ and came up as ‘inactive’
Issue-2:
My instance boot was successful. Nova list show instance active and IP address 192.168.11.3 assigned to it but ping to instance failed. This could be either network issue or dhcp issue.
Note: nova list command show instance IP address but that doesn’t mean instance actual got the IP.
I rebooted my instance (nova reboot Tenant1_VM1) and checked dhcp interface counts to see if it is receiving any packets. As you can see Rx packets count is not incrementing, it means instance dhcp discover messages are not making upto dhcp server
This didn’t resolve issue, I still can’t ping my instance
I wanted to make sure my instance actually got the IP address. The best way to check it is by console-log command. console-log command provides detail boot log of an instance, it dumps instance interface info. Try ‘nova console-log <tenant name>’ command and see if instance has IP address
[root@localhost ~(keystone_admin)]# nova list
+--------------------------------------+-------------+--------+------------+-------------+--------------------------+
| ID                                   | Name        | Status | Task State | Power State | Networks                 |
+--------------------------------------+-------------+--------+------------+-------------+--------------------------+
| a33591b6-c325-454d-a4b0-50ba82d0b257 | Tenant1_VM1 | ACTIVE | -          | Running     | Tenant1_net=192.168.11.3 |
+--------------------------------------+-------------+--------+------------+-------------+--------------------------+
[root@localhost ~(keystone_admin)]# ip netns
qrouter-ee34dbdc-2368-4cb9-ba50-8f13e00ae389
qdhcp-c44c3620-122a-450f-99ab-839c7798084d
[root@localhost ~(keystone_admin)]# ip netns exec qrouter-ee34dbdc-2368-4cb9-ba50-8f13e00ae389 ping 192.168.11.3
PING 192.168.11.3 (192.168.11.3) 56(84) bytes of data.
From 192.168.11.1 icmp_seq=1 Destination Host Unreachable
From 192.168.11.1 icmp_seq=2 Destination Host Unreachable
From 192.168.11.1 icmp_seq=3 Destination Host Unreachable
From 192.168.11.1 icmp_seq=4 Destination Host Unreachable
^C
--- 192.168.11.3 ping statistics ---
5 packets transmitted, 0 received, +4 errors, 100% packet loss, time 3999ms
pipe 4

#I am not showing the complete log only the part I am interested in
[root@localhost ~(keystone_admin)]# nova console-log Tenant1_VM1
udhcpc (v1.20.1) started
Sending discover...
Sending discover...
Sending discover...
############ debug start ##############
### /etc/init.d/sshd start
Starting dropbear sshd: OK
route: fscanf
### ifconfig -a
eth0      Link encap:Ethernet  HWaddr FA:16:3E:DB:A1:50
          inet6 addr: fe80::f816:3eff:fedb:a150/64 Scope:Link
          UP BROADCAST RUNNING MULTICAST  MTU:1500  Metric:1
          RX packets:16 errors:0 dropped:0 overruns:0 frame:0
          TX packets:8 errors:0 dropped:0 overruns:0 carrier:0
          collisions:0 txqueuelen:1000
          RX bytes:1284 (1.2 KiB)  TX bytes:1132 (1.1 KiB)
lo        Link encap:Local Loopback
          inet addr:127.0.0.1  Mask:255.0.0.0
          inet6 addr: ::1/128 Scope:Host
          UP LOOPBACK RUNNING  MTU:16436  Metric:1
          RX packets:0 errors:0 dropped:0 overruns:0 frame:0
          TX packets:0 errors:0 dropped:0 overruns:0 carrier:0
          collisions:0 txqueuelen:0
          RX bytes:0 (0.0 B)  TX bytes:0 (0.0 B)
### route -n
Kernel IP routing table
Destination     Gateway         Genmask         Flags Metric Ref    Use Iface
route: fscanf
As you can see from console-log my instance doesn’t have IP address.Eth0 interface has no IP address, also dhcp discover is timing out. This mean dhcp packets are getting dropped by the network somewhere, something is not set correctly
I dumped br-int, br-tun bridges on compute and network nodes. I noticed that vxlan port was missing in br-tun bridge on compute node. I knew neutron-openvswitch plugin is responsible for setting up br-tun & br-int so I restarted this agent, it resolved the issue and now br-tun on compute node has vxlan port. I rebooted the instance (nova reboot Tenant1_VM1) and checked the console-log. No change, instance still doesn’t have IP address, bummer…
#vxlan port is missing from br-tun bridge on compute node
[root@localhost ~]# ovs-vsctl show
4973e933-214d-4d54-b241-db3b33e16526
    Bridge br-tun
        fail_mode: secure
        Port patch-int
            Interface patch-int
                type: patch
                options: {peer=patch-tun}
        Port br-tun
            Interface br-tun
                type: internal
    Bridge br-int
        fail_mode: secure
        Port br-int
            Interface br-int
                type: internal
        Port patch-tun
            Interface patch-tun
                type: patch
                options: {peer=patch-int}
        Port "qvo8d2aef86-ef"
            tag: 1
            Interface "qvo8d2aef86-ef"
    ovs_version: "2.4.0"

# restart openvswitch-agent
[root@localhost ~(keystone_admin)]# service neutron-openvswitch-agent status

#vxlan port created
[root@localhost ~]# ovs-vsctl show
4973e933-214d-4d54-b241-db3b33e16526
    Bridge br-tun
        fail_mode: secure
        Port patch-int
            Interface patch-int
                type: patch
                options: {peer=patch-tun}
        Port "vxlan-0a0a0001"
            Interface "vxlan-0a0a0001"
                type: vxlan
                options: {df_default="true", in_key=flow, local_ip="10.10.0.10", out_key=flow, remote_ip="10.10.0.1"}
        Port br-tun
            Interface br-tun
                type: internal
    Bridge br-int
        fail_mode: secure
        Port br-int
            Interface br-int
                type: internal
        Port patch-tun
            Interface patch-tun
                type: patch
                options: {peer=patch-int}
        Port "qvo8d2aef86-ef"
            tag: 2
            Interface "qvo8d2aef86-ef"
    ovs_version: "2.4.0"
[root@localhost ~(keystone_admin)]# nova list
+--------------------------------------+-------------+--------+------------+-------------+--------------------------+
| ID                                   | Name        | Status | Task State | Power State | Networks                 |
+--------------------------------------+-------------+--------+------------+-------------+--------------------------+
| a33591b6-c325-454d-a4b0-50ba82d0b257 | Tenant1_VM1 | ACTIVE | -          | Running     | Tenant1_net=192.168.11.3 |
+--------------------------------------+-------------+--------+------------+-------------+--------------------------+
[root@localhost ~(keystone_admin)]# ip netns
qrouter-ee34dbdc-2368-4cb9-ba50-8f13e00ae389
qdhcp-c44c3620-122a-450f-99ab-839c7798084d
[root@localhost ~(keystone_admin)]# ip netns exec qrouter-ee34dbdc-2368-4cb9-ba50-8f13e00ae389 ping 192.168.11.3
PING 192.168.11.3 (192.168.11.3) 56(84) bytes of data.
From 192.168.11.1 icmp_seq=1 Destination Host Unreachable
From 192.168.11.1 icmp_seq=2 Destination Host Unreachable
From 192.168.11.1 icmp_seq=3 Destination Host Unreachable
From 192.168.11.1 icmp_seq=4 Destination Host Unreachable
^C
--- 192.168.11.3 ping statistics ---
5 packets transmitted, 0 received, +4 errors, 100% packet loss, time 3999ms
pipe 4
[root@localhost ~(keystone_admin)]# nova console-log Tenant1_VM1
Now it is personal bring it on, take out big guns.. tcpdump
Started from the source of the problem, tenant instance. I started with tcpdump on linux bridge interfaces (tap & qvb) and rebooted my instance.
[root@localhost ~]# tcpdump -i qvb90ebb2d6-19 udp
tcpdump: WARNING: qvb90ebb2d6-19: no IPv4 address assigned
tcpdump: verbose output suppressed, use -v or -vv for full protocol decode
listening on qvb90ebb2d6-19, link-type EN10MB (Ethernet), capture size 65535 bytes
12:03:23.199952 IP 0.0.0.0.bootpc > 255.255.255.255.bootps: BOOTP/DHCP, Request from fa:16:3e:20:22:f0 (oui Unknown), length 295
12:03:23.201467 IP 0.0.0.0.bootpc > 255.255.255.255.bootps: BOOTP/DHCP, Request from fa:16:3e:20:22:f0 (oui Unknown), length 307
As you can see dhcp discover packets received on bridge interfaces but no reply packets. So Linux bridge is not the culprit .. move on
Next I did tcpdump on br-int interface qvo. This interface also receiving dhcp packets
We have covered all virtual interfaces on compute node, other interfaces on br-int and br-tun are internal interfaces tcpdump will not work on them. This link shows a cool trick how to create mirror port for internal bridge port and run tcpdump on it.
Here am creating mirror port for br-int internal port patch-tun which is connected to br-tun bridge. I will then run tcpdump on it
#create a dummy port name mmport and set state to UP
$ip link add name mmport type dummy
$ip link set dev mmport up

#Add device mmport to bridge br-int:
$ovs-vsctl add-port br-int mmport

[root@localhost ~]# ovs-vsctl show
4973e933-214d-4d54-b241-db3b33e16526
    Bridge br-tun
        fail_mode: secure
        Port patch-int
            Interface patch-int
                type: patch
                options: {peer=patch-tun}
        Port "vxlan-0a0a0001"
            Interface "vxlan-0a0a0001"
                type: vxlan
                options: {df_default="true", in_key=flow, local_ip="10.10.0.10", out_key=flow, remote_ip="10.10.0.1"}
        Port br-tun
            Interface br-tun
                type: internal
    Bridge br-int
        fail_mode: secure
        Port br-int
            Interface br-int
                type: internal
        Port "qvo90ebb2d6-19"
            tag: 4
            Interface "qvo90ebb2d6-19"
        Port mmport
            Interface mmport
        Port patch-tun
            Interface patch-tun
                type: patch
                options: {peer=patch-int}
    ovs_version: "2.4.0"
[root@localhost ~]#
#Create mirror of patch-tun to mmport. I don't understand the command but believe
#me it works, just cut & paste
[root@localhost ~]# ovs-vsctl -- set Bridge br-int mirrors=@m  -- --id=@mmport \
> get Port mmport  -- --id=@patch-tun get Port patch-tun \
> -- --id=@m create Mirror name=mmirror select-dst-port=@patch-tun \
> select-src-port=@patch-tun output-port=@mmport select_all=1
c171aa59-313a-4e7f-b4ae-e0568fe6ab7a
[root@localhost ~]#
run tcpdump on dummy mirror port, as you can see it is receiving dhcp discover messages.
[root@localhost ~]# tcpdump -i mmport | grep DHCP
tcpdump: WARNING: mmport: no IPv4 address assigned
tcpdump: verbose output suppressed, use -v or -vv for full protocol decode
listening on mmport, link-type EN10MB (Ethernet), capture size 65535 bytes
12:52:13.625834 IP 0.0.0.0.bootpc > 255.255.255.255.bootps: BOOTP/DHCP, Request from fa:16:3e:20:22:f0 (oui Unknown), length 295
12:52:13.627315 IP 0.0.0.0.bootpc > 255.255.255.255.bootps: BOOTP/DHCP, Request from fa:16:3e:20:22:f0 (oui Unknown), length 307
Try these commands to delete mirror port
#ovs-vsctl clear Bridge br-int mirrors
#ovs-vsctl del-port br-int mmport
#ip link delete dev mmport
Next I tried ens5 (physical) interface. Network and compute nodes are connected on this interface. This interface is also receiving dhcp messages. So the issue is not compute node
Compute node seems to be having right so I moved debugging to network node. tcpdump on ens5 looks good. tcpdump on qvo interface is not good , no dhcp messages received on it. I created mirror port on br-int on patch-tun bridge and found that it is not receiving dhcp messages. So something is wrong in br-tun on network node. Looks like I have identified the culprit.
I closely analyzed br-tun bridge port and flows. After googling and learning about OVS flow table also comparing flow table with compute node br-tun (both nodes table should be identical) I found a flow was missing in network node br-tun
I added the flow manually and rebooted my instance. My instance successfully fetched an IP address from dhcp server. I am able to ping the instance.
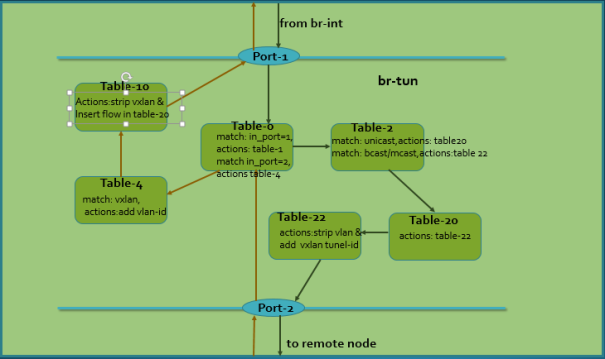
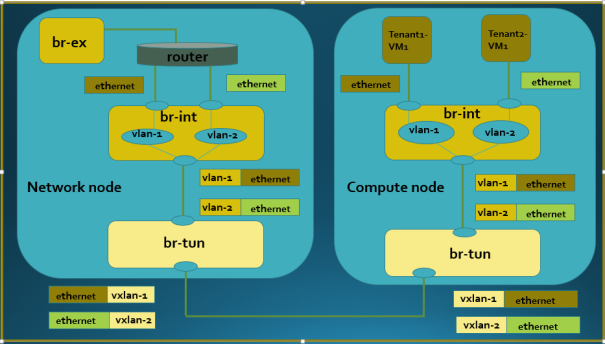
Here is the overview of br-tun flow table. This link explained it quite well. OVS tables are made of match and actions criteria. These are the tables I have in my br-tun bridge
Table-0:by default all packets lands in table-0
match: In_port.
actions: In_port=1 (traffic from br-int) send packet to table-1. In_port=2 (traffic from remote br-tun) send packets to table-4
Table-2,
match: unicast, broadcast and multicast
actions: unicast packet send packet to table-20. broadcast or multi-cast send packet to table-22
Table-20
actions: send packets to table-22
Table-22
match: dl_vlan.
actions: strip vlan, add vxlan tag and send it out of port-2
Table-4
match: vxlan tunnel-id.
actions: add dl_vlan and send it to table-10
Table-10
actions: this table strips vxlan tunnel-id and insert flow in table-20
I finally managed to get second machine. In this lab I will demonstrate Openstack deployment in two node environment. I will setup controller and network node in one machine and compute node in another machine. As usual I will be using packstack.
Pre-condition:
For this lab I am using CentOS 7. I have installed CentOS 7 on two machines. I have two physical interfaces on both machines (enp1s0 & ens5). I am using enp1s0 for remote access to machines and ens5 to connect them together. ens5 will be used for Openstack API and tunnel communication.
# cat /etc/*elease

CentOS Linux release 7.2.1511 (Core)
NAME="CentOS Linux"
VERSION="7 (Core)"
ID="centos"
ID_LIKE="rhel fedora"
VERSION_ID="7"
PRETTY_NAME="CentOS Linux 7 (Core)"
ANSI_COLOR="0;31"
CPE_NAME="cpe:/o:centos:centos:7"
HOME_URL="https://www.centos.org/"
BUG_REPORT_URL="https://bugs.centos.org/"

CENTOS_MANTISBT_PROJECT="CentOS-7"
CENTOS_MANTISBT_PROJECT_VERSION="7"
REDHAT_SUPPORT_PRODUCT="centos"
REDHAT_SUPPORT_PRODUCT_VERSION="7"

CentOS Linux release 7.2.1511 (Core)
CentOS Linux release 7.2.1511 (Core)
[root@controller ~]#
Follow these steps to prep for packstack installation
Install yum-utils on both nodes
$yum install -y yum-utils
Set SELINUX in permissive mode on both nodes (vi /etc/selinux/config)
SELINUX=permissive
disable Network Manager on both nodes
$sudo systemctl disable NetworkManager
Disable firewall on both nodes
$systemctl disable firewalld
sudo yum update -y
reboot both nodes
I followed thislinkto load latest Openstack, in my case Liberty. Try below commands on controller node
Update IP address for ens5 interface on controller/network and compute node. I have updated file in this directory /etc/sysconfig/network-scripts/ifcfg-ens5 and then restart network manager ‘sudo service network restart’
#This is the example of my ens5 file in controller/network node
[root@localhost network-scripts(keystone_admin)]# cat ifcfg-ens5
HWADDR=00:0A:CD:2A:14:08
TYPE=Ethernet
BOOTPROTO=none
DEFROUTE=yes
PEERDNS=yes
NAME=ens5
UUID=2bb5b0d3-1369-4039-b07f-5deebfc25bd9
ONBOOT=yes
IPADDR=10.10.0.1
PREFIX=24
Make sure you can ssh to compute node from controller node
[root@localhost network-scripts]# ssh -l labadmin 10.10.0.10
The authenticity of host '10.10.0.10 (10.10.0.10)' can't be established.
ECDSA key fingerprint is 48:06:a3:81:f4:62:4e:1e:3f:73:9f:34:12:1d:17:af.
Are you sure you want to continue connecting (yes/no)? yes
Warning: Permanently added '10.10.0.10' (ECDSA) to the list of known hosts.
labadmin@10.10.0.10's password:
Last login: Fri Apr  8 17:06:13 2016
[labadmin@localhost ~]$
Procedure:
Generate an answer-file and edit it to suite your topology. Below are the changes I have made in my answer-file. you can find my answer file multi-node-answer-file-lab_19.txt
 $packstack --gen-answer-file=multi-node-answer-file-lab_19.txt

#these are the changes I made in my answer-file
CONFIG_SWIFT_INSTALL=n
CONFIG_CEILOMETER_INSTALL=n
CONFIG_CINDER_INSTALL=n
CONFIG_CONTROLLER_HOST=10.10.0.1
CONFIG_COMPUTE_HOSTS=10.10.0.10
CONFIG_NETWORK_HOSTS=10.10.0.1
CONFIG_LBAAS_INSTALL=y
CONFIG_NEUTRON_FWAAS=y
CONFIG_NEUTRON_VPNAAS=y
CONFIG_PROVISION_OVS_BRIDGE=y
CONFIG_NEUTRON_ML2_TYPE_DRIVERS=vxlan
CONFIG_NEUTRON_ML2_TENANT_NETWORK_TYPES=vxlan
CONFIG_NEUTRON_ML2_MECHANISM_DRIVERS=openvswitch
CONFIG_NEUTRON_L2_AGENT=openvswitch
CONFIG_NEUTRON_OVS_TUNNEL_IF=ens5
CONFIG_KEYSTONE_ADMIN_USERNAME=admin
CONFIG_KEYSTONE_ADMIN_PW=admin
Start Packstack with newly created answer file
 $packstack --answer-file multi-node-answer-file-lab_9.txt

#after 10-15 min you will see this message
**** Installation completed successfully ******

Additional information:
 * Time synchronization installation was skipped. Please note that unsynchronized time on server instances might be problem for some OpenStack components.
 * File /root/keystonerc_admin has been created on OpenStack client host 10.10.0.1. To use the command line tools you need to source the file.
 * To access the OpenStack Dashboard browse to http://10.10.0.1/dashboard .
Please, find your login credentials stored in the keystonerc_admin in your home directory.
 * Because of the kernel update the host 10.10.0.1 requires reboot.
 * Because of the kernel update the host 10.10.0.10 requires reboot.
 * The installation log file is available at: /var/tmp/packstack/20160422-202525-FLQT1Q/openstack-setup.log
 * The generated manifests are available at: /var/tmp/packstack/20160422-202525-FLQT1Q/manifests
On a browser point to this location ‘http://10.10.0.1/dashboard’. Login as username:admin and password:admin. Note: check the admin user password in ‘keystonerc_admin’ file located in same directory from where packstack was started. Delete routers,networks and flavors from GUI
Source admin resources and create networks and tenants
Check Openstack status make sure all require components are ‘active’. Note:for me neutron-l3-agent was ‘inactive’ I tried below command to make it active
Create Tenant network and attach them to router interface
[root@localhost ~(keystone_admin)]# neutron net-create Tenant1_net
Created a new network:
+---------------------------+--------------------------------------+
| Field                     | Value                                |
+---------------------------+--------------------------------------+
| admin_state_up            | True                                 |
| id                        | c44c3620-122a-450f-99ab-839c7798084d |
| mtu                       | 0                                    |
| name                      | Tenant1_net                          |
| provider:network_type     | vxlan                                |
| provider:physical_network |                                      |
| provider:segmentation_id  | 36                                   |
| router:external           | False                                |
| shared                    | False                                |
| status                    | ACTIVE                               |
| subnets                   |                                      |
| tenant_id                 | 5dc8330acb6f4fb8a91f2abb839f7773     |
+---------------------------+--------------------------------------+

[root@localhost ~(keystone_admin)]# neutron subnet-create --name Tenant1_subnet \
>   --dns-nameserver 8.8.8.8 Tenant1_net 192.168.11.0/24
Created a new subnet:
+-------------------+----------------------------------------------------+
| Field             | Value                                              |
+-------------------+----------------------------------------------------+
| allocation_pools  | {"start": "192.168.11.2", "end": "192.168.11.254"} |
| cidr              | 192.168.11.0/24                                    |
| dns_nameservers   | 8.8.8.8                                            |
| enable_dhcp       | True                                               |
| gateway_ip        | 192.168.11.1                                       |
| host_routes       |                                                    |
| id                | 395d7a7d-7479-4b6e-b184-c9638ff19beb               |
| ip_version        | 4                                                  |
| ipv6_address_mode |                                                    |
| ipv6_ra_mode      |                                                    |
| name              | Tenant1_subnet                                     |
| network_id        | c44c3620-122a-450f-99ab-839c7798084d               |
| subnetpool_id     |                                                    |
| tenant_id         | 5dc8330acb6f4fb8a91f2abb839f7773                   |
+-------------------+----------------------------------------------------+
#add interface to public router
[root@localhost ~(keystone_admin)]# neutron router-interface-add pub_router Tenant1_subnet
Added interface 51a1f2ed-eef5-4527-bce9-153d6a7986cd to router pub_router.
[root@localhost ~(keystone_admin)]#
Create ssh keypair and add it to nova
#create keypair for tenant1
[root@localhost ~(keystone_admin)]# ssh-keygen -f tenant1_rsa -t rsa -b 2048 -N ''
Generating public/private rsa key pair.
Your identification has been saved in tenant1_rsa.
Your public key has been saved in tenant1_rsa.pub.
The key fingerprint is:
f9:36:17:06:b1:ab:8f:11:ab:46:0e:37:ca:c8:29:0f root@localhost.localdomain
The key's randomart image is:
+--[ RSA 2048]----+
|          .      |
|           o     |
|          o      |
|         . o     |
|        S . o    |
|    . +  = . .   |
|E. + * .+ + .    |
|..+ o o. = o     |
| o.  .. . .      |
+-----------------+
[root@localhost ~(keystone_admin)]# nova keypair-add --pub-key tenant1_rsa.pub tenant1
[root@localhost ~(keystone_admin)]#
Create a new security group and rule to allow ssh and ICMP protocols for the instance
At this point instance started but could not be reached. Ping from router namespace to VM (192.168.11.5) failed. I checked console-log for VM and found that it couldn’t get IP from DHCP server. Below messages from console-log show no dhcp offer message
[root@localhost ~(keystone_admin)]# nova console-log Tenant1_VM1
Starting network...
udhcpc (v1.20.1) started
Sending discover...
Sending discover...
Sending discover...
I checked configuration and found that vxlan interface was missing from br-tun bridge in compute node. After restarting openvswitch agent on controller node vxlan interface created. But it didn’t resolve dhcp issue, VM still doesn’t have IP address
$service neutron-openvswitch-agent restart
[root@localhost ~]# ovs-vsctl show
4973e933-214d-4d54-b241-db3b33e16526
    Bridge br-tun
        fail_mode: secure
        Port patch-int
            Interface patch-int
                type: patch
                options: {peer=patch-tun}
        Port br-tun
            Interface br-tun
                type: internal
    Bridge br-int
        fail_mode: secure
        Port br-int
            Interface br-int
                type: internal
        Port patch-tun
            Interface patch-tun
                type: patch
                options: {peer=patch-int}
        Port "qvo8d2aef86-ef"
            tag: 1
            Interface "qvo8d2aef86-ef"
    ovs_version: "2.4.0"

# restart openvswitch fixed the problem vxlan port issue
[root@localhost ~(keystone_admin)]# service neutron-openvswitch-agent restart
[root@localhost ~]# ovs-vsctl show
4973e933-214d-4d54-b241-db3b33e16526
    Bridge br-tun
        fail_mode: secure
        Port patch-int
            Interface patch-int
                type: patch
                options: {peer=patch-tun}
        Port "vxlan-0a0a0001"
            Interface "vxlan-0a0a0001"
                type: vxlan
                options: {df_default="true", in_key=flow, local_ip="10.10.0.10", out_key=flow, remote_ip="10.10.0.1"}
        Port br-tun
            Interface br-tun
                type: internal
    Bridge br-int
        fail_mode: secure
        Port br-int
            Interface br-int
                type: internal
        Port patch-tun
            Interface patch-tun
                type: patch
                options: {peer=patch-int}
        Port "qvo8d2aef86-ef"
            tag: 2
            Interface "qvo8d2aef86-ef"
    ovs_version: "2.4.0"
Upon further debugging I found that a flow was missing from br-tun bridge in network node. Restarting openvswitch didn’t resolve this issue so I manually created the flow. This resolved dhcp issue and VM successfully fetched IP address from dhcp.
Check out this linkfor details on how I resolved dhcp issue in my setup
Try these commands to create second tenant (Tenant2)
ssh-keygen -f tenant2_rsa -t rsa -b 2048 -N ''
nova keypair-add --pub-key tenant2_rsa.pub tenant2
neutron net-create Tenant2_net
neutron subnet-create --name Tenant2_subnet \
--dns-nameserver 8.8.8.8 Tenant2_net 192.168.12.0/24
 neutron router-interface-add pub_router Tenant2_subnet
 nova boot --poll --flavor m2.nano --image cirros \
   --nic net-id=ff9c3eb7-f88f-42bb-af5f-ea810dad7505 \
--key-name tenant2 Tenant2_VM1 --security-groups mysec
[root@localhost ~(keystone_admin)]# nova list
+--------------------------------------+-------------+--------+------------+-------------+--------------------------+
| ID                                   | Name        | Status | Task State | Power State | Networks                 |
+--------------------------------------+-------------+--------+------------+-------------+--------------------------+
| 0b48cd50-04ef-40b1-a3a5-69e61bb2b2df | Tenant1_VM1 | ACTIVE | -          | Running     | Tenant1_net=192.168.11.5 |
| b3a7d7e6-eb4b-4c21-9b9d-974680c35cd6 | Tenant2_VM1 | ACTIVE | -          | Running     | Tenant2_net=192.168.12.3 |
+--------------------------------------+-------------+--------+------------+-------------+--------------------------+
[root@localhost ~(keystone_admin)]# ip netns
qdhcp-ff9c3eb7-f88f-42bb-af5f-ea810dad7505
qrouter-ee34dbdc-2368-4cb9-ba50-8f13e00ae389
qdhcp-c44c3620-122a-450f-99ab-839c7798084d
[root@localhost ~(keystone_admin)]# ip netns exec qrouter-ee34dbdc-2368-4cb9-ba50-8f13e00ae389 192.168.12.3
exec of "192.168.12.3" failed: No such file or directory
[root@localhost ~(keystone_admin)]# ip netns exec qrouter-ee34dbdc-2368-4cb9-ba50-8f13e00ae389 ping 192.168.12.3
PING 192.168.12.3 (192.168.12.3) 56(84) bytes of data.
64 bytes from 192.168.12.3: icmp_seq=1 ttl=64 time=1.04 ms
64 bytes from 192.168.12.3: icmp_seq=2 ttl=64 time=0.341 ms
64 bytes from 192.168.12.3: icmp_seq=3 ttl=64 time=0.387 ms
64 bytes from 192.168.12.3: icmp_seq=4 ttl=64 time=0.332 ms
^C
--- 192.168.12.3 ping statistics ---
4 packets transmitted, 4 received, 0% packet loss, time 3001ms
This is the topology shown on Openstack Horizon gui
This is the topology I drew
Two node topologyTwo node topology with traffic flow
Observations:
If you get below error while installing openstack-packstack change repos in location /etc/yum.repos.d to baseurl instead of mirrorlist on both nodes and try again
Loaded plugins: fastestmirror
 Could not retrieve mirrorlist http://mirrorlist.centos.org/?release=7&arch=x86_64&repo=os error was
 14: curl#6 - "Could not resolve host: mirrorlist.centos.org; Unknown error"
You can also disable fastestmirror in this file /etc/yum/pluginconf.d/fastestmirror.conf
enable=0
I encountered below error on compute node while running packstack. You need to upgrade lvm2 on compute node to resolve it $yum upgrade lvm2
 ---
 ERROR : Error appeared during Puppet run: 10.10.0.10_nova.pp
 Error: Execution of '/usr/bin/yum -d 0 -e 0 -y install openstack-nova-compute' returned 1: Transaction check error:
 You will find full trace in log /var/tmp/packstack/20160408-202825-TbrmD6/manifests/10.10.0.10_nova.pp.log
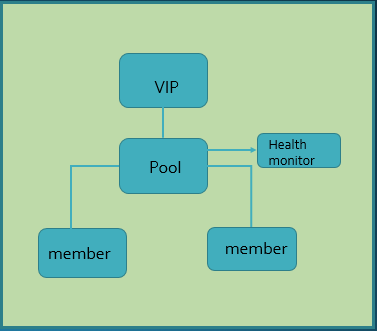
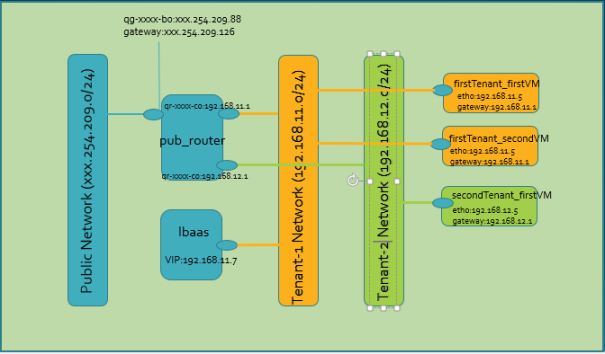
In this lab I will demonstrate how to setup Load Balancer (LB) function in Openstack Neutron. Openstack provides LBaas service using HAproxy. HAproxy is an open source high availability load balancer for TCP and HTTP based application.
This is a logical picture of LBaas
VIP: – Vitual IP address. We can call it LB address
POOL – Logical binding of members. A pool contains attributes like load balancing method (Round Robin) and protocols (HTTP,TCP) listen to etc
Member: These are actual servers for which load balancing is performed.
Health Monitor:- Health monitor monitors health of pool members. This is done either pinging members or HTTP GET request. If member fails to report status or report failure it is removed from the pool
Pre-condition:
Install Openstack using packstack. Follow this link to install Openstack in one machine. Start packstack with lbaas. You can use my earlier lab-13 to deploy Redhat Openstack
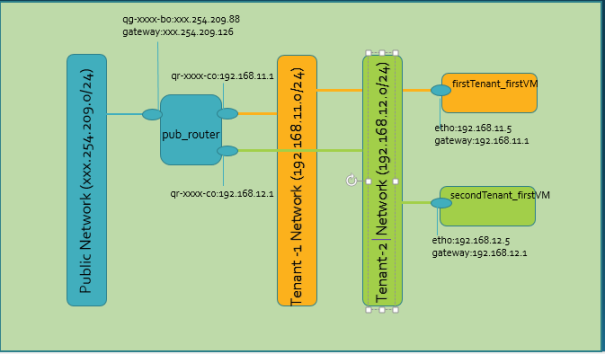
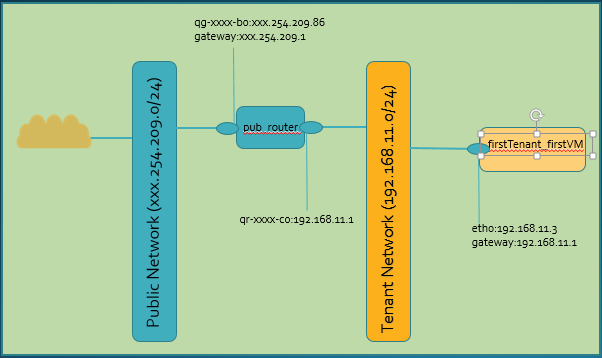
I have installed Openstack using packstack on my RHEL 7. I have created two private networks (192.168.11.0 & 192.168.12.0) and one public network (xxx.254.209.0). I have external network connectivity thru physical port enp1s0, no floating IP address created. Each tenant has one instance. Please refer to previous lab to setup this topology. This is the picture of my initial topology
Procedure:
Delete firstTenant_firstVM
>nova delete firstTenant_firstVM
Add security group rule to default security-group to allow HTTP traffic. This is important otherwise servers will not accept HTTP request.
Create firstTenant instances. These VMs will serve as Web servers
#create VMs for firstTenant
[root@localhost ~(keystone_tenant1)]#nova boot --poll --flavor m2.nano --image cirros \
  --nic net-id=d3c2f3a3-b2f8-4d9f-824d-cc20dd38fd92 --key-name firstTenant \
firstTenant_firstVM --security-groups default

[root@localhost ~(keystone_tenant1)]#nova boot --poll --flavor m2.nano --image cirros
\   --nic net-id=d3c2f3a3-b2f8-4d9f-824d-cc20dd38fd92 --key-name firstTenant
\ firstTenant_secondVM --security-groups default
[root@localhost ~(keystone_tenant1)]# nova list
+--------------------------------------+----------------------+--------+------------+-------------+------------------------------+
| ID                                   | Name                 | Status | Task State | Power State | Networks                     |
+--------------------------------------+----------------------+--------+------------+-------------+------------------------------+
| 363df149-a248-4c67-b3c5-2da0af96ccbe | firstTenant_firstVM  | ACTIVE | -          | Running     | firstTenant_net=192.168.11.5 |
| a4ec9ada-775e-44f0-93ae-846ab9b96364 | firstTenant_secondVM | ACTIVE | -          | Running     | firstTenant_net=192.168.11.6 |
+--------------------------------------+----------------------+--------+------------+-------------+------------------------------+
[root@localhost ~(keystone_tenant1)]#
Login to firstTenant VM1 & VM2 and start poor man’s web server on them. Note:This a very slow web server implementation. I didn’t have any choice cirros image doesn’t come with many goodies. Try this link if you are interested in experimenting with other simple web server. My server uses Linux Netcat utility, it is a very powerful tool try this linkto learn more about nc
#ssh to first tenant second VM and start command line web server
[root@localhost ~(keystone_tenant1)]# ip netns exec qrouter-fbdc95f9-aa97-4203-997b-c0cc09021a95 ssh -i tenant1_rsa cirros@192.168.11.6
The authenticity of host '192.168.11.6 (192.168.11.6)' can't be established.
RSA key fingerprint is 2e:5f:0f:53:61:e2:5e:ea:2a:d2:82:b2:98:67:fd:4b.
Are you sure you want to continue connecting (yes/no)? yes
Warning: Permanently added '192.168.11.6' (RSA) to the list of known hosts.
$
$ ifconfig
eth0      Link encap:Ethernet  HWaddr FA:16:3E:49:24:2A
          inet addr:192.168.11.6  Bcast:192.168.11.255  Mask:255.255.255.0
          inet6 addr: fe80::f816:3eff:fe49:242a/64 Scope:Link
          UP BROADCAST RUNNING MULTICAST  MTU:1400  Metric:1
          RX packets:119 errors:0 dropped:0 overruns:0 frame:0
          TX packets:136 errors:0 dropped:0 overruns:0 carrier:0
          collisions:0 txqueuelen:1000
          RX bytes:15801 (15.4 KiB)  TX bytes:14741 (14.3 KiB)

lo        Link encap:Local Loopback
          inet addr:127.0.0.1  Mask:255.0.0.0
          inet6 addr: ::1/128 Scope:Host
          UP LOOPBACK RUNNING  MTU:16436  Metric:1
          RX packets:0 errors:0 dropped:0 overruns:0 frame:0
          TX packets:0 errors:0 dropped:0 overruns:0 carrier:0
          collisions:0 txqueuelen:0
          RX bytes:0 (0.0 B)  TX bytes:0 (0.0 B)

#start command line web server. Edit the text depending on which VM command is executed,
#cut & paste below line. This will start nc process to listen on port 80 (HTTP)
$while true; do { echo -e 'HTTP/1.1 200 OK\r\n\r\n'; echo "This is Server-2";} | sudo nc -lp 80;sleep 1;  done

#ssh to first tenant first VM and start command line web server
[root@localhost ~(keystone_tenant1)]# ip netns
qdhcp-8460a127-ee67-474f-bbe2-9f5916097f2d
qdhcp-d3c2f3a3-b2f8-4d9f-824d-cc20dd38fd92
qrouter-fbdc95f9-aa97-4203-997b-c0cc09021a95
[root@localhost ~(keystone_tenant1)]# ip netns exec qrouter-fbdc95f9-aa97-4203-997b-c0cc09021a95 ssh -i tenant1_rsa cirros@192.168.11.5
$
$ ifconfig
eth0      Link encap:Ethernet  HWaddr FA:16:3E:D4:6B:DF
          inet addr:192.168.11.5  Bcast:192.168.11.255  Mask:255.255.255.0
          inet6 addr: fe80::f816:3eff:fed4:6bdf/64 Scope:Link
          UP BROADCAST RUNNING MULTICAST  MTU:1400  Metric:1
          RX packets:7374 errors:0 dropped:0 overruns:0 frame:0
          TX packets:6895 errors:0 dropped:0 overruns:0 carrier:0
          collisions:0 txqueuelen:1000
          RX bytes:542829 (530.1 KiB)  TX bytes:578034 (564.4 KiB)
lo        Link encap:Local Loopback
          inet addr:127.0.0.1  Mask:255.0.0.0
          inet6 addr: ::1/128 Scope:Host
          UP LOOPBACK RUNNING  MTU:16436  Metric:1
          RX packets:0 errors:0 dropped:0 overruns:0 frame:0
          TX packets:0 errors:0 dropped:0 overruns:0 carrier:0
          collisions:0 txqueuelen:0
          RX bytes:0 (0.0 B)  TX bytes:0 (0.0 B)

#start command line web server. Edit the text depending on which VM command is executed,
#cut & paste below line. This will start nc process to listen on port 80 (HTTP)
$while true; do { echo -e 'HTTP/1.1 200 OK\r\n\r\n'; echo "This is Server-1";} | sudo nc -lp 80;sleep 1;  done
Lets create the load balancer (LB). First we need to create load balancer pool. Pool contains attributes like load balancer method, protocol LB should be listening for and the subnet-id of the pool. Pool should be on the same subnet as servers, in my case 192.168.11.0. I am using ROUND_ROBIN method and HTTP protocol
We need external connectivity to our LB. For that we need to create floating IP address and attach it to VIP. This command will internally create NAT rule in router iptables for VIP (192.168.11.7)
Create floating IP address
Associate floating IP address to VIP
[root@localhost ~(keystone_tenant1)]# nova floating-ip-create public
+--------------------------------------+----------------+-----------+----------+--------+
| Id                                   | IP             | Server Id | Fixed IP | Pool   |
+--------------------------------------+----------------+-----------+----------+--------+
| 839d3bbf-6ba6-49ea-b0c3-ac14c73c437d | xxx.254.209.86 | -         | -        | public |
+--------------------------------------+----------------+-----------+----------+--------+
[root@localhost ~(keystone_tenant1)]#
[root@localhost ~(keystone_tenant1)]# neutron lb-vip-show f6c83181-3c7c-44db-9f89-02c7baf34a4e
+---------------------+--------------------------------------+
| Field               | Value                                |
+---------------------+--------------------------------------+
| address             | 192.168.11.7                         |
| admin_state_up      | True                                 |
| connection_limit    | -1                                   |
| description         |                                      |
| id                  | f6c83181-3c7c-44db-9f89-02c7baf34a4e |
| name                | lbaas_vip                            |
| pool_id             | 1ae0d964-1ce3-4664-85f3-55271251cd30 |
| port_id             | 5735947b-48d4-45a9-950a-be99fb60edeb |
| protocol            | HTTP                                 |
| protocol_port       | 80                                   |
| session_persistence |                                      |
| status              | ACTIVE                               |
| status_description  |                                      |
| subnet_id           | 079e2bad-589f-456b-9fc9-81c04b925dd3 |
| tenant_id           | ad0e0f45e48045efba0e5d831222c30c     |
+---------------------+--------------------------------------+
[root@localhost ~(keystone_tenant1)]#
[root@localhost ~(keystone_tenant1)]# neutron help floatingip-associate
usage: neutron floatingip-associate [-h] [--request-format {json,xml}]
                                    [--fixed-ip-address FIXED_IP_ADDRESS]
                                    FLOATINGIP_ID PORT
Create a mapping between a floating IP and a fixed IP.
positional arguments:
  FLOATINGIP_ID         ID of the floating IP to associate.
  PORT                  ID or name of the port to be associated with the
                        floating IP.
optional arguments:
  -h, --help            show this help message and exit
  --request-format {json,xml}
                        The XML or JSON request format.
  --fixed-ip-address FIXED_IP_ADDRESS
                        IP address on the port (only required if port has
                        multiple IPs).
#This command takes floating IP id and VIP port-id. Check 'lb-vip-show' command for
#vip port-id
[root@localhost ~(keystone_tenant1)]# neutron floatingip-associate 839d3bbf-6ba6-49ea-b0c3-ac14c73c437d 5735947b-48d4-45a9-950a-be99fb60edeb
Associated floating IP 839d3bbf-6ba6-49ea-b0c3-ac14c73c437d
This completes the LB provisioning. Let’s check our configuration data
#Let's check router to make sure NAT rule for VIP is setup
[root@localhost ~(keystone_tenant1)]# ip netns exec qrouter-fbdc95f9-aa97-4203-997b-c0cc09021a95 iptables -S -t nat
-P PREROUTING ACCEPT
-P INPUT ACCEPT
-P OUTPUT ACCEPT
-P POSTROUTING ACCEPT
-N neutron-l3-agent-OUTPUT
-N neutron-l3-agent-POSTROUTING
-N neutron-l3-agent-PREROUTING
-N neutron-l3-agent-float-snat
-N neutron-l3-agent-snat
-N neutron-postrouting-bottom
-A PREROUTING -j neutron-l3-agent-PREROUTING
-A OUTPUT -j neutron-l3-agent-OUTPUT
-A POSTROUTING -j neutron-l3-agent-POSTROUTING
-A POSTROUTING -j neutron-postrouting-bottom
-A neutron-l3-agent-OUTPUT -d 167.254.209.86/32 -j DNAT --to-destination 192.168.11.7
-A neutron-l3-agent-POSTROUTING ! -i qg-fb0745d5-0f ! -o qg-fb0745d5-0f -m conntrack ! --ctstate DNAT -j ACCEPT
-A neutron-l3-agent-PREROUTING -d 169.254.169.254/32 -i qr-+ -p tcp -m tcp --dport 80 -j REDIRECT --to-ports 9697
-A neutron-l3-agent-PREROUTING -d xxx.254.209.86/32 -j DNAT --to-destination 192.168.11.7-A neutron-l3-agent-float-snat -s 192.168.11.7/32 -j SNAT --to-source xxx.254.209.86
-A neutron-l3-agent-snat -j neutron-l3-agent-float-snat
-A neutron-l3-agent-snat -o qg-fb0745d5-0f -j SNAT --to-source xxx.254.209.88
-A neutron-l3-agent-snat -m mark ! --mark 0x2 -m conntrack --ctstate DNAT -j SNAT --to-source xxx.254.209.88
-A neutron-postrouting-bottom -m comment --comment "Perform source NAT on outgoing traffic." -j neutron-l3-agent-snat
[root@localhost ~(keystone_tenant1)]#
#lbaas name space created
[root@localhost ~(keystone_tenant1)]# ip netns
qlbaas-1ae0d964-1ce3-4664-85f3-55271251cd30
qdhcp-8460a127-ee67-474f-bbe2-9f5916097f2d
qdhcp-d3c2f3a3-b2f8-4d9f-824d-cc20dd38fd92
qrouter-fbdc95f9-aa97-4203-997b-c0cc09021a95
[root@localhost ~(keystone_tenant1)]#
[root@localhost ~(keystone_tenant1)]# ip netns exec qlbaas-1ae0d964-1ce3-4664-85f3-55271251cd30 ifconfig
lo: flags=73<UP,LOOPBACK,RUNNING> mtu 65536
inet 127.0.0.1 netmask 255.0.0.0
inet6 ::1 prefixlen 128 scopeid 0x10<host>
loop txqueuelen 0 (Local Loopback)
RX packets 0 bytes 0 (0.0 B)
RX errors 0 dropped 0 overruns 0 frame 0
TX packets 0 bytes 0 (0.0 B)
TX errors 0 dropped 0 overruns 0 carrier 0 collisions 0
tap5735947b-48: flags=4163<UP,BROADCAST,RUNNING,MULTICAST> mtu 1500
inet 192.168.11.7 netmask 255.255.255.0 broadcast 192.168.11.255
inet6 fe80::f816:3eff:fe17:b98e prefixlen 64 scopeid 0x20<link>
ether fa:16:3e:17:b9:8e txqueuelen 0 (Ethernet)
RX packets 46 bytes 3718 (3.6 KiB)
RX errors 0 dropped 0 overruns 0 frame 0
TX packets 61 bytes 5594 (5.4 KiB)
TX errors 0 dropped 0 overruns 0 carrier 0 collisions 0
[root@localhost ~(keystone_tenant1)]# ip netns exec qlbaas-1ae0d964-1ce3-4664-85f3-55271251cd30 ip route
default via 192.168.11.1 dev tap5735947b-48
192.168.11.0/24 dev tap5735947b-48 proto kernel scope link src 192.168.11.7
[root@localhost ~(keystone_tenant1)]#
[root@localhost ~(keystone_tenant1)]# nova floating-ip-list
+--------------------------------------+----------------+--------------------------------------+--------------+--------+
| Id | IP | Server Id | Fixed IP | Pool |
+--------------------------------------+----------------+--------------------------------------+--------------+--------+
| 839d3bbf-6ba6-49ea-b0c3-ac14c73c437d | xxx.254.209.86 | 9865e801-38da-5791-ac1c-c10be03452c8 | 192.168.11.7 | public |
+--------------------------------------+----------------+--------------------------------------+--------------+--------+
[root@localhost ~(keystone_tenant1)]#
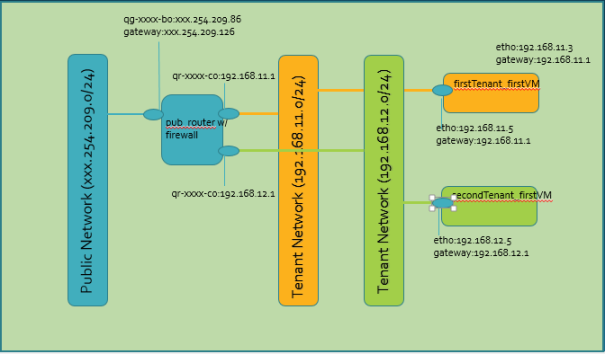
This is our new topology with load balancer configured
Neutron with Load Balancer configuredTraffic flow with LBaas
Another view of traffic flow
Time to test our LB. Open a terminal on local host or remote host. First check you have ping connectivity to floating IP address. If ping is successful run below curl command to test load balancing.
As you can see LB is doing its job, it is doing round robin load balancing to Server-1 & Server-2. Note: As I mentioned earlier our servers are very slow so have some patience while running curl command. Command takes ~1-2 min to complete
[labadmin@localhost ~]$ curl --url http://167.254.209.86
This is Server-1
[labadmin@localhost ~]$ curl --url http://167.254.209.86
This is Server-2
[labadmin@localhost ~]$ curl --url http://167.254.209.86
This is Server-1
[labadmin@localhost ~]$ curl --url http://167.254.209.86
This is Server-2
[labadmin@localhost ~]$
We can even test LB from second tenant VM. This method is useful if you don’t have external connectivity. SSH to second tenant VM, check to make sure it has ping connectivity to VIP address (192.168.11.7). Then run curl commands
[root@localhost ~(keystone_admin)]# ip netns
qlbaas-1ae0d964-1ce3-4664-85f3-55271251cd30
qdhcp-8460a127-ee67-474f-bbe2-9f5916097f2d
qdhcp-d3c2f3a3-b2f8-4d9f-824d-cc20dd38fd92
qrouter-fbdc95f9-aa97-4203-997b-c0cc09021a95
[root@localhost ~(keystone_admin)]# ip netns exec qrouter-fbdc95f9-aa97-4203-997b-c0cc09021a95 ssh -i tenant2_rsa cirros@192.168.12.5
$
$ ifconfig
eth0      Link encap:Ethernet  HWaddr FA:16:3E:EE:07:30
          inet addr:192.168.12.5  Bcast:192.168.12.255  Mask:255.255.255.0
          inet6 addr: fe80::f816:3eff:feee:730/64 Scope:Link
          UP BROADCAST RUNNING MULTICAST  MTU:1400  Metric:1
          RX packets:692 errors:0 dropped:0 overruns:0 frame:0
          TX packets:672 errors:0 dropped:0 overruns:0 carrier:0
          collisions:0 txqueuelen:1000
          RX bytes:60471 (59.0 KiB)  TX bytes:56456 (55.1 KiB)
lo        Link encap:Local Loopback
          inet addr:127.0.0.1  Mask:255.0.0.0
          inet6 addr: ::1/128 Scope:Host
          UP LOOPBACK RUNNING  MTU:16436  Metric:1
          RX packets:0 errors:0 dropped:0 overruns:0 frame:0
          TX packets:0 errors:0 dropped:0 overruns:0 carrier:0
          collisions:0 txqueuelen:0
          RX bytes:0 (0.0 B)  TX bytes:0 (0.0 B)
$ ping 192.168.11.7
PING 192.168.11.7 (192.168.11.7): 56 data bytes
64 bytes from 192.168.11.7: seq=0 ttl=63 time=0.614 ms
64 bytes from 192.168.11.7: seq=1 ttl=63 time=0.561 ms
64 bytes from 192.168.11.7: seq=2 ttl=63 time=0.410 ms
^C
--- 192.168.11.7 ping statistics ---
3 packets transmitted, 3 packets received, 0% packet loss
round-trip min/avg/max = 0.410/0.528/0.614 ms
$ curl --url http://192.168.11.7
This is Server-1
$ curl --url http://192.168.11.7
This is Server-2
$ curl --url http://192.168.11.7
This is Server-1
Health Monitoring function
LBaas provides health monitoring function. Health monitor monitors the health of pool members, this is done either sending ping or HTTP GET. If member doesn’t reply within a set time period member declared dead and removed from LB algorithm. Since my servers are web based, I am using HTTP method. Note: Healthmonitor function didn’t work reliably for me because my web servers are slow so members keep getting timed out and removed from the pool
[root@localhost ~(keystone_tenant1)]# neutron lb-healthmonitor-create --delay 5 --type HTTP --max-retries 3 --timeout 2
Created a new health_monitor:
+----------------+--------------------------------------+
| Field          | Value                                |
+----------------+--------------------------------------+
| admin_state_up | True                                 |
| delay          | 5                                    |
| expected_codes | 200                                  |
| http_method    | GET                                  |
| id             | 97b68a9c-9aa3-4cdf-94e4-92396bd2f268 |
| max_retries    | 3                                    |
| pools          |                                      |
| tenant_id      | ad0e0f45e48045efba0e5d831222c30c     |
| timeout        | 2                                    |
| type           | HTTP                                 |
| url_path       | /                                    |
+----------------+--------------------------------------+
[root@localhost ~(keystone_tenant1)]#
[root@localhost ~(keystone_tenant1)]# neutron lb-healthmonitor-associate 97b68a9c-9aa3-4cdf-94e4-92396bd2f268 lbaas_pool
Associated health monitor 97b68a9c-9aa3-4cdf-94e4-92396bd2f268
[root@localhost ~(keystone_tenant1)]#
[root@localhost ~(keystone_tenant1)]# neutron lb-healthmonitor-show 97b68a9c-9aa3-4cdf-94e4-92396bd2f268
+----------------+-----------------------------------------------------------------------------------------------------+
| Field          | Value                                                                                               |
+----------------+-----------------------------------------------------------------------------------------------------+
| admin_state_up | True                                                                                                |
| delay          | 5                                                                                                   |
| expected_codes | 200                                                                                                 |
| http_method    | GET                                                                                                 |
| id             | 97b68a9c-9aa3-4cdf-94e4-92396bd2f268                                                                |
| max_retries    | 3                                                                                                   |
| pools          | {"status": "ACTIVE", "status_description": null, "pool_id": "1ae0d964-1ce3-4664-85f3-55271251cd30"} |
| tenant_id      | ad0e0f45e48045efba0e5d831222c30c                                                                    |
| timeout        | 2                                                                                                   |
| type           | HTTP                                                                                                |
| url_path       | /                                                                                                   |
+----------------+-----------------------------------------------------------------------------------------------------+
[root@localhost ~(keystone_tenant1)]#
[root@localhost ~(keystone_tenant1)]# neutron lb-healthmonitor-list
+--------------------------------------+------+----------------+
| id                                   | type | admin_state_up |
+--------------------------------------+------+----------------+
| 97b68a9c-9aa3-4cdf-94e4-92396bd2f268 | HTTP | True           |
+--------------------------------------+------+----------------+
[root@localhost ~(keystone_tenant1)]# neutron lb-healthmonitor-disassociate 97b68a9c-9aa3-4cdf-94e4-92396bd2f268 lbaas_pool
Disassociated health monitor 97b68a9c-9aa3-4cdf-94e4-92396bd2f268
[root@localhost ~(keystone_tenant1)]#
[root@localhost ~(keystone_admin)]# neutron help lb-healthmonitor-create
usage: neutron lb-healthmonitor-create [-h] [-f {shell,table,value}]
                                       [-c COLUMN] [--max-width <integer>]
                                       [--prefix PREFIX]
                                       [--request-format {json,xml}]
                                       [--tenant-id TENANT_ID]
                                       [--admin-state-down]
                                       [--expected-codes EXPECTED_CODES]
                                       [--http-method HTTP_METHOD]
                                       [--url-path URL_PATH] --delay DELAY
                                       --max-retries MAX_RETRIES --timeout
                                       TIMEOUT --type {PING,TCP,HTTP,HTTPS}

Create a health monitor.
optional arguments:
  -h, --help            show this help message and exit
  --request-format {json,xml}
                        The XML or JSON request format.
  --tenant-id TENANT_ID
                        The owner tenant ID.
  --admin-state-down    Set admin state up to false.
  --expected-codes EXPECTED_CODES
                        The list of HTTP status codes expected in response
                        from the member to declare it healthy. This attribute
                        can contain one value, or a list of values separated
                        by comma, or a range of values (e.g. "200-299"). If
                        this attribute is not specified, it defaults to "200".
  --http-method HTTP_METHOD
                        The HTTP method used for requests by the monitor of
                        type HTTP.
  --url-path URL_PATH   The HTTP path used in the HTTP request used by the
                        monitor to test a member health. This must be a string
                        beginning with a / (forward slash).
  --delay DELAY         The time in seconds between sending probes to members.
  --max-retries MAX_RETRIES
                        Number of permissible connection failures before
                        changing the member status to INACTIVE. [1..10]
  --timeout TIMEOUT     Maximum number of seconds for a monitor to wait for a
                        connection to be established before it times out. The
                        value must be less than the delay value.
  --type {PING,TCP,HTTP,HTTPS}
                        One of the predefined health monitor types.
output formatters:
  output formatter options
  -f {shell,table,value}, --format {shell,table,value}
                        the output format, defaults to table
  -c COLUMN, --column COLUMN
                        specify the column(s) to include, can be repeated
table formatter:
  --max-width <integer>
                        Maximum display width, 0 to disable
shell formatter:
  a format a UNIX shell can parse (variable="value")
  --prefix PREFIX       add a prefix to all variable names
[root@localhost ~(keystone_admin)]#
The goal of this lab is to deep dive into Openstack floating IP address. The purpose of floating IP address is to provide external connectivity to an instance. For external I mean outside of machine connectivity, physical network connectivity. Why it’s called floating IP, because these IPs are not mapped to any virtual or physical interfaces. Floating IP addresses can be used on demand and if not required released to the pool. Floating IP is used by neutron router to perform NAT function for an instance. Neutron supports two types of NAT
N:1 NAT without floating IP address. In this case router external interface IP address is used for NAT function. Neutron uses PAT for traffic mapping to individual VMs. This link provide information on various NAT types
1:1 NAT with floating IP address. In this case each VM assigned a public IP using floating IP address
Below actions required on user part to associate floating IP to an instance
Create a pool of floating IP addresses
Get a floating IP address from the pool
Assign floating IP address to an instance
This is a picture of 1:1 NAT operation on neutron router using floating IP
Neutron router with 1:1 NAT function using floating IP
Now lets try this in the lab. I have Openstack in a machine. A physical interface (enp1s0) mapped to br-ex bridge. enp1s0 connected to public network. Floating IP pool created with public IP address.
#Here a pool of public IP xxx.254.209.86 to xxx.254.209.88 created. IP addresses
#from this pool will be allocated to floating IP and router interface facing
#public network
[root@localhost ~(keystone_admin)]#neutron subnet-create --disable-dhcp public xxx.254.209.0/24 \
--name public_subnet --allocation-pool start=xxx.254.209.86,end=xxx.254.209.88
[root@localhost ~(keystone_admin)]# neutron subnet-list
+--------------------------------------+---------------------+------------------+------------------------------------------------------+
| id                                   | name                | cidr             | allocation_pools                                     |
+--------------------------------------+---------------------+------------------+------------------------------------------------------+
| b7b1dcc6-0322-4fa5-b7aa-bb36c92b192d | public_subnet       | xxx.254.209.0/24 | {"start": "xxx.254.209.86", "end": "xxx.254.209.88"} |

[root@localhost ~(keystone_admin)]# neutron subnet-show b7b1dcc6-0322-4fa5-b7aa-bb36c92b192d
+-------------------+------------------------------------------------------+
| Field             | Value                                                |
+-------------------+------------------------------------------------------+
| allocation_pools  | {"start": "xxx.254.209.86", "end": "xxx.254.209.88"} |
| cidr              | xxx.254.209.0/24                                     |
| dns_nameservers   |                                                      |
| enable_dhcp       | False                                                |
| gateway_ip        | xxx.254.209.126                                      |
| host_routes       |                                                      |
| id                | b7b1dcc6-0322-4fa5-b7aa-bb36c92b192d                 |
| ip_version        | 4                                                    |
| ipv6_address_mode |                                                      |
| ipv6_ra_mode      |                                                      |
| name              | public_subnet                                        |
| network_id        | 4fc7ff44-38f5-4895-856e-fad5b81f53b2                 |
| subnetpool_id     |                                                      |
| tenant_id         | e5b04b788a814a489a366eb91970512c                     |
+-------------------+------------------------------------------------------+
[root@localhost ~(keystone_admin)]#
The instance name is firstTenant_firstVM. Lets create a floating IP address, this action will get a free IP address from the public sub-net pool we created earlier
#instance source address 192.168.11.5, it part of network 192.168.11.0/24
[root@localhost ~(keystone_tenant1)]# nova list
+--------------------------------------+---------------------+--------+------------+-------------+------------------------------+
| ID                                   | Name                | Status | Task State | Power State | Networks                     |
+--------------------------------------+---------------------+--------+------------+-------------+------------------------------+
| 363df149-a248-4c67-b3c5-2da0af96ccbe | firstTenant_firstVM | ACTIVE | -          | Running     | firstTenant_net=192.168.11.5 |
+--------------------------------------+---------------------+--------+------------+-------------+------------------------------+

#create floating IP address.
[root@localhost ~(keystone_tenant1)]# nova floating-ip-list
+----+----+-----------+----------+------+
| Id | IP | Server Id | Fixed IP | Pool |
+----+----+-----------+----------+------+
+----+----+-----------+----------+------+

#As you can see IP address xxx.254.209.87 allocated as floating IP address
[root@localhost ~(keystone_tenant1)]# nova floating-ip-create public
+--------------------------------------+----------------+-----------+----------+--------+
| Id                                   | IP             | Server Id | Fixed IP | Pool   |
+--------------------------------------+----------------+-----------+----------+--------+
| 704c207d-dc2a-47ae-8c3f-a5c1a1f58ed0 | xxx.254.209.87 | -         | -        | public |
+--------------------------------------+----------------+-----------+----------+--------+
[root@localhost ~(keystone_tenant1)]#
[root@localhost ~(keystone_tenant1)]# nova floating-ip-list
+--------------------------------------+----------------+-----------+----------+--------+
| Id                                   | IP             | Server Id | Fixed IP | Pool   |
+--------------------------------------+----------------+-----------+----------+--------+
| 704c207d-dc2a-47ae-8c3f-a5c1a1f58ed0 | xxx.254.209.87 | -         | -        | public |
+--------------------------------------+----------------+-----------+----------+--------+
[root@localhost ~(keystone_tenant1)]#
Next step is to assign this floating IP to our Tenant VM. This action will create NAT rules in neutron router iptables to translate VM internal IP address to floating IP address and vice versa.
#iptables before floating IP associated with instance
[root@localhost ~(keystone_tenant1)]# ip netns exec qrouter-fbdc95f9-aa97-4203-997b-c0cc09021a95 iptables -S -t nat
-P PREROUTING ACCEPT
-P INPUT ACCEPT
-P OUTPUT ACCEPT
-P POSTROUTING ACCEPT
-N neutron-l3-agent-OUTPUT
-N neutron-l3-agent-POSTROUTING
-N neutron-l3-agent-PREROUTING
-N neutron-l3-agent-float-snat
-N neutron-l3-agent-snat
-N neutron-postrouting-bottom
-A PREROUTING -j neutron-l3-agent-PREROUTING
-A OUTPUT -j neutron-l3-agent-OUTPUT
-A POSTROUTING -j neutron-l3-agent-POSTROUTING
-A POSTROUTING -j neutron-postrouting-bottom
-A neutron-l3-agent-POSTROUTING ! -i qg-4d2c2605-5d ! -o qg-4d2c2605-5d -m conntrack ! --ctstate DNAT -j ACCEPT
-A neutron-l3-agent-PREROUTING -d 169.254.169.254/32 -i qr-+ -p tcp -m tcp --dport 80 -j REDIRECT --to-ports 9697
-A neutron-l3-agent-snat -j neutron-l3-agent-float-snat
-A neutron-l3-agent-snat -o qg-4d2c2605-5d -j SNAT --to-source xxx.254.209.86
-A neutron-l3-agent-snat -m mark ! --mark 0x2 -m conntrack --ctstate DNAT -j SNAT --to-source xxx.254.209.86
-A neutron-postrouting-bottom -m comment --comment "Perform source NAT on outgoing traffic." -j neutron-l3-agent-snat
[root@localhost ~(keystone_tenant1)]#
#Associate floating IP address to VM. As you can see instance show part of two
#networks 192.168.11.5 & xxx.254.209.87
[root@localhost ~(keystone_tenant1)]# nova add-floating-ip firstTenant_firstVM xxx.254.209.87
[root@localhost ~(keystone_tenant1)]# nova list
+--------------------------------------+---------------------+--------+------------+-------------+----------------------------------------------+
| ID | Name | Status | Task State | Power State | Networks |
+--------------------------------------+---------------------+--------+------------+-------------+----------------------------------------------+
| 363df149-a248-4c67-b3c5-2da0af96ccbe | firstTenant_firstVM | ACTIVE | - | Running | firstTenant_net=192.168.11.5, 167.254.209.87 |
+--------------------------------------+---------------------+--------+------------+-------------+----------------------------------------------+
#iptables after floating IP associated to VM, as you can see SNAT & DNAT rules added
#into iptables
[root@localhost ~(keystone_tenant1)]#
ip netns exec qrouter-fbdc95f9-aa97-4203-997b-c0cc09021a95 iptables -S -t nat
-P PREROUTING ACCEPT -P INPUT ACCEPT -P OUTPUT ACCEPT -P POSTROUTING ACCEPT
-N neutron-l3-agent-OUTPUT -N neutron-l3-agent-POSTROUTING
-N neutron-l3-agent-PREROUTING -N neutron-l3-agent-float-snat
-N neutron-l3-agent-snat -N neutron-postrouting-bottom
-A PREROUTING -j neutron-l3-agent-PREROUTING -A OUTPUT
-j neutron-l3-agent-OUTPUT -A POSTROUTING -j neutron-l3-agent-POSTROUTING
-A POSTROUTING -j neutron-postrouting-bottom
-A neutron-l3-agent-OUTPUT -d xxx.254.209.87/32 -j DNAT --to-destination 192.168.11.5
-A neutron-l3-agent-POSTROUTING ! -i qg-4d2c2605-5d ! -o qg-4d2c2605-5d -m conntrack ! --ctstate DNAT -j ACCEPT
-A neutron-l3-agent-PREROUTING -d 169.254.169.254/32 -i qr-+ -p tcp -m tcp --dport 80 -j REDIRECT --to-ports 9697
-A neutron-l3-agent-PREROUTING -d xxx.254.209.87/32 -j DNAT --to-destination 192.168.11.5-A neutron-l3-agent-float-snat -s 192.168.11.5/32 -j SNAT --to-source xxx.254.209.87
-A neutron-l3-agent-snat -j neutron-l3-agent-float-snat
-A neutron-l3-agent-snat -o qg-4d2c2605-5d -j SNAT --to-source xxx.254.209.86
-A neutron-l3-agent-snat -m mark ! --mark 0x2 -m conntrack --ctstate DNAT -j SNAT --to-source 167.254.209.86
-A neutron-postrouting-bottom -m comment --comment "Perform source NAT on outgoing traffic." -j neutron-l3-agent-snat
[root@localhost ~(keystone_tenant1)]# nova floating-ip-list
+--------------------------------------+----------------+--------------------------------------+--------------+--------+
| Id | IP | Server Id | Fixed IP | Pool |
+--------------------------------------+----------------+--------------------------------------+--------------+--------+
| 3f128a57-65d7-4677-ad9b-ef9a2ed8df4c | xxx.254.209.87 | 363df149-a248-4c67-b3c5-2da0af96ccbe | 192.168.11.5 | public |
+--------------------------------------+----------------+--------------------------------------+--------------+--------+
[root@localhost ~(keystone_tenant1)]#
Let’s try ping from VM to outside machine and see if ping is successful
#login to Tenant instance using router namespace
[root@localhost ~(keystone_tenant1)]# ip netns exec qrouter-fbdc95f9-aa97-4203-997b-c0cc09021a95 ssh -i tenant1_rsa cirros@192.168.11.5
$
$
$ route
Kernel IP routing table
Destination     Gateway         Genmask         Flags Metric Ref    Use Iface
default         192.168.11.1    0.0.0.0         UG    0      0        0 eth0
192.168.11.0    *               255.255.255.0   U     0      0        0 eth0

#ping to external network gateway, as seen ping is successful
$ ping xxx.254.209.126
PING xxx.254.209.126 (xxx.254.209.126): 56 data bytes
64 bytes from xxx.254.209.126: seq=0 ttl=254 time=12.211 ms
64 bytes from xxx.254.209.126: seq=1 ttl=254 time=13.454 ms
64 bytes from xxx.254.209.126: seq=2 ttl=254 time=11.197 ms
^C
--- xxx.254.209.126 ping statistics ---
3 packets transmitted, 3 packets received, 0% packet loss
round-trip min/avg/max = 11.197/12.287/13.454 ms
$
release floating IP from VM
[root@localhost ~(keystone_tenant1)]# nova remove-floating-ip firstTenant_firstVM xxx.254.209.87
[root@localhost ~(keystone_tenant1)]# nova list
+--------------------------------------+---------------------+--------+------------+-------------+------------------------------+
| ID                                   | Name                | Status | Task State | Power State | Networks                     |
+--------------------------------------+---------------------+--------+------------+-------------+------------------------------+
| 363df149-a248-4c67-b3c5-2da0af96ccbe | firstTenant_firstVM | ACTIVE | -          | Running     | firstTenant_net=192.168.11.5 |
+--------------------------------------+---------------------+--------+------------+-------------+------------------------------+
[root@localhost ~(keystone_tenant1)]# nova floating-ip-list
+--------------------------------------+----------------+-----------+----------+--------+
| Id                                   | IP             | Server Id | Fixed IP | Pool   |
+--------------------------------------+----------------+-----------+----------+--------+
| 3f128a57-65d7-4677-ad9b-ef9a2ed8df4c | xxx.254.209.87 | -         | -        | public |
+--------------------------------------+----------------+-----------+----------+--------+
[root@localhost ~(keystone_tenant1)]#
[root@localhost ~(keystone_tenant1)]# ip netns
qdhcp-8460a127-ee67-474f-bbe2-9f5916097f2d
qdhcp-d3c2f3a3-b2f8-4d9f-824d-cc20dd38fd92
qrouter-fbdc95f9-aa97-4203-997b-c0cc09021a95
[root@localhost ~(keystone_tenant1)]# ip netns exec qrouter-fbdc95f9-aa97-4203-997b-c0cc09021a95 iptables -S -t nat
-P PREROUTING ACCEPT
-P INPUT ACCEPT
-P OUTPUT ACCEPT
-P POSTROUTING ACCEPT
-N neutron-l3-agent-OUTPUT
-N neutron-l3-agent-POSTROUTING
-N neutron-l3-agent-PREROUTING
-N neutron-l3-agent-float-snat
-N neutron-l3-agent-snat
-N neutron-postrouting-bottom
-A PREROUTING -j neutron-l3-agent-PREROUTING
-A OUTPUT -j neutron-l3-agent-OUTPUT
-A POSTROUTING -j neutron-l3-agent-POSTROUTING
-A POSTROUTING -j neutron-postrouting-bottom
-A neutron-l3-agent-POSTROUTING ! -i qg-4d2c2605-5d ! -o qg-4d2c2605-5d -m conntrack ! --ctstate DNAT -j ACCEPT
-A neutron-l3-agent-PREROUTING -d 169.254.169.254/32 -i qr-+ -p tcp -m tcp --dport 80 -j REDIRECT --to-ports 9697
-A neutron-l3-agent-snat -j neutron-l3-agent-float-snat
-A neutron-l3-agent-snat -o qg-4d2c2605-5d -j SNAT --to-source xxx.254.209.86
-A neutron-l3-agent-snat -m mark ! --mark 0x2 -m conntrack --ctstate DNAT -j SNAT --to-source xxx.254.209.86
-A neutron-postrouting-bottom -m comment --comment "Perform source NAT on outgoing traffic." -j neutron-l3-agent-snat
[root@localhost ~(keystone_tenant1)]#
N:1 NAT
Neutron router creates N:1 NAT rules after external gateway created on it . In this case no floating IP is required for VM to communicate with external network. Router uses its external interface to SNAT outgoing traffic. For incoming traffic router maintains VM IP,port# tuple to forward traffic to right VM.
So the question is why we need floating IP, why not use N:1 NAT. The reason is with N:1 NAT external host doesn’t have visibility to VM, say an external host wants to talk to a VM it can use router external interface IP as destination but if VM has not spoken yet there will be no VM IP, port# tuple and without it, its impossible for router to forward traffic to right VM.
In this lab I will demonstrate how to create neutron firewall. Neutron realized firewall by adding firewall rules into Openstack router iptables. We will examine router iptables before and after firewall has been created.
For this lab I am creating two tenants connected to same public router. Tenants are in different sub-nets. I will use ping operation between tenants to test firewall. I am not using external network so floating IP is not applied in this lab
Pre-condition:
Machine with RHEL 7 installed. User subscribed to RedHat
Subscribe to Redhat for Enterprise Linux and also for Openstack 7.0
Openstack creates default networks for you, I prefer to delete them before creating my own networks & router. The easier way to do this is thru Openstack Horizon gui.
On your browser point to ‘http://<controller ip>/dashboard’ username:admin. for password cat the file keystone_admin and use OS_PASSWORD as password. Under ‘Routers’ & ‘Networks’ delete everything
Create public network, tenants and users in admin domain
#source admin resource file
> . /root/keystonerc_admin

#create a new flavor
>nova flavor-create m2.nano auto 128 1 1

#create public network
>neutron net-create public --router:external=True

#create public subnet
>neutron subnet-create --disable-dhcp public xxx.254.209.0/24 \
--name public_subnet --allocation-pool start=xxx.254.209.86,end=xxx.254.209.88 \
--gateway xxx.254.209.126
#create router & set gateway to router
>neutron router-create pub_router
>neutron router-gateway-set pub_router public
#add tenant to router interface
>neutron router-interface-add pub_router secondTenant_subnet
#create SSH keypair for tenant2 and add it to nova
>ssh-keygen -f tenant2_rsa -t rsa -b 2048 -N ''
>nova keypair-add --pub-key tenant2_rsa.pub secondTenant
#Make sure we allow ICMP and SSH traffic to instances
>neutron security-group-create secondTenantSec
>neutron security-group-rule-create --protocol icmp secondTenantSec
>neutron security-group-rule-create --protocol tcp \
  --port-range-min 22 --port-range-max 22 secondTenantSec
check configuration to make sure networks are created
This is our final topology with tenant VMs and IP addresses
Check if our firewall is working
[root@localhost ~(keystone_admin)]# ip netns
qdhcp-8460a127-ee67-474f-bbe2-9f5916097f2d
qdhcp-d3c2f3a3-b2f8-4d9f-824d-cc20dd38fd92
qrouter-fbdc95f9-aa97-4203-997b-c0cc09021a95

#firewall in openstack router is realized using iptables. as you can see from below
#log rule has been added in router to drop ICMP packets
[root@localhost ~(keystone_admin)]# ip netns exec qrouter-fbdc95f9-aa97-4203-997b-c0cc09021a95 iptables -S
-P INPUT ACCEPT
-P FORWARD ACCEPT
-P OUTPUT ACCEPT
-N neutron-filter-top
-N neutron-l3-agent-FORWARD
-N neutron-l3-agent-INPUT
-N neutron-l3-agent-OUTPUT
-N neutron-l3-agent-fwaas-defau
-N neutron-l3-agent-iv46c13e919
-N neutron-l3-agent-local
-N neutron-l3-agent-ov46c13e919
-A INPUT -j neutron-l3-agent-INPUT
-A FORWARD -j neutron-filter-top
-A FORWARD -j neutron-l3-agent-FORWARD
-A OUTPUT -j neutron-filter-top
-A OUTPUT -j neutron-l3-agent-OUTPUT
-A neutron-filter-top -j neutron-l3-agent-local
-A neutron-l3-agent-FORWARD -o qr-+ -j neutron-l3-agent-iv46c13e919
-A neutron-l3-agent-FORWARD -i qr-+ -j neutron-l3-agent-ov46c13e919
-A neutron-l3-agent-FORWARD -o qr-+ -j neutron-l3-agent-fwaas-defau
-A neutron-l3-agent-FORWARD -i qr-+ -j neutron-l3-agent-fwaas-defau
-A neutron-l3-agent-INPUT -m mark --mark 0x1 -j ACCEPT
-A neutron-l3-agent-INPUT -p tcp -m tcp --dport 9697 -j DROP
-A neutron-l3-agent-fwaas-defau -j DROP
-A neutron-l3-agent-iv46c13e919 -m state --state INVALID -j DROP
-A neutron-l3-agent-iv46c13e919 -m state --state RELATED,ESTABLISHED -j ACCEPT
-A neutron-l3-agent-iv46c13e919 -p icmp -j DROP
-A neutron-l3-agent-ov46c13e919 -m state --state INVALID -j DROP
-A neutron-l3-agent-ov46c13e919 -m state --state RELATED,ESTABLISHED -j ACCEPT
-A neutron-l3-agent-ov46c13e919 -p icmp -j DROP

#login to first tenant VM and ping to second tenant VM, ping failed due to firewall
#rule
[root@localhost ~(keystone_admin)]# ip netns exec qrouter-fbdc95f9-aa97-4203-997b-c0cc09021a95 ssh -i tenant1_rsa cirros@192.168.11.5
$
$
$ ping 192.168.12.5
PING 192.168.12.5 (192.168.12.5): 56 data bytes
^C
--- 192.168.12.5 ping statistics ---
8 packets transmitted, 0 packets received, 100% packet loss

#ping to router interface for second tenant VM is ok
$ ping 192.168.12.1
PING 192.168.12.1 (192.168.12.1): 56 data bytes
64 bytes from 192.168.12.1: seq=0 ttl=64 time=0.206 ms
64 bytes from 192.168.12.1: seq=1 ttl=64 time=0.169 ms
^C
--- 192.168.12.1 ping statistics ---
2 packets transmitted, 2 packets received, 0% packet loss
round-trip min/avg/max = 0.169/0.187/0.206 ms

#ping to router interface for first tenant VM is ok
$ ping 192.168.11.1
PING 192.168.11.1 (192.168.11.1): 56 data bytes
64 bytes from 192.168.11.1: seq=0 ttl=64 time=0.169 ms
64 bytes from 192.168.11.1: seq=1 ttl=64 time=0.190 ms
64 bytes from 192.168.11.1: seq=2 ttl=64 time=0.278 ms
^C
--- 192.168.11.1 ping statistics ---
3 packets transmitted, 3 packets received, 0% packet loss
round-trip min/avg/max = 0.169/0.212/0.278 ms
$
Delete firewall rule and check ping connectivity again
[root@localhost ~(keystone_admin)]# neutron firewall-list
+--------------------------------------+------+--------------------------------------+
| id                                   | name | firewall_policy_id                   |
+--------------------------------------+------+--------------------------------------+
| 6c13e919-0244-42f0-aa10-ed46c9ad371f |      | 5e496550-a4f6-4196-a553-569d04a5d2ca |
+--------------------------------------+------+--------------------------------------+
[root@localhost ~(keystone_admin)]#
[root@localhost ~(keystone_admin)]#
[root@localhost ~(keystone_admin)]# neutron firewall-delete 6c13e919-0244-42f0-aa10-ed46c9ad371f
Deleted firewall: 6c13e919-0244-42f0-aa10-ed46c9ad371f
[root@localhost ~(keystone_admin)]# neutron firewall-list

[root@localhost ~(keystone_admin)]# ip netns
qdhcp-8460a127-ee67-474f-bbe2-9f5916097f2d
qdhcp-d3c2f3a3-b2f8-4d9f-824d-cc20dd38fd92
qrouter-fbdc95f9-aa97-4203-997b-c0cc09021a95

#ICMP rule from iptables are deleted
[root@localhost ~(keystone_admin)]# ip netns exec qrouter-fbdc95f9-aa97-4203-997b-c0cc09021a95 iptables -S
-P INPUT ACCEPT
-P FORWARD ACCEPT
-P OUTPUT ACCEPT
-N neutron-filter-top
-N neutron-l3-agent-FORWARD
-N neutron-l3-agent-INPUT
-N neutron-l3-agent-OUTPUT
-N neutron-l3-agent-local
-A INPUT -j neutron-l3-agent-INPUT
-A FORWARD -j neutron-filter-top
-A FORWARD -j neutron-l3-agent-FORWARD
-A OUTPUT -j neutron-filter-top
-A OUTPUT -j neutron-l3-agent-OUTPUT
-A neutron-filter-top -j neutron-l3-agent-local
-A neutron-l3-agent-INPUT -m mark --mark 0x1 -j ACCEPT
-A neutron-l3-agent-INPUT -p tcp -m tcp --dport 9697 -j DROP
[root@localhost ~(keystone_admin)]#

#ping from firt tenant VM to second tenant VM is successfully passed
$ ping 192.168.12.5
PING 192.168.12.5 (192.168.12.5): 56 data bytes
64 bytes from 192.168.12.5: seq=0 ttl=63 time=0.801 ms
64 bytes from 192.168.12.5: seq=1 ttl=63 time=0.403 ms
64 bytes from 192.168.12.5: seq=2 ttl=63 time=0.401 ms
64 bytes from 192.168.12.5: seq=3 ttl=63 time=0.284 ms
64 bytes from 192.168.12.5: seq=4 ttl=63 time=0.321 ms
^C
--- 192.168.12.5 ping statistics ---
5 packets transmitted, 5 packets received, 0% packet loss
round-trip min/avg/max = 0.284/0.442/0.801 ms
$
Openstack lab running & controller IP address is xxx.254.209.85. I am using Lab for this
Procedure:
First we need to take care of authentication token and tenant-id . Look for ‘token’ and associated ‘id’, ‘tenant’ and associated ‘id’ field in below curl command response. Set OS_USERNAME and OS_PASSWORD environment variables. Note: Token comes with expiry time of 1 hr you need to run this command again after 1 hr to get new token
In this lab I will demonstrate how to deploy Openstack using packstack as allinone option. All in one mean using one machine to deploy all Openstack components (compute,network node & controller). Below is the picture when Openstack deployed in one machine
All in one Openstack
pre-condition:
Machine with RHEL 7 installed
[root@localhost ~(keystone_test)]# cat /etc/*-release
NAME="Red Hat Enterprise Linux Server"
VERSION="7.2 (Maipo)"
ID="rhel"
ID_LIKE="fedora"
VERSION_ID="7.2"
PRETTY_NAME="Red Hat Enterprise Linux"
My machine RAM (snapshot taken after starting Openstack)
Set selinux to permissive mode. Edit config file (/etc/selinux/config)
SELINUX=permissive
Reboot machine
>reboot
Install the packStack.
>sudo yum install -y openstack-packstack
Run pacstack as allinone. This will take around 10-15 mins, after successful run you will see “Installation completed successfully” message.
Packstack will create an answer file in your local directory so next time when you run packstack you can specify answer file instead of typing options on command line (packstack –allinone –answer-file <answer file name>)
**** Installation completed successfully ******
Additional information:
 * A new answerfile was created in: /root/packstack-answers-20160328-123852.txt
 * Time synchronization installation was skipped. Please note that unsynchronized time on server instances might be problem for some OpenStack components.
 * File /root/keystonerc_admin has been created on OpenStack client host xxx.254.209.85. To use the command line tools you need to source the file.
 * To access the OpenStack Dashboard browse to http://xxx.254.209.85/dashboard .
Please, find your login credentials stored in the keystonerc_admin in your home directory.
 * The installation log file is available at: /var/tmp/packstack/20160328-123851-o7e3NS/openstack-setup.log
 * The generated manifests are available at: /var/tmp/packstack/20160328-123851-o7e3NS/manifests
Openstack creates three OVS bridges
br-ex: bridge connected to external public interface and openstack router
br-int: integration bridge tenants will be connected to this bridge. it will also be connected to br-tun
br-tun:tunnel bridge we are not using this bridge it is used for tunneling between tenants in different machines. since in our setup all tenants are in same machine this bridge is not needed
[root@localhost ~]# ip add
1: lo: <LOOPBACK,UP,LOWER_UP> mtu 65536 qdisc noqueue state UNKNOWN
    link/loopback 00:00:00:00:00:00 brd 00:00:00:00:00:00
    inet 127.0.0.1/8 scope host lo
       valid_lft forever preferred_lft forever
    inet6 ::1/128 scope host
       valid_lft forever preferred_lft forever
4: enp1s0: <BROADCAST,MULTICAST,UP,LOWER_UP> mtu 1500 qdisc mq state UP qlen 1000
    link/ether 2c:27:d7:1c:88:a8 brd ff:ff:ff:ff:ff:ff
    inet xxx.254.209.85/16 brd 167.254.255.255 scope global enp1s0
       valid_lft forever preferred_lft forever
    inet6 fe80::2e27:d7ff:fe1c:88a8/64 scope link
       valid_lft forever preferred_lft forever
5: ovs-system: <BROADCAST,MULTICAST> mtu 1500 qdisc noop state DOWN
    link/ether be:16:1c:25:91:40 brd ff:ff:ff:ff:ff:ff
6: br-tun: <BROADCAST,MULTICAST> mtu 1500 qdisc noop state DOWN
    link/ether c2:b8:31:d6:54:49 brd ff:ff:ff:ff:ff:ff
12: br-int: <BROADCAST,MULTICAST> mtu 1500 qdisc noop state DOWN
    link/ether d2:e4:ec:56:2f:44 brd ff:ff:ff:ff:ff:ff
15: br-ex: <BROADCAST,MULTICAST,UP,LOWER_UP> mtu 1500 qdisc noqueue state UNKNOWN
    link/ether 00:0a:cd:2a:14:08 brd ff:ff:ff:ff:ff:ff
    inet 172.24.4.225/28 scope global br-ex
       valid_lft forever preferred_lft forever
    inet6 fe80::20a:cdff:fe2a:1408/64 scope link
       valid_lft forever preferred_lft forever
[root@localhost ~]# systemctl enable network
I am using physical interface ‘enps10’ for tenant external network. This port will be connected to external bridge (br-ex). We need to make changes in network config files to achieve this, these files are located at /etc/systemconfig/network-scripts. Note:I am hiding first octet of public IP address for security reason
Restart network manager after making the changes (sudo /etc/init.d/network restart)
IP address after changing network config files, you see IP address is now under bridge br-ex. No IP on physical interface enp1s0
[root@localhost network-scripts]# ip addr
1: lo: <LOOPBACK,UP,LOWER_UP> mtu 65536 qdisc noqueue state UNKNOWN
    link/loopback 00:00:00:00:00:00 brd 00:00:00:00:00:00
    inet 127.0.0.1/8 scope host lo
       valid_lft forever preferred_lft forever
    inet6 ::1/128 scope host
       valid_lft forever preferred_lft forever
4: enp1s0: <BROADCAST,MULTICAST,UP,LOWER_UP> mtu 1500 qdisc mq master ovs-system state UP qlen 1000
    link/ether 78:ac:c0:a5:65:11 brd ff:ff:ff:ff:ff:ff
    inet6 fe80::7aac:c0ff:fea5:6511/64 scope link
       valid_lft forever preferred_lft forever
5: ovs-system: <BROADCAST,MULTICAST> mtu 1500 qdisc noop state DOWN
    link/ether 32:3c:45:a8:5c:55 brd ff:ff:ff:ff:ff:ff
7: br-int: <BROADCAST,MULTICAST> mtu 1500 qdisc noop state DOWN
    link/ether ca:31:61:70:2e:4b brd ff:ff:ff:ff:ff:ff
8: br-tun: <BROADCAST,MULTICAST> mtu 1500 qdisc noop state DOWN
    link/ether ca:11:74:2d:ea:40 brd ff:ff:ff:ff:ff:ff
69: br-ex: <BROADCAST,MULTICAST,UP,LOWER_UP> mtu 1500 qdisc noqueue state UNKNOWN
    link/ether 78:ac:c0:a5:65:11 brd ff:ff:ff:ff:ff:ff
    inet xxx.254.209.85/24 brd xxx.254.209.255 scope global br-ex
       valid_lft forever preferred_lft forever
    inet6 fe80::383b:d5ff:fe88:e443/64 scope link
       valid_lft forever preferred_lft forever
[root@localhost network-scripts]#

## Physical interface enp1s0 became bridge br-ex interface
[root@localhost network-scripts]# ovs-vsctl show
  Bridge br-ex
        Port "enp1s0"
            Interface "enp1s0"
        Port br-ex
            Interface br-ex
                type: internal
    ovs_version: "2.4.0
Check Openstack status everything looks good here. All required services are active
[root@localhost network-scripts]# openstack-status
== Nova services ==
openstack-nova-api:                     active
openstack-nova-cert:                    active
openstack-nova-compute:                 active
openstack-nova-network:                 inactive  (disabled on boot)
openstack-nova-scheduler:               active
openstack-nova-conductor:               active
== Glance services ==
openstack-glance-api:                   active
openstack-glance-registry:              active
== Keystone service ==
openstack-keystone:                     inactive  (disabled on boot)
== Horizon service ==
openstack-dashboard:                    active
== neutron services ==
neutron-server:                         active
neutron-dhcp-agent:                     active
neutron-l3-agent:                       active
neutron-metadata-agent:                 active
neutron-openvswitch-agent:              active
== Swift services ==
openstack-swift-proxy:                  active
openstack-swift-account:                active
openstack-swift-container:              active
openstack-swift-object:                 active
== Cinder services ==
openstack-cinder-api:                   active
openstack-cinder-scheduler:             active
openstack-cinder-volume:                active
openstack-cinder-backup:                active
== Support services ==
mysqld:                                 inactive  (disabled on boot)
openvswitch:                            active
dbus:                                   active
target:                                 active
rabbitmq-server:                        active
memcached:                              active
== Keystone users ==
Warning keystonerc not sourced
Packstack creates admin user credentials in /root. Source admin credentials
>. /root/keystonerc_admin
[root@localhost network-scripts(keystone_admin)]# nova image-list
+--------------------------------------+--------+--------+--------+
| ID | Name | Status | Server |
+--------------------------------------+--------+--------+--------+
| cb9fbbf7-5f85-46fc-8d1a-4fa77822ced8 | cirros | ACTIVE | |
+--------------------------------------+--------+--------+--------+
Openstack by default creates 5 flavors we will create a new one with less resources
Create external network. This network will be used by openstack router to communicate with public network. Note: only admin user has permission to create external network
>neutron net-create public –router:external=True
[root@localhost network-scripts(keystone_admin)]# neutron net-create public \
--router:external=True
Created a new network:
+---------------------------+--------------------------------------+
| Field                     | Value                                |
+---------------------------+--------------------------------------+
| admin_state_up            | True                                 |
| id                        | b480ec2d-47ca-4459-bc6f-b28e7b7650f5 |
| mtu                       | 0                                    |
| name                      | public                               |
| provider:network_type     | vxlan                                |
| provider:physical_network |                                      |
| provider:segmentation_id  | 77                                   |
| router:external           | True                                 |
| shared                    | False                                |
| status                    | ACTIVE                               |
| subnets                   |                                      |
| tenant_id                 | 59c358a9e1d444a5a642c0d14ca6d606     |
+---------------------------+--------------------------------------+
Create sub-network for external network. Note: I am using public address space for this
Allocation pool is for floating IP addresses. floating IP address explained in later steps
>neutron subnet-create –disable-dhcp public xxx.254.209.0/24 \
–name public_subnet –allocation-pool start=xxx.254.209.86,end=xxx.254.209.88
#source test resource
[root@localhost ~(keystone_admin)]# . keystonerc_test
create a keypair and add it to nova. We will this keypair to login to tenant Instance
>ssh-keygen -f test_rsa -t rsa -b 2048 -N ‘ ‘
>nova keypair-add –pub-key test_rsa.pub test //its two dash pub, WordPress editor has issue showing two dash
[root@localhost ~(keystone_test)]# nova keypair-list
+------+-------------------------------------------------+
| Name | Fingerprint                                     |
+------+-------------------------------------------------+
| test | 5f:ba:9b:01:d6:dd:11:e3:3e:19:aa:78:cd:6d:c0:0e |
+------+-------------------------------------------------+
[root@localhost ~(keystone_admin)]#
Create tenant network. Tenant network is a private network, it is used by tenant Instances to communicate with each other.
>neutron net-create firstTenant_net
[root@localhost ~(keystone_test)]# neutron net-create firstTenant_net
Created a new network:
+-----------------+--------------------------------------+
| Field           | Value                                |
+-----------------+--------------------------------------+
| admin_state_up  | True                                 |
| id              | 67eef7cd-bc40-4aa3-b244-8c3bf64826f0 |
| mtu             | 0                                    |
| name            | firstTenant_net                      |
| router:external | False                                |
| shared          | False                                |
| status          | ACTIVE                               |
| subnets         |                                      |
| tenant_id       | a6615546ebd3445d89d5d1ffb00e06e5     |
+-----------------+--------------------------------------+
Create sub-network for tenant network. Note that I am using private IP subnet for it
>neutron subnet-create –name firstTenant_subnet \
–dns-nameserver 8.8.8.8 firstTenant_net 192.168.11.0/24
So now we have two networks created 1) external public network to communicate with external world and 2) private internal network for tenant
Create router. Router connects tenants to external world by performing NAT and inter-tenant routing
>neutron router-create pub_router
[root@localhost ~(keystone_test)]# neutron router-create pub_router
Created a new router:
+-----------------------+--------------------------------------+
| Field                 | Value                                |
+-----------------------+--------------------------------------+
| admin_state_up        | True                                 |
| external_gateway_info |                                      |
| id                    | 602dc4e2-24b6-401e-be1f-4e4ac3008b3b |
| name                  | pub_router                           |
| routes                |                                      |
| status                | ACTIVE                               |
| tenant_id             | a6615546ebd3445d89d5d1ffb00e06e5     |
+-----------------------+--------------------------------------+
Create router gateway. Note: we are setting gateway by using public network we created above (xxx.254.209.0). By default openstack takes first IP in the subnet to setup gateway , in our case xxx.254.209.1
>neutron router-gateway-set pub_router public
[root@localhost ~(keystone_test)]# neutron router-gateway-set pub_router public
Set gateway for router pub_router
Now we need to stitch router to tenant network. Add one router interface to tenant network. Note: The stitching is happening by setting router interface to same IP as tenant network gateway-ip in our case it is 192.168.11.1
At this point we are done with network setup
>neutron router-interface-add pub_router firstTenant_subnet
Open a browser and point to http://<your ip>/dashboard. Login as test/test. Under ‘Network’ ‘Nework-topology’ you should see this picture
Lets take a break and review what has been created so far as far network is concerned
We have created public network with public IP subnet, xxx.254.209.0/24
We have created tenant private network with private IP subnet, 192.168.11.0/24
We have created a router and assigned public gateway to it
We have stitched public and private (tenant) network together
We have created an instance on tenant network
Next step is to give public network access to tenant instance. This is done by creating floating IP network. Below command gets IP address from public network address pool (xxx.254.209.0)
>nova floating-ip-create public
[root@localhost ~(keystone_test)]# nova floating-ip-create public
+--------------------------------------+----------------+-----------+----------+--------+
| Id                                   | IP             | Server Id | Fixed IP | Pool   |
+--------------------------------------+----------------+-----------+----------+--------+
| 4b041d17-91e2-40c4-8a22-23ed9dd1f697 | xxx.254.209.87 | -         | -        | public |
+--------------------------------------+----------------+-----------+----------+--------+
Assign floating IP from above step to our instance.What this step is doing is creating NAT rule in router for our instance so instance can communicate with external world
Note: ‘networks’ field show two IPs, one for internal and one for public network. The router uses public IP for NAT function
>nova add-floating-ip firstTenant_firstVM xxx.254.209.87
[root@localhost ~(keystone_test)]# nova add-floating-ip firstTenant_firstVM xxx.254.209.87
[root@localhost ~(keystone_test)]# nova list
+--------------------------------------+---------------------+--------+------------+-------------+-----------+
| ID                                   | Name                | Status | Task State | Power State | Networks                                     |
+--------------------------------------+---------------------+--------+------------+-------------+-----------+
| 8b666fa7-0143-4a87-a61e-ece9146cf121 | firstTenant_firstVM | ACTIVE | -          | Running     | firstTenant_net=192.168.11.3, 167.254.209.87 |
+--------------------------------------+---------------------+--------+------------+-------------+-----------+
Below is the picture of our network.
login to instance using ssh key over public network
[root@localhost ~(keystone_test)]# ls
anaconda-ks.cfg  demo_rsa.pub  keystonerc_admin  keystonerc_open  open_rsa      packstack-answers-20160328-123852.txt  test_rsa.pub
demo_rsa         Desktop       keystonerc_demo   keystonerc_test  open_rsa.pub  test_rsa
[root@localhost ~(keystone_test)]# ssh -i test_rsa cirros@xxx.254.209.87
$
$ ip addr
1: lo: <LOOPBACK,UP,LOWER_UP> mtu 16436 qdisc noqueue
    link/loopback 00:00:00:00:00:00 brd 00:00:00:00:00:00
    inet 127.0.0.1/8 scope host lo
    inet6 ::1/128 scope host
       valid_lft forever preferred_lft forever
2: eth0: <BROADCAST,MULTICAST,UP,LOWER_UP> mtu 1400 qdisc pfifo_fast qlen 1000
    link/ether fa:16:3e:de:94:ce brd ff:ff:ff:ff:ff:ff
    inet 192.168.11.3/24 brd 192.168.11.255 scope global eth0
    inet6 fe80::f816:3eff:fede:94ce/64 scope link
       valid_lft forever preferred_lft forever
$ route
Kernel IP routing table
Destination     Gateway         Genmask         Flags Metric Ref    Use Iface
default         192.168.11.1    0.0.0.0         UG    0      0        0 eth0
192.168.11.0    *               255.255.255.0   U     0      0        0 eth0
$
$ ping xxx.254.209.126
PING 167.254.209.126 (xxx.254.209.126): 56 data bytes
64 bytes from xxx.254.209.126: seq=1 ttl=254 time=2.742 ms

--- xxx.254.209.126 ping statistics ---
4 packets transmitted, 3 packets received, 25% packet loss
round-trip min/avg/max = 2.456/2.767/3.105 ms
$ $ exit
Connection to xxx.254.209.87 closed.
[root@localhost ~(keystone_test)]#
Below some useful logs
    [root@localhost ~(keystone_test)]# ip netns
    qrouter-602dc4e2-24b6-401e-be1f-4e4ac3008b3b
    qdhcp-67eef7cd-bc40-4aa3-b244-8c3bf64826f0
    [root@localhost ~(keystone_test)]# ip netns exec qrouter-602dc4e2-24b6-401e-be1f-4e4ac3008b3b ip addr
    1: lo: <LOOPBACK,UP,LOWER_UP> mtu 65536 qdisc noqueue state UNKNOWN
        link/loopback 00:00:00:00:00:00 brd 00:00:00:00:00:00
        inet 127.0.0.1/8 scope host lo
           valid_lft forever preferred_lft forever
        inet6 ::1/128 scope host
           valid_lft forever preferred_lft forever
    13: qg-18cece2c-b0: <BROADCAST,MULTICAST,UP,LOWER_UP> mtu 1500 qdisc noqueue state UNKNOWN
        link/ether fa:16:3e:39:9b:9a brd ff:ff:ff:ff:ff:ff
        inet xxx.254.209.86/24 brd xxx.254.209.255 scope global qg-18cece2c-b0
           valid_lft forever preferred_lft forever
        inet6 fe80::f816:3eff:fe39:9b9a/64 scope link
           valid_lft forever preferred_lft forever
    14: qr-1e062199-c0: <BROADCAST,MULTICAST,UP,LOWER_UP> mtu 1500 qdisc noqueue state UNKNOWN
        link/ether fa:16:3e:02:af:9c brd ff:ff:ff:ff:ff:ff
        inet 192.168.11.1/24 brd 192.168.11.255 scope global qr-1e062199-c0
           valid_lft forever preferred_lft forever
        inet6 fe80::f816:3eff:fe02:af9c/64 scope link
           valid_lft forever preferred_lft forever
    [root@localhost ~(keystone_test)]# ip netns exec qrouter-602dc4e2-24b6-401e-be1f-4e4ac3008b3b ping xxx.254.209.126
    PING xxx.254.209.126 (xxx.254.209.126) 56(84) bytes of data.
    64 bytes from xxx.254.209.126: icmp_seq=1 ttl=255 time=9.53 ms
    64 bytes from xxx.254.209.126: icmp_seq=2 ttl=255 time=2.04 ms
    64 bytes from xxx.254.209.126: icmp_seq=3 ttl=255 time=2.52 ms
    ^C
    --- xxx.254.209.126 ping statistics ---
    3 packets transmitted, 3 received, 0% packet loss, time 2002ms
    rtt min/avg/max/mdev = 2.045/4.701/9.539/3.426 ms
    [root@localhost ~(keystone_test)]#

    [root@localhost ~(keystone_test)]# ip netns exec qdhcp-67eef7cd-bc40-4aa3-b244-8c3bf64826f0 ip addr
    1: lo: <LOOPBACK,UP,LOWER_UP> mtu 65536 qdisc noqueue state UNKNOWN
        link/loopback 00:00:00:00:00:00 brd 00:00:00:00:00:00
        inet 127.0.0.1/8 scope host lo
           valid_lft forever preferred_lft forever
        inet6 ::1/128 scope host
           valid_lft forever preferred_lft forever
    12: tap95895d8b-77: <BROADCAST,MULTICAST,UP,LOWER_UP> mtu 1500 qdisc noqueue state UNKNOWN
        link/ether fa:16:3e:8f:1b:a1 brd ff:ff:ff:ff:ff:ff
        inet 192.168.11.2/24 brd 192.168.11.255 scope global tap95895d8b-77
           valid_lft forever preferred_lft forever
        inet6 fe80::f816:3eff:fe8f:1ba1/64 scope link
           valid_lft forever preferred_lft forever
    [root@localhost ~(keystone_test)]# ip netns exec qdhcp-67eef7cd-bc40-4aa3-b244-8c3bf64826f0 ping 192.168.11.1
    PING 192.168.11.1 (192.168.11.1) 56(84) bytes of data.
    64 bytes from 192.168.11.1: icmp_seq=1 ttl=64 time=0.327 ms
    64 bytes from 192.168.11.1: icmp_seq=2 ttl=64 time=0.056 ms
    ^C
    --- 192.168.11.1 ping statistics ---
    2 packets transmitted, 2 received, 0% packet loss, time 999ms
    rtt min/avg/max/mdev = 0.056/0.191/0.327/0.136 ms
    [root@localhost ~(keystone_test)]#

    [root@localhost ~(keystone_test)]# ip addr
    1: lo: <LOOPBACK,UP,LOWER_UP> mtu 65536 qdisc noqueue state UNKNOWN
        link/loopback 00:00:00:00:00:00 brd 00:00:00:00:00:00
        inet 127.0.0.1/8 scope host lo
           valid_lft forever preferred_lft forever
        inet6 ::1/128 scope host
           valid_lft forever preferred_lft forever
    2: ens2: <NO-CARRIER,BROADCAST,MULTICAST,UP> mtu 1500 qdisc pfifo_fast state DOWN qlen 1000
        link/ether 00:13:3b:10:b7:2a brd ff:ff:ff:ff:ff:ff
        inet 192.168.10.1/24 brd 192.168.10.255 scope global ens2
           valid_lft forever preferred_lft forever
    3: ens5: <NO-CARRIER,BROADCAST,MULTICAST,UP> mtu 1500 qdisc pfifo_fast master ovs-system state DOWN qlen 1000
        link/ether 00:0a:cd:2a:14:08 brd ff:ff:ff:ff:ff:ff
    4: enp1s0: <BROADCAST,MULTICAST,UP,LOWER_UP> mtu 1500 qdisc mq master ovs-system state UP qlen 1000
        link/ether 2c:27:d7:1c:88:a8 brd ff:ff:ff:ff:ff:ff
        inet6 fe80::2e27:d7ff:fe1c:88a8/64 scope link
           valid_lft forever preferred_lft forever
    5: ovs-system: <BROADCAST,MULTICAST> mtu 1500 qdisc noop state DOWN
        link/ether 56:c4:71:ce:82:c4 brd ff:ff:ff:ff:ff:ff
    7: br-tun: <BROADCAST,MULTICAST> mtu 1500 qdisc noop state DOWN
        link/ether ea:0f:f5:22:6c:4a brd ff:ff:ff:ff:ff:ff
    8: br-int: <BROADCAST,MULTICAST> mtu 1500 qdisc noop state DOWN
        link/ether d2:e4:ec:56:2f:44 brd ff:ff:ff:ff:ff:ff
    11: br-ex: <BROADCAST,MULTICAST,UP,LOWER_UP> mtu 1500 qdisc noqueue state UNKNOWN
        link/ether 00:0a:cd:2a:14:08 brd ff:ff:ff:ff:ff:ff
        inet xxx.254.209.85/24 brd xxx.254.209.255 scope global br-ex
           valid_lft forever preferred_lft forever
        inet6 fe80::5cf4:8dff:fe8d:3446/64 scope link
           valid_lft forever preferred_lft forever
    15: qbr44a1eb3f-a8: <BROADCAST,MULTICAST,UP,LOWER_UP> mtu 1500 qdisc noqueue state UP
        link/ether 82:58:a3:06:44:c0 brd ff:ff:ff:ff:ff:ff
    16: qvo44a1eb3f-a8@qvb44a1eb3f-a8: <BROADCAST,MULTICAST,PROMISC,UP,LOWER_UP> mtu 1500 qdisc pfifo_fast master ovs-system state UP qlen 1000
        link/ether 66:8b:21:ce:0b:ca brd ff:ff:ff:ff:ff:ff
        inet6 fe80::648b:21ff:fece:bca/64 scope link
           valid_lft forever preferred_lft forever
    17: qvb44a1eb3f-a8@qvo44a1eb3f-a8: <BROADCAST,MULTICAST,PROMISC,UP,LOWER_UP> mtu 1500 qdisc pfifo_fast master qbr44a1eb3f-a8 state UP qlen 1000
        link/ether 82:58:a3:06:44:c0 brd ff:ff:ff:ff:ff:ff
        inet6 fe80::8058:a3ff:fe06:44c0/64 scope link
           valid_lft forever preferred_lft forever
    18: tap44a1eb3f-a8: <BROADCAST,MULTICAST,UP,LOWER_UP> mtu 1500 qdisc pfifo_fast master qbr44a1eb3f-a8 state UNKNOWN qlen 500
        link/ether fe:16:3e:de:94:ce brd ff:ff:ff:ff:ff:ff
        inet6 fe80::fc16:3eff:fede:94ce/64 scope link
           valid_lft forever preferred_lft forever

    [root@localhost ~(keystone_test)]# ip netns exec qrouter-602dc4e2-24b6-401e-be1f-4e4ac3008b3b iptables -S -t nat
    -P PREROUTING ACCEPT
    -P INPUT ACCEPT
    -P OUTPUT ACCEPT
    -P POSTROUTING ACCEPT
    -N neutron-l3-agent-OUTPUT
    -N neutron-l3-agent-POSTROUTING
    -N neutron-l3-agent-PREROUTING
    -N neutron-l3-agent-float-snat
    -N neutron-l3-agent-snat
    -N neutron-postrouting-bottom
    -A PREROUTING -j neutron-l3-agent-PREROUTING
    -A OUTPUT -j neutron-l3-agent-OUTPUT
    -A POSTROUTING -j neutron-l3-agent-POSTROUTING
    -A POSTROUTING -j neutron-postrouting-bottom
    -A neutron-l3-agent-OUTPUT -d xxx.254.209.87/32 -j DNAT --to-destination 192.168.11.3
    -A neutron-l3-agent-POSTROUTING ! -i qg-18cece2c-b0 ! -o qg-18cece2c-b0 -m conntrack ! --ctstate DNAT -j ACCEPT
    -A neutron-l3-agent-PREROUTING -d 169.254.169.254/32 -i qr-+ -p tcp -m tcp --dport 80 -j REDIRECT --to-ports 9697
    -A neutron-l3-agent-PREROUTING -d xxx.254.209.87/32 -j DNAT --to-destination 192.168.11.3
    -A neutron-l3-agent-float-snat -s 192.168.11.3/32 -j SNAT --to-source xxx.254.209.87
    -A neutron-l3-agent-snat -j neutron-l3-agent-float-snat
    -A neutron-l3-agent-snat -o qg-18cece2c-b0 -j SNAT --to-source xxx.254.209.86
    -A neutron-l3-agent-snat -m mark ! --mark 0x2 -m conntrack --ctstate DNAT -j SNAT --to-source xxx.254.209.86
    -A neutron-postrouting-bottom -m comment --comment "Perform source NAT on outgoing traffic." -j neutron-l3-agent-snat

    [root@localhost ~(keystone_test)]# ovs-vsctl show
    42a06974-d8e8-46aa-973f-732a0c1284bd
        Bridge br-int
            fail_mode: secure
            Port "qvo44a1eb3f-a8"
                tag: 1
                Interface "qvo44a1eb3f-a8"
            Port patch-tun
                Interface patch-tun
                    type: patch
                    options: {peer=patch-int}
            Port "tap95895d8b-77"
                tag: 1
                Interface "tap95895d8b-77"
                    type: internal
            Port br-int
                Interface br-int
                    type: internal
            Port int-br-ex
                Interface int-br-ex
                    type: patch
                    options: {peer=phy-br-ex}
            Port "qr-1e062199-c0"
                tag: 1
                Interface "qr-1e062199-c0"
                    type: internal
        Bridge br-tun
            fail_mode: secure
            Port patch-int
                Interface patch-int
                    type: patch
                    options: {peer=patch-tun}
            Port br-tun
                Interface br-tun
                    type: internal
        Bridge br-ex
            Port "ens5"
                Interface "ens5"
            Port "enp1s0"
                Interface "enp1s0"
            Port phy-br-ex
                Interface phy-br-ex
                    type: patch
                    options: {peer=int-br-ex}
            Port "qg-18cece2c-b0"
                Interface "qg-18cece2c-b0"
                    type: internal
            Port br-ex
                Interface br-ex
                    type: internal
        ovs_version: "2.4.0"
    [root@localhost ~(keystone_test)]#

    [root@localhost ~(keystone_test)]# ovs-ofctl show br-int
    OFPT_FEATURES_REPLY (xid=0x2): dpid:0000d2e4ec562f44
    n_tables:254, n_buffers:256
    capabilities: FLOW_STATS TABLE_STATS PORT_STATS QUEUE_STATS ARP_MATCH_IP
    actions: output enqueue set_vlan_vid set_vlan_pcp strip_vlan mod_dl_src mod_dl_dst mod_nw_src mod_nw_dst mod_nw_tos mod_tp_src mod_tp_dst
     5(int-br-ex): addr:f6:c7:6d:bf:bc:e3
         config:     0
         state:      0
         speed: 0 Mbps now, 0 Mbps max
     6(patch-tun): addr:46:47:a7:29:a2:7b
         config:     0
         state:      0
         speed: 0 Mbps now, 0 Mbps max
     7(tap95895d8b-77): addr:00:00:00:00:00:00
         config:     PORT_DOWN
         state:      LINK_DOWN
         speed: 0 Mbps now, 0 Mbps max
     8(qr-1e062199-c0): addr:00:00:00:00:00:00
         config:     PORT_DOWN
         state:      LINK_DOWN
         speed: 0 Mbps now, 0 Mbps max
     9(qvo44a1eb3f-a8): addr:66:8b:21:ce:0b:ca
         config:     0
         state:      0
         current:    10GB-FD COPPER
         speed: 10000 Mbps now, 0 Mbps max
     LOCAL(br-int): addr:d2:e4:ec:56:2f:44
         config:     PORT_DOWN
         state:      LINK_DOWN
         speed: 0 Mbps now, 0 Mbps max
    OFPT_GET_CONFIG_REPLY (xid=0x4): frags=normal miss_send_len=0
    [root@localhost ~(keystone_test)]# ovs-ofctl show br-ex
    OFPT_FEATURES_REPLY (xid=0x2): dpid:0000000acd2a1408
    n_tables:254, n_buffers:256
    capabilities: FLOW_STATS TABLE_STATS PORT_STATS QUEUE_STATS ARP_MATCH_IP
    actions: output enqueue set_vlan_vid set_vlan_pcp strip_vlan mod_dl_src mod_dl_dst mod_nw_src mod_nw_dst mod_nw_tos mod_tp_src mod_tp_dst
     1(enp1s0): addr:2c:27:d7:1c:88:a8
         config:     0
         state:      0
         current:    100MB-FD COPPER AUTO_NEG
         advertised: 10MB-HD 10MB-FD 100MB-HD 100MB-FD 1GB-HD 1GB-FD COPPER AUTO_NEG AUTO_PAUSE
         supported:  10MB-HD 10MB-FD 100MB-HD 100MB-FD 1GB-HD 1GB-FD COPPER AUTO_NEG
         speed: 100 Mbps now, 1000 Mbps max
     2(ens5): addr:00:0a:cd:2a:14:08
         config:     0
         state:      LINK_DOWN
         current:    10MB-HD AUTO_NEG
         advertised: 10MB-HD 10MB-FD 100MB-HD 100MB-FD 1GB-HD 1GB-FD COPPER AUTO_NEG AUTO_PAUSE AUTO_PAUSE_ASYM
         supported:  10MB-HD 10MB-FD 100MB-HD 100MB-FD 1GB-HD 1GB-FD COPPER AUTO_NEG
         speed: 10 Mbps now, 1000 Mbps max
     3(phy-br-ex): addr:4e:61:b1:1d:80:c9
         config:     0
         state:      0
         speed: 0 Mbps now, 0 Mbps max
     4(qg-18cece2c-b0): addr:00:00:00:00:00:00
         config:     PORT_DOWN
         state:      LINK_DOWN
         speed: 0 Mbps now, 0 Mbps max
     LOCAL(br-ex): addr:00:0a:cd:2a:14:08
         config:     0
         state:      0
         speed: 0 Mbps now, 0 Mbps max
    OFPT_GET_CONFIG_REPLY (xid=0x4): frags=normal miss_send_len=0
    [root@localhost ~(keystone_test)]# ovs-ofctl show br-tun
    OFPT_FEATURES_REPLY (xid=0x2): dpid:0000ea0ff5226c4a
    n_tables:254, n_buffers:256
    capabilities: FLOW_STATS TABLE_STATS PORT_STATS QUEUE_STATS ARP_MATCH_IP
    actions: output enqueue set_vlan_vid set_vlan_pcp strip_vlan mod_dl_src mod_dl_dst mod_nw_src mod_nw_dst mod_nw_tos mod_tp_src mod_tp_dst
     3(patch-int): addr:16:fc:f9:6b:6a:f3
         config:     0
         state:      0
         speed: 0 Mbps now, 0 Mbps max
     LOCAL(br-tun): addr:ea:0f:f5:22:6c:4a
         config:     PORT_DOWN
         state:      LINK_DOWN
         speed: 0 Mbps now, 0 Mbps max
    OFPT_GET_CONFIG_REPLY (xid=0x4): frags=normal miss_send_len=0
    [root@localhost ~(keystone_test)]#