For a long time I wanted to deploy Openstack in a Virtual box this became true after I purchased a new laptop with sufficient RAM
Precondition:
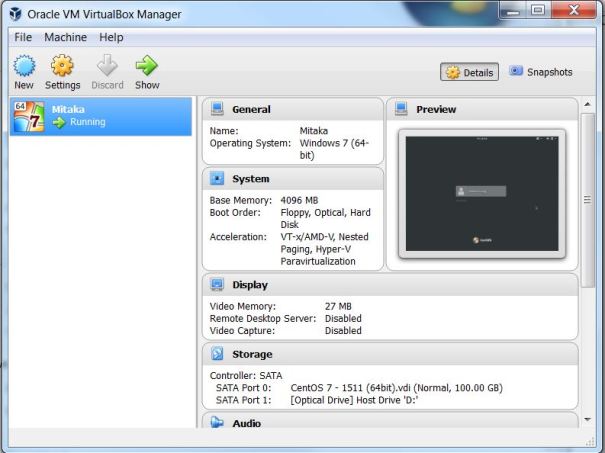
My laptop has Windows 7 64-bit, 16 GB RAM.
Download CentOS 7 virtual box image from this link. I downloaded 7.1-1511. Images come with usrname:osboxes, password:osboxes.org and root passward:oxboxes.org
Download virtualBox from this link.Start VirtualBox with CentOS image, I have given it 4 GB RAM
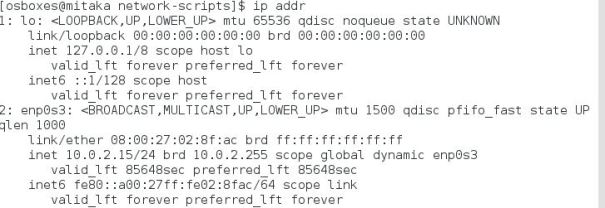
I have not changed network setting in VirtualBox, it is using default NAT mode. My VM came up with interface enp0s3 and IP address 10.0.2.15.
Make sure you can ping internet using domain name.
Follow below steps to prepare machine for Openstack deployment
Install yum-utils on both nodes
$yum install -y yum-utils
Set SELINUX in permissive mode on both nodes , edit file /etc/selinux/config
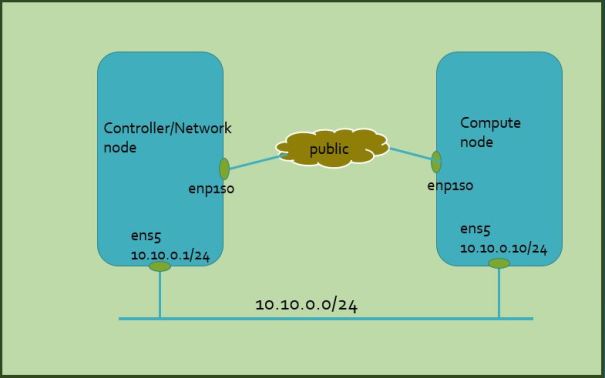
In this lab I will deploy Openstack Mitaka release using packstack.I am using CentOS 7. This is a two machine setup, one machine acting as controller/network node and another as compute node. Try this link to check my openstack liberty lab
This is the physical connection picture. Both machines are connected to public network through enp1s0 and to each other through ens5 interface
Here is my CentOS version. I have installed CentOS fresh on both machines
$packstack --answer-file multi-node-mitaka.txt
##It takes about 15-20 min, on successful installation you will see this message
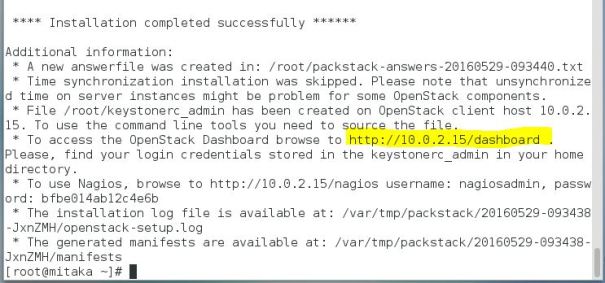
**** Installation completed successfully ******
Additional information:
* Time synchronization installation was skipped. Please note that unsynchronized time on server instances might be problem for some OpenStack components.
* File /root/keystonerc_admin has been created on OpenStack client host 10.10.0.1. To use the command line tools you need to source the file.
* To access the OpenStack Dashboard browse to http://10.10.0.1/dashboard .
Please, find your login credentials stored in the keystonerc_admin in your home directory.
* To use Nagios, browse to http://10.10.0.1/nagios username: nagiosadmin, password: f96c84b4884d45a4
* The installation log file is available at: /var/tmp/packstack/20160516-184147-03uUsE/openstack-setup.log
* The generated manifests are available at: /var/tmp/packstack/20160516-184147-03uUsE/manifests
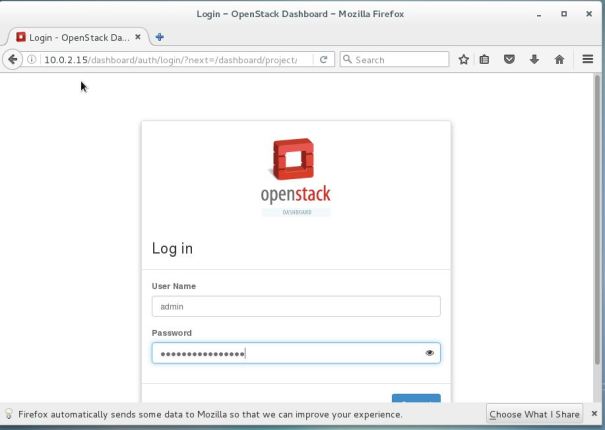
On you browser point to http://10.10.0.1/dashboard, login to Horizon GUI using username ‘admin’ and password from file ‘keystaonerc_admin’ (packstack creates this file in the directory from where you started the packstack in my case under /root). First thing you need to do is delete router and network, we will create router and network from scratch.
On the terminal try below commands. I ran these commands from /root directory. Packstack created two resource files keystonetc_admin and keystonerc_demo
#source admin resource file
. keystonerc_admin
#create new flavor
nova flavor-create m2.nano auto 128 1 1
#create public network
neutron net-create public --router:external=True
#create public subnet
neutron subnet-create --disable-dhcp public 172.254.209.0/24 \
--name public_subnet --allocation-pool start=172.254.209.87,end=172.254.209.95 --gateway-ip 172.254.209.126
#create public router
neutron router-create pub_router
#add router interface to public network
neutron router-gateway-set pub_router public
#create Tenant1
keystone tenant-create --name Tenant1
#source demo resource file
. keystonerc_demo
#create Tenant1 network
neutron net-create Tenant1_net
#create Tenant1 subnet
neutron subnet-create --name Tenant1_subnet \
--dns-nameserver 8.8.8.8 Tenant1_net 192.168.11.0/24
#genrate ssh keypair
ssh-keygen -f tenant1_rsa -t rsa -b 2048 -N ''
#add keypair
nova keypair-add --pub-key tenant1_rsa.pub tenant1
#create a new security group
neutron security-group-create mysec
#set rule to allow ssh & icmp
neutron security-group-rule-create --protocol icmp mysec
neutron security-group-rule-create --protocol tcp \
--port-range-min 22 --port-range-max 22 mysec
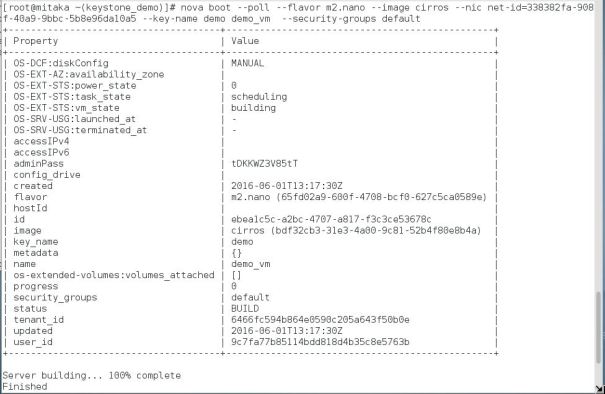
#create a new instance, net-id is Tenant1 net-id
nova boot --poll --flavor m2.nano --image cirros \
--nic net-id=535659e3-2c4d-4ccd-a05f-6b03cd29e9b0 --key-name tenant1 Tenant1_VM1 --security-groups mysec
#check if Tenant1 instance is running
[root@controller ~(keystone_demo)]# nova list
+--------------------------------------+-------------+--------+------------+-------------+--------------------------+
| ID | Name | Status | Task State | Power State | Networks |
+--------------------------------------+-------------+--------+------------+-------------+--------------------------+
| 7f95ec40-3945-445b-aeba-fcdbf5f8b99e | Tenant1_VM1 | ACTIVE | - | Running | Tenant1_net=192.168.11.3 |
+--------------------------------------+-------------+--------+------------+-------------+--------------------------+
[root@controller ~(keystone_demo)]#
Observations:
When I tried packstack with ceilometer disabled (CONFIG_CEILOMETER_INSTALL=n) it failed with this error but after changing CONFIG_CEILOMETER_INSTALL=y things worked fine (default is ‘y’). This is a known issue in Mitaka
167.254.209.85_mariadb.pp:                        [ ERROR ]
Applying Puppet manifests                         [ ERROR ]

ERROR : Error appeared during Puppet run: 167.254.209.85_mariadb.pp
Error: Could not find data item CONFIG_GNOCCHI_DB_PW in any Hiera data file and no default supplied at /var/tmp/packstack/45cb2ad222434ebe94634bcedb3510b5/manifests/167.254.209.85_mariadb.pp:121 on node controller.cloud.net
I finally managed to get second machine. In this lab I will demonstrate Openstack deployment in two node environment. I will setup controller and network node in one machine and compute node in another machine. As usual I will be using packstack.
Pre-condition:
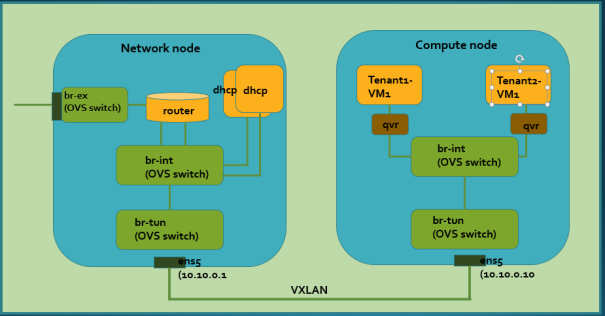
For this lab I am using CentOS 7. I have installed CentOS 7 on two machines. I have two physical interfaces on both machines (enp1s0 & ens5). I am using enp1s0 for remote access to machines and ens5 to connect them together. ens5 will be used for Openstack API and tunnel communication.
# cat /etc/*elease

CentOS Linux release 7.2.1511 (Core)
NAME="CentOS Linux"
VERSION="7 (Core)"
ID="centos"
ID_LIKE="rhel fedora"
VERSION_ID="7"
PRETTY_NAME="CentOS Linux 7 (Core)"
ANSI_COLOR="0;31"
CPE_NAME="cpe:/o:centos:centos:7"
HOME_URL="https://www.centos.org/"
BUG_REPORT_URL="https://bugs.centos.org/"

CENTOS_MANTISBT_PROJECT="CentOS-7"
CENTOS_MANTISBT_PROJECT_VERSION="7"
REDHAT_SUPPORT_PRODUCT="centos"
REDHAT_SUPPORT_PRODUCT_VERSION="7"

CentOS Linux release 7.2.1511 (Core)
CentOS Linux release 7.2.1511 (Core)
[root@controller ~]#
Follow these steps to prep for packstack installation
Install yum-utils on both nodes
$yum install -y yum-utils
Set SELINUX in permissive mode on both nodes (vi /etc/selinux/config)
SELINUX=permissive
disable Network Manager on both nodes
$sudo systemctl disable NetworkManager
Disable firewall on both nodes
$systemctl disable firewalld
sudo yum update -y
reboot both nodes
I followed thislinkto load latest Openstack, in my case Liberty. Try below commands on controller node
Update IP address for ens5 interface on controller/network and compute node. I have updated file in this directory /etc/sysconfig/network-scripts/ifcfg-ens5 and then restart network manager ‘sudo service network restart’
#This is the example of my ens5 file in controller/network node
[root@localhost network-scripts(keystone_admin)]# cat ifcfg-ens5
HWADDR=00:0A:CD:2A:14:08
TYPE=Ethernet
BOOTPROTO=none
DEFROUTE=yes
PEERDNS=yes
NAME=ens5
UUID=2bb5b0d3-1369-4039-b07f-5deebfc25bd9
ONBOOT=yes
IPADDR=10.10.0.1
PREFIX=24
Make sure you can ssh to compute node from controller node
[root@localhost network-scripts]# ssh -l labadmin 10.10.0.10
The authenticity of host '10.10.0.10 (10.10.0.10)' can't be established.
ECDSA key fingerprint is 48:06:a3:81:f4:62:4e:1e:3f:73:9f:34:12:1d:17:af.
Are you sure you want to continue connecting (yes/no)? yes
Warning: Permanently added '10.10.0.10' (ECDSA) to the list of known hosts.
labadmin@10.10.0.10's password:
Last login: Fri Apr  8 17:06:13 2016
[labadmin@localhost ~]$
Procedure:
Generate an answer-file and edit it to suite your topology. Below are the changes I have made in my answer-file. you can find my answer file multi-node-answer-file-lab_19.txt
 $packstack --gen-answer-file=multi-node-answer-file-lab_19.txt

#these are the changes I made in my answer-file
CONFIG_SWIFT_INSTALL=n
CONFIG_CEILOMETER_INSTALL=n
CONFIG_CINDER_INSTALL=n
CONFIG_CONTROLLER_HOST=10.10.0.1
CONFIG_COMPUTE_HOSTS=10.10.0.10
CONFIG_NETWORK_HOSTS=10.10.0.1
CONFIG_LBAAS_INSTALL=y
CONFIG_NEUTRON_FWAAS=y
CONFIG_NEUTRON_VPNAAS=y
CONFIG_PROVISION_OVS_BRIDGE=y
CONFIG_NEUTRON_ML2_TYPE_DRIVERS=vxlan
CONFIG_NEUTRON_ML2_TENANT_NETWORK_TYPES=vxlan
CONFIG_NEUTRON_ML2_MECHANISM_DRIVERS=openvswitch
CONFIG_NEUTRON_L2_AGENT=openvswitch
CONFIG_NEUTRON_OVS_TUNNEL_IF=ens5
CONFIG_KEYSTONE_ADMIN_USERNAME=admin
CONFIG_KEYSTONE_ADMIN_PW=admin
Start Packstack with newly created answer file
 $packstack --answer-file multi-node-answer-file-lab_9.txt

#after 10-15 min you will see this message
**** Installation completed successfully ******

Additional information:
 * Time synchronization installation was skipped. Please note that unsynchronized time on server instances might be problem for some OpenStack components.
 * File /root/keystonerc_admin has been created on OpenStack client host 10.10.0.1. To use the command line tools you need to source the file.
 * To access the OpenStack Dashboard browse to http://10.10.0.1/dashboard .
Please, find your login credentials stored in the keystonerc_admin in your home directory.
 * Because of the kernel update the host 10.10.0.1 requires reboot.
 * Because of the kernel update the host 10.10.0.10 requires reboot.
 * The installation log file is available at: /var/tmp/packstack/20160422-202525-FLQT1Q/openstack-setup.log
 * The generated manifests are available at: /var/tmp/packstack/20160422-202525-FLQT1Q/manifests
On a browser point to this location ‘http://10.10.0.1/dashboard’. Login as username:admin and password:admin. Note: check the admin user password in ‘keystonerc_admin’ file located in same directory from where packstack was started. Delete routers,networks and flavors from GUI
Source admin resources and create networks and tenants
Check Openstack status make sure all require components are ‘active’. Note:for me neutron-l3-agent was ‘inactive’ I tried below command to make it active
Create Tenant network and attach them to router interface
[root@localhost ~(keystone_admin)]# neutron net-create Tenant1_net
Created a new network:
+---------------------------+--------------------------------------+
| Field                     | Value                                |
+---------------------------+--------------------------------------+
| admin_state_up            | True                                 |
| id                        | c44c3620-122a-450f-99ab-839c7798084d |
| mtu                       | 0                                    |
| name                      | Tenant1_net                          |
| provider:network_type     | vxlan                                |
| provider:physical_network |                                      |
| provider:segmentation_id  | 36                                   |
| router:external           | False                                |
| shared                    | False                                |
| status                    | ACTIVE                               |
| subnets                   |                                      |
| tenant_id                 | 5dc8330acb6f4fb8a91f2abb839f7773     |
+---------------------------+--------------------------------------+

[root@localhost ~(keystone_admin)]# neutron subnet-create --name Tenant1_subnet \
>   --dns-nameserver 8.8.8.8 Tenant1_net 192.168.11.0/24
Created a new subnet:
+-------------------+----------------------------------------------------+
| Field             | Value                                              |
+-------------------+----------------------------------------------------+
| allocation_pools  | {"start": "192.168.11.2", "end": "192.168.11.254"} |
| cidr              | 192.168.11.0/24                                    |
| dns_nameservers   | 8.8.8.8                                            |
| enable_dhcp       | True                                               |
| gateway_ip        | 192.168.11.1                                       |
| host_routes       |                                                    |
| id                | 395d7a7d-7479-4b6e-b184-c9638ff19beb               |
| ip_version        | 4                                                  |
| ipv6_address_mode |                                                    |
| ipv6_ra_mode      |                                                    |
| name              | Tenant1_subnet                                     |
| network_id        | c44c3620-122a-450f-99ab-839c7798084d               |
| subnetpool_id     |                                                    |
| tenant_id         | 5dc8330acb6f4fb8a91f2abb839f7773                   |
+-------------------+----------------------------------------------------+
#add interface to public router
[root@localhost ~(keystone_admin)]# neutron router-interface-add pub_router Tenant1_subnet
Added interface 51a1f2ed-eef5-4527-bce9-153d6a7986cd to router pub_router.
[root@localhost ~(keystone_admin)]#
Create ssh keypair and add it to nova
#create keypair for tenant1
[root@localhost ~(keystone_admin)]# ssh-keygen -f tenant1_rsa -t rsa -b 2048 -N ''
Generating public/private rsa key pair.
Your identification has been saved in tenant1_rsa.
Your public key has been saved in tenant1_rsa.pub.
The key fingerprint is:
f9:36:17:06:b1:ab:8f:11:ab:46:0e:37:ca:c8:29:0f root@localhost.localdomain
The key's randomart image is:
+--[ RSA 2048]----+
|          .      |
|           o     |
|          o      |
|         . o     |
|        S . o    |
|    . +  = . .   |
|E. + * .+ + .    |
|..+ o o. = o     |
| o.  .. . .      |
+-----------------+
[root@localhost ~(keystone_admin)]# nova keypair-add --pub-key tenant1_rsa.pub tenant1
[root@localhost ~(keystone_admin)]#
Create a new security group and rule to allow ssh and ICMP protocols for the instance
At this point instance started but could not be reached. Ping from router namespace to VM (192.168.11.5) failed. I checked console-log for VM and found that it couldn’t get IP from DHCP server. Below messages from console-log show no dhcp offer message
[root@localhost ~(keystone_admin)]# nova console-log Tenant1_VM1
Starting network...
udhcpc (v1.20.1) started
Sending discover...
Sending discover...
Sending discover...
I checked configuration and found that vxlan interface was missing from br-tun bridge in compute node. After restarting openvswitch agent on controller node vxlan interface created. But it didn’t resolve dhcp issue, VM still doesn’t have IP address
$service neutron-openvswitch-agent restart
[root@localhost ~]# ovs-vsctl show
4973e933-214d-4d54-b241-db3b33e16526
    Bridge br-tun
        fail_mode: secure
        Port patch-int
            Interface patch-int
                type: patch
                options: {peer=patch-tun}
        Port br-tun
            Interface br-tun
                type: internal
    Bridge br-int
        fail_mode: secure
        Port br-int
            Interface br-int
                type: internal
        Port patch-tun
            Interface patch-tun
                type: patch
                options: {peer=patch-int}
        Port "qvo8d2aef86-ef"
            tag: 1
            Interface "qvo8d2aef86-ef"
    ovs_version: "2.4.0"

# restart openvswitch fixed the problem vxlan port issue
[root@localhost ~(keystone_admin)]# service neutron-openvswitch-agent restart
[root@localhost ~]# ovs-vsctl show
4973e933-214d-4d54-b241-db3b33e16526
    Bridge br-tun
        fail_mode: secure
        Port patch-int
            Interface patch-int
                type: patch
                options: {peer=patch-tun}
        Port "vxlan-0a0a0001"
            Interface "vxlan-0a0a0001"
                type: vxlan
                options: {df_default="true", in_key=flow, local_ip="10.10.0.10", out_key=flow, remote_ip="10.10.0.1"}
        Port br-tun
            Interface br-tun
                type: internal
    Bridge br-int
        fail_mode: secure
        Port br-int
            Interface br-int
                type: internal
        Port patch-tun
            Interface patch-tun
                type: patch
                options: {peer=patch-int}
        Port "qvo8d2aef86-ef"
            tag: 2
            Interface "qvo8d2aef86-ef"
    ovs_version: "2.4.0"
Upon further debugging I found that a flow was missing from br-tun bridge in network node. Restarting openvswitch didn’t resolve this issue so I manually created the flow. This resolved dhcp issue and VM successfully fetched IP address from dhcp.
Check out this linkfor details on how I resolved dhcp issue in my setup
Try these commands to create second tenant (Tenant2)
ssh-keygen -f tenant2_rsa -t rsa -b 2048 -N ''
nova keypair-add --pub-key tenant2_rsa.pub tenant2
neutron net-create Tenant2_net
neutron subnet-create --name Tenant2_subnet \
--dns-nameserver 8.8.8.8 Tenant2_net 192.168.12.0/24
 neutron router-interface-add pub_router Tenant2_subnet
 nova boot --poll --flavor m2.nano --image cirros \
   --nic net-id=ff9c3eb7-f88f-42bb-af5f-ea810dad7505 \
--key-name tenant2 Tenant2_VM1 --security-groups mysec
[root@localhost ~(keystone_admin)]# nova list
+--------------------------------------+-------------+--------+------------+-------------+--------------------------+
| ID                                   | Name        | Status | Task State | Power State | Networks                 |
+--------------------------------------+-------------+--------+------------+-------------+--------------------------+
| 0b48cd50-04ef-40b1-a3a5-69e61bb2b2df | Tenant1_VM1 | ACTIVE | -          | Running     | Tenant1_net=192.168.11.5 |
| b3a7d7e6-eb4b-4c21-9b9d-974680c35cd6 | Tenant2_VM1 | ACTIVE | -          | Running     | Tenant2_net=192.168.12.3 |
+--------------------------------------+-------------+--------+------------+-------------+--------------------------+
[root@localhost ~(keystone_admin)]# ip netns
qdhcp-ff9c3eb7-f88f-42bb-af5f-ea810dad7505
qrouter-ee34dbdc-2368-4cb9-ba50-8f13e00ae389
qdhcp-c44c3620-122a-450f-99ab-839c7798084d
[root@localhost ~(keystone_admin)]# ip netns exec qrouter-ee34dbdc-2368-4cb9-ba50-8f13e00ae389 192.168.12.3
exec of "192.168.12.3" failed: No such file or directory
[root@localhost ~(keystone_admin)]# ip netns exec qrouter-ee34dbdc-2368-4cb9-ba50-8f13e00ae389 ping 192.168.12.3
PING 192.168.12.3 (192.168.12.3) 56(84) bytes of data.
64 bytes from 192.168.12.3: icmp_seq=1 ttl=64 time=1.04 ms
64 bytes from 192.168.12.3: icmp_seq=2 ttl=64 time=0.341 ms
64 bytes from 192.168.12.3: icmp_seq=3 ttl=64 time=0.387 ms
64 bytes from 192.168.12.3: icmp_seq=4 ttl=64 time=0.332 ms
^C
--- 192.168.12.3 ping statistics ---
4 packets transmitted, 4 received, 0% packet loss, time 3001ms
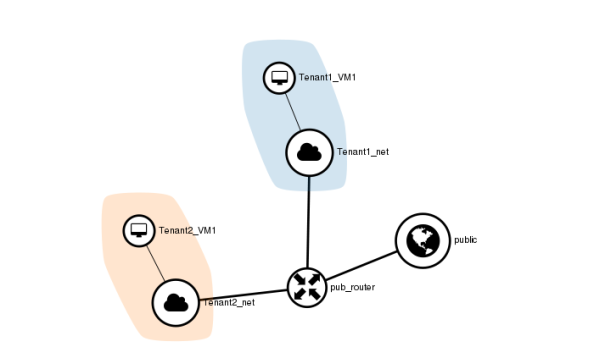
This is the topology shown on Openstack Horizon gui
This is the topology I drew
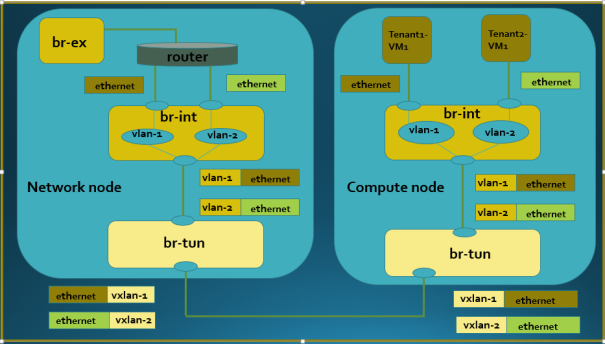
Two node topologyTwo node topology with traffic flow
Observations:
If you get below error while installing openstack-packstack change repos in location /etc/yum.repos.d to baseurl instead of mirrorlist on both nodes and try again
Loaded plugins: fastestmirror
 Could not retrieve mirrorlist http://mirrorlist.centos.org/?release=7&arch=x86_64&repo=os error was
 14: curl#6 - "Could not resolve host: mirrorlist.centos.org; Unknown error"
You can also disable fastestmirror in this file /etc/yum/pluginconf.d/fastestmirror.conf
enable=0
I encountered below error on compute node while running packstack. You need to upgrade lvm2 on compute node to resolve it $yum upgrade lvm2
 ---
 ERROR : Error appeared during Puppet run: 10.10.0.10_nova.pp
 Error: Execution of '/usr/bin/yum -d 0 -e 0 -y install openstack-nova-compute' returned 1: Transaction check error:
 You will find full trace in log /var/tmp/packstack/20160408-202825-TbrmD6/manifests/10.10.0.10_nova.pp.log