In this lab I will show how to install and automate web gui testing using Selenium.
Selenium is a browser testing tool. Webdriver is a component of Selenium which provides native support for various browser types like Firefox,Chrome,IE etc. Using webdriver API testers can automate website testing.
Precondition:
I am using Ubuntu 14.04 LTS for this lab, it comes with Python 2.7.
Install Selenium and required packages.
$sudo apt-get install pip
$sudo pip install selenium
$sudo apt-get install firefox
Procedure:
Try basic python script to make sure packages are installed properly. This script will open Firefox browser, launch google.com website , print website title and close the browser.
$sjakhwal@rtxl3rld05:~$ python
Python 2.7.6 (default, Mar 22 2014, 22:59:56)
[GCC 4.8.2] on linux2
Type "help", "copyright", "credits" or "license" for more information.
>>> from selenium import webdriver
>>> driver = webdriver.Firefox()
>>> driver.get('https://www.google.com')
>>> print driver.title
Google
>>> driver.close()
>>>
Element locator
Element locator is an important aspect of Selenium automation. The idea is to uniquely locate an element in the web page. Before you automate the click or fill a form you need to first locate the right button or box to fill in, webdriver provides library of functions to uniquely locate an element in the web page. You can locate element by name,id,link text,tag name and xpath. You need to check how to uniquely locate an element using any one of these functions
There are tools to decompose website and get element name, id, xpath etc. I have installed ‘firebug’ plugin in Firefox browser it allows me to check details of each element in the web site.
How to install firebug
Click on ‘Open menu’  icon in Firefox, it is located on upper right hand then click on ‘Add-ons’. In the search box type ‘firebug’ and hit enter. Click install ‘firebug’. Now you can right click on an element and select ‘Inspect Element with Firebug’
Let’s try to uniquely locate search box in google.com website using different methods. Detail info can be find here
In the google.com search box click right button and select ‘Inspect Element with Firebug’ you will see search box element highlighted in the button part of the screen.
By element name
The name of search box element is “q” (name=”q”). Let’s try this to locate search box in python using webdriver API
This script locates element by name “q” and type search query “life divine” in the search box
>>> from selenium import webdriver
>>> from selenium.webdriver.common.keys import Keys
>>> driver = webdriver.Firefox()
>>> driver.get('https://www.google.com')
>>> print driver.title
Google
>>> search_element = driver.find_element_by_name("q")
>>> search_element.send_keys("life divine")
>>> search_element.send_keys(Keys.RETURN)
>>> driver.close()
>>>
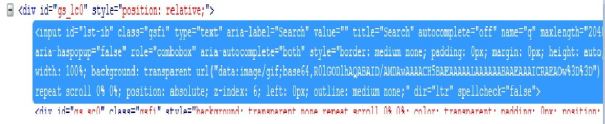
By id
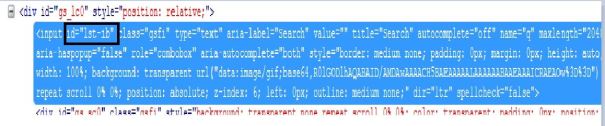
The id of search element is “lst-ib” (id=”lst-ib”).
>>> from selenium import webdriver
>>> from selenium.webdriver.common.keys import Keys

>>> driver = webdriver.Firefox()
>>> driver.get('https://www.google.com')
>>> print driver.title
Google
>>> search_element = driver.find_element_by_id("lst-ib")
>>> search_element.send_keys("life divine")
>>> search_element.send_keys(Keys.RETURN)
>>> driver.close()
By link text
Link text is a visible text for a link. When you search for “life divine” on google the first link with link text is “The Life Divine: Sri Aurobindo: 9788170588443: Amazon.com: Books”. Below script uses this text to identify first link and click on it
If you don’t want to type whole link text, ‘find_element_by_partial_link_text’ can be used with partial string to match
>>> from selenium import webdriver
>>> from selenium.webdriver.common.keys import Keys

>>> driver = webdriver.Firefox()
>>> driver.get("https://www.google.com")
>>> search_element = driver.find_element_by_id("lst-ib")
>>> search_element.send_keys("life divine")
>>> search_element.send_keys(Keys.RETURN)
>>> driver.find_element_by_link_text("The Life Divine: Sri Aurobindo: 9788170588443: Amazon.com: Books").click()
>>> print driver.title
The Life Divine: Sri Aurobindo: 9788170588443: Amazon.com: Books
>>> driver.close()
By Xpath
Below example of xpath locator, // means relative path
>>> from selenium import webdriver
>>> from selenium.webdriver.common.keys import Keys

>>> driver = webdriver.Firefox()
>>> driver.get("https://www.google.com")
>>> search_element = driver.find_element_by_xpath("//input[@id='lst-ib']")
>>> search_element.send_keys("life divine")
>>> search_element.send_keys(Keys.RETURN)
>>> print driver.title
life divine - Google Search
>>> driver.close()
By css
In css locator ‘#’ represents element Id and ‘.’ represents element class.
>>> from selenium import webdriver
>>> from selenium.webdriver.common.keys import Keys

>>> driver = webdriver.Firefox()
>>> driver.get("https://www.google.com")
>>> search_element = driver.find_element_by_css_selector('input#lst-ib')
>>> search_element.send_keys("life divine")
>>> search_element.send_keys(Keys.RETURN)
>>> print driver.title
life divine - Google Search
>>> driver.close()

or you can try css for class
>>> search_element = driver.find_element_by_css_selector('input.gsfi')
Headless browser
It is annoying and slow to have browser open every time you run the script. You can run browser in the background or headless by using PhantomJS.
$cd /usr/local/bin
$sudo wget https://bitbucket.org/ariya/phantomjs/downloads/phantomjs-2.1.1-linux-x86_64.tar.bz2
$sudo tar xjf phantomjs-2.1.1-linux-x86_64.tar.bz2
$sudo ln -s /usr/local/bin/phantomjs-2.1.1-linux-x86_64/bin/phantomjs /usr/bin/phantomjs
After phantomJS installed run script like this. The disadvantage of this approach is you rely on phantomJS browser you loose capability to test with different web browsers
sjakhwal@rtxl3rld05:~$ python
Python 2.7.6 (default, Mar 22 2014, 22:59:56)
[GCC 4.8.2] on linux2
Type "help", "copyright", "credits" or "license" for more information.
>>> from selenium import webdriver
>>> driver = webdriver.PhantomJS()
>>> driver.set_window_size(1120, 550)
>>> driver.get('https://www.google.com')
>>> print driver.title
Google
>>> driver.close()
Remote webserver
Remote webserver provides capability to access a web gui from remote PC.
You need to download and install webserver sw on the machine where web gui resides.
Why you need webserver, in my case company firewall was blocking the port number (8443) of web gui and I couldn’t launch it from my local machine. I had two options 1) run scripts on same machine where web gui was installed or 2) use webserver and run scripts from my local machine. I chose option 2.
Below are commands to install webserver. In this case I am running webserver in a CentOS 7 machine (my web gui application resides in this machine). The machine IP address is 172.254.211.167
$sudo wget http://selenium-release.storage.googleapis.com/2.53/selenium-server-standalone-2.53.0.jar
$yum install xorg-x11-server-Xvfb
$sudo yum install java-1.7.0-openjdk
$/usr/bin/Xvfb :1 -screen 0 1024x768x24 &
$export DISPLAY=:1
$java -jar ~/selenium/selenium-server-standalone-2.53.0.jar

[root@localhost ~]# java -jar /home/labuser1/selenium-server-standalone-2.53.0.jar
12:58:47.562 INFO - Launching a standalone Selenium Server
12:58:47.587 INFO - Java: Oracle Corporation 25.60-b23
12:58:47.588 INFO - OS: Linux 3.10.0-123.el7.x86_64 amd64
12:58:47.596 INFO - v2.53.0, with Core v2.53.0. Built from revision 35ae25b
12:58:47.646 INFO - Driver provider org.openqa.selenium.ie.InternetExplorerDriver registration is skipped:
registration capabilities Capabilities [{ensureCleanSession=true, browserName=internet explorer, version=, platform=WINDOWS}] does not match the current platform LINUX
12:58:47.646 INFO - Driver provider org.openqa.selenium.edge.EdgeDriver registration is skipped:
registration capabilities Capabilities [{browserName=MicrosoftEdge, version=, platform=WINDOWS}] does not match the current platform LINUX
12:58:47.647 INFO - Driver class not found: com.opera.core.systems.OperaDriver
12:58:47.647 INFO - Driver provider com.opera.core.systems.OperaDriver is not registered
12:58:47.648 INFO - Driver provider org.openqa.selenium.safari.SafariDriver registration is skipped:
registration capabilities Capabilities [{browserName=safari, version=, platform=MAC}] does not match the current platform LINUX
12:58:47.648 INFO - Driver class not found: org.openqa.selenium.htmlunit.HtmlUnitDriver
12:58:47.648 INFO - Driver provider org.openqa.selenium.htmlunit.HtmlUnitDriver is not registered
12:58:47.690 INFO - RemoteWebDriver instances should connect to: http://127.0.0.1:4444/wd/hub
12:58:47.690 INFO - Selenium Server is up and running
This is how to write script on your local machine to access remote web gui. My remote web server IP address is 172.254.211.167. You need to replace the web gui url
sjakhwal@rtxl3rld05:~$ python
Python 2.7.6 (default, Mar 22 2014, 22:59:56)
[GCC 4.8.2] on linux2
Type "help", "copyright", "credits" or "license" for more information.
>>> from selenium import webdriver

>> driver = webdriver.Remote(desired_capabilities=webdriver.DesiredCapabilities.FIREFOX,\
command_executor='http://172.254.211.167:4444/wd/hub')
>>> driver.get('https://localhost:8443/virtuoranc/index.html')
>>> print driver.title
Virtuora NC
>>> driver.close()
Wait
If you get into a situation where website is not fully loaded yet and your script tries to locate element and eventually fails. You can either put a hard coded sleep in the script or use more intelligent wait mechanism. Selenium supports two types of waits 1)Explicit 2)Implicit. In case of explicit wait you tell webdriver to wait for a certain event and for certain time before proceeding. Detail explanation can be found here
Below example script is for Explicit wait. In this script webdriver waits for link text “Life Divine” to be present before clicking on the link. Script waits for 10 sec for the presence of link text . Expected conditions link
>>> from selenium import webdriver
>>> from selenium.webdriver.common.keys import Keys
>>> from selenium.webdriver.support.ui import WebDriverWait
>>> from selenium.webdriver.support import expected_conditions as EC
>>> from selenium.webdriver.common.by import By
>>> driver = webdriver.Firefox()
>>> driver.get("https://www.google.com")
>>> search_element = driver.find_element_by_id("lst-ib")
>>> search_element.send_keys("life divine")
>>> search_element.send_keys(Keys.RETURN)
>>> try:
>>>     WebDriverWait(driver, 10).until(EC.presence_of_element_located((By.PARTIAL_LINK_TEXT,"Life Divine")))
>>> finally:
>>>     driver.close()
>>>     exit
>>> driver.find_element_by_partial_link_text("The Life Divine: Sri Aurobindo:").click()
>>> print driver.title The Life Divine: Sri Aurobindo: 9788170588443: Amazon.com: Books
>>> driver.close()
Below example script for implicit wait. Implicit wait is poll based, all find element APIs waits for implicit wait timer to timeout before proceeding to next step. Default implicit timer is 0.
In this case implicit timer is set to 10 sec
>>> from selenium import webdriver
>>> from selenium.webdriver.common.keys import Keys

>>> driver = webdriver.Firefox()
>>> driver.implicitly_wait(10)
>>> driver.get("https://www.google.com")
>>> search_element = driver.find_element_by_id("lst-ib")
>>> search_element.send_keys("life divine")
>>> search_element.send_keys(Keys.RETURN)
>>> driver.find_element_by_partial_link_text("The Life Divine: Sri Aurobindo:").click()
>>> print driver.title
The Life Divine: Sri Aurobindo: 9788170588443: Amazon.com: Books
>>> driver.close()
Selenium IDE
Last but not least Firefox provides Selenium IDE which can capture mouse clicks, keyboard actions, basically any action you perform in a website. You can save these actions as test cases and later replay them or even export them as Python,Java or Ruby script .
Download Selenium IDE for Firefox
Go to this link and download/add Selenium IDE to your Firefox. Restart Firefox, you will see Selenium IDE under your tools menu. Click on Selenium IDE to start it
Click this link to watch a youtube video on it.
References:
https://www.seleniumeasy.com/selenium-tutorials
https://cse.google.com/cse?cx=partner-pub-4494420772031453:2717605672&ie=UTF-8&q=selenium&sa=Search&ref=www.softwaretestinghelp.com/#gsc.tab=0&gsc.q=selenium&gsc.page=1