This lab is the continuation of Lab-50 In Lab-50 we learned how to setup Azure IoT hub, simulate IoT device and read device to cloud messages using web app and device explorer/iothub-explorer. In this lab we will learn how to read D2C and send C2D messages programmatically using Visual Studio 2017
Before we proceed it will be good to understand few concepts in IoT hub, mainly Endpoints and Routes

Endpoints:
There are two type of endpoints in IoT hub 1) Built-in endpoints and 2) custom end-points. Think of endpoints as topics or queue in AMQP, MQTT protocols.
- Built-in Endpoints
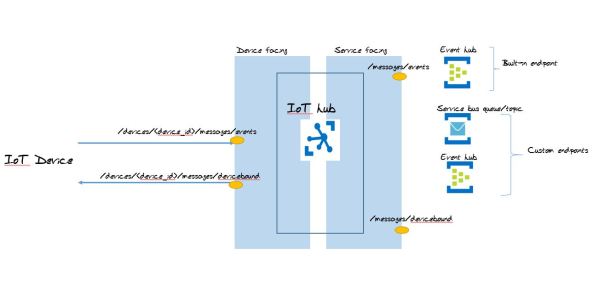
For each device in the identity registry, IoT Hub exposes a set of built-in endpoints, these endpoints can be device facing or service facing
Device side endpoints
When device sending message to cloud it uses this endpoint. If you are using Azure client SDK you don’t need to worry about setting this endpoint, SDK does it for you.
/devices/{device_id}/messages/events
Device receives C2D messages on this endpoint
/device/{device_id}/messages/devicebound
Service endpoints
Each IoT hub exposes a set of endpoints for your solution back end to communicate with your devices. With one exception, these endpoints are only exposed using the AMQP protocol.
D2C endpoint. This endpoint is compatible with Azure Event Hubs. A back-end service can use it to read device-to-cloud messages sent by your devices.
/messages/events
C2D endpoints enable your solution back end to send reliable cloud-to-device messages, and to receive the corresponding acknowledgments.
/messages/devicebound
2. Custom Endpoints
Custom endpoints mainly deal with service endpoints and D2C messages. Instead of using built-in service endpoint (/messages/events) you can create custom endpoints. Custom endpoints can be on even hub, service bus queue or service bus topics
Azure IoT hub provides following type of custom endpoints each cater different requirement
- Event Hubs
- Event Hubs is a scalable event processing service that ingests and processes large volumes of events, with low latency and high reliability. Events in even hub can be retained for one to seven days. Events can be played back again. You can read more about event hub here
- Service Bus Queues. Service bus messaging contains:
- Queues, which allow one-directional communication. Each queue acts as an intermediary (sometimes called a broker) that stores sent messages until they are received. Each message is received by a single recipient
- Service Bus Topics. Topics, which provide one-directional communication using subscriptions-a single topic can have multiple subscriptions. Like a queue, a topic acts as a broker, but each subscription can optionally use a filter to receive only messages that match specific criteria
Routes
Routes routes D2C messages to service endpoints in IoT hub. If there are no routes configured messages are routed to default service endpoint (/messages/events). Messages can be routed to custom endpoints also, check this link for routing rules
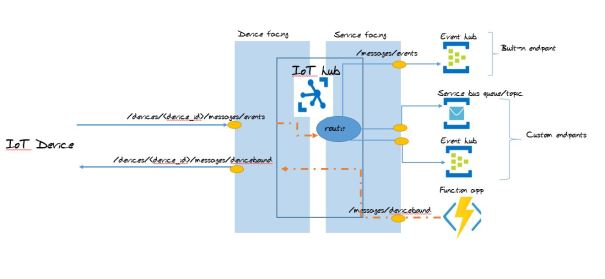
As seen in the above picture messages received by IoT hub is checked against route, if there are no route configured or none matches the rule, message routes to default endpoint (messages/events) otherwise message routed to respective endpoints
Pre-requisite
- Microsoft Visual Studio 2017. Link to install visual Studio here
- Account in Azure IoT hub
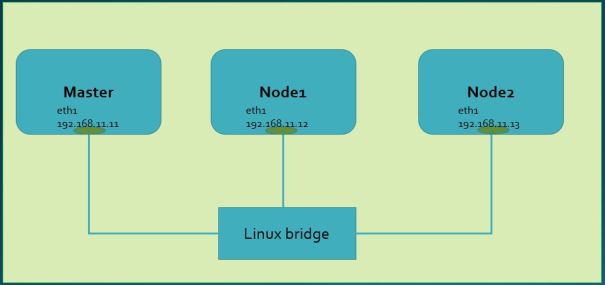
- Ubuntu 16.04 to simulate IoT device
Procedure
In this lab we will try these exercises
- Read D2C messages using built-in endpoint (/messages/events)
- Send C2D messages using built-in endpoint (/messages/devicebound)
- Read D2C messages using service bus queue
- Send C2D messages using service bus queue
Lot’s to do so let’s get started
1. Reading D2C messages using built-in endpoint (messages/events)
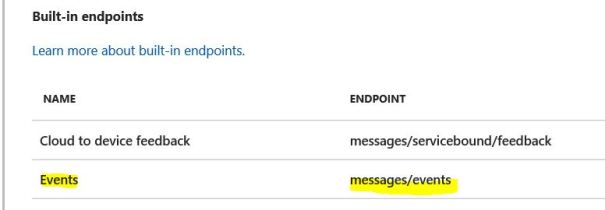
D2C messages are routed to default service endpoint (messages/events) if there is no route created in IoT hub. messages/events is Event hub compatible endpoint. We are not creating any route in this exercise so we can use this service endpoint to read D2C messages. This is the built-in endpoint in IoT hub so no need to create one.
You can find this endpoint under IoT Hub -> Endpoints
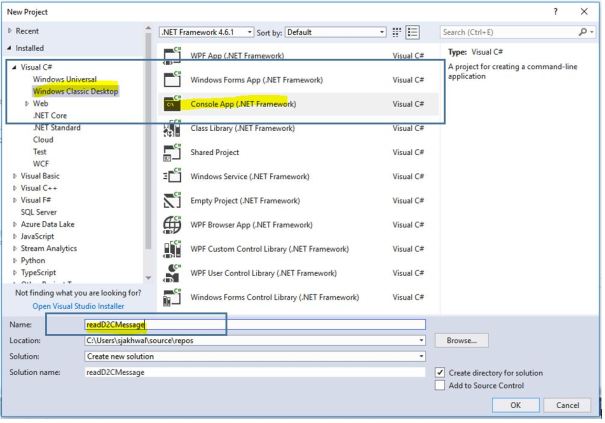
In Visual Studio, add a Visual C# Windows Classic Desktop project to the current solution, by using the Console App (.NET Framework) project template. Name the project readD2CMessage
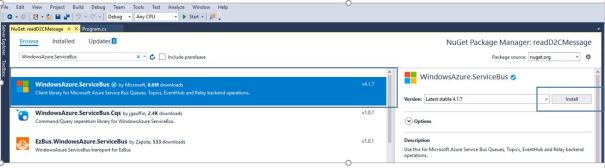
In Solution Explorer, right-click the readD2CMessage project, and then click Manage NuGet Packages. This operation displays the NuGet Package Manager window.
Browse for WindowsAzure.ServiceBus, click Install, and accept the terms of use. This operation downloads, installs, and adds a reference to the Azure Service Bus, with all its dependencies.
Add the following using statements at the top of the Program.cs file:
using Microsoft.ServiceBus.Messaging;
Add your IoT connection string and default built-in service endpoint (/messages/events)
static string connectionString = "<your IoT hub connection string>";
static string iotHubD2cEndpoint = "messages/events";
complete code looks like this
using System;
using System.Collections.Generic;
using System.Linq;
using System.Text;
using System.Threading.Tasks;
using Microsoft.ServiceBus.Messaging;
using System.Threading;
using System.IO;

namespace ConsoleApp3
{
   class Program
   {
       static void Main(string[] args)
       {
           Console.WriteLine("Receive messages. Ctrl-C to exit.\n");
           eventHubClient = EventHubClient.CreateFromConnectionString(connectionString, iotHubD2cEndpoint);
         var d2cPartitions = eventHubClient.GetRuntimeInformation().PartitionIds;
           CancellationTokenSource cts = new CancellationTokenSource();
           System.Console.CancelKeyPress += (s, e) =>
           {
               e.Cancel = true;
               cts.Cancel();
               Console.WriteLine("Exiting...");
           };
           var tasks = new List<Task>();
           foreach (string partition in d2cPartitions)
           {
               tasks.Add(ReceiveMessagesFromDeviceAsync(partition, cts.Token));
           }
           Task.WaitAll(tasks.ToArray());
       }
       static string connectionString = "HostName=myIoT-Hub.azure-devices.net;SharedAccessKeyName=iothubowner;SharedAccessKey=xxxx=";
       static string iotHubD2cEndpoint = "messages/events";
       static EventHubClient eventHubClient;
       private static async Task ReceiveMessagesFromDeviceAsync(string partition, CancellationToken ct)
       {
           var eventHubReceiver = eventHubClient.GetDefaultConsumerGroup().CreateReceiver(partition, DateTime.UtcNow);
           while (true)
           {
               if (ct.IsCancellationRequested) break;
               EventData eventData = await eventHubReceiver.ReceiveAsync();
               if (eventData == null) continue;
               string data = Encoding.UTF8.GetString(eventData.GetBytes());
               var prop = (string)eventData.Properties["temperatureAlert"];
		Console.WriteLine("Message received. Partition: {0} Data: '{1}' Property: '{2}'", partition, data, prop);
           }
       }
   }
}
Now you are ready to run the applications.
Press F5 to start the console app. The App display D2C messages.
Start IoT device simulation program in your VM as we did in Lab-50.
You will see D2C messages on Console

2. Sending C2D messages using built-in endpoint (/messages/devicebound)
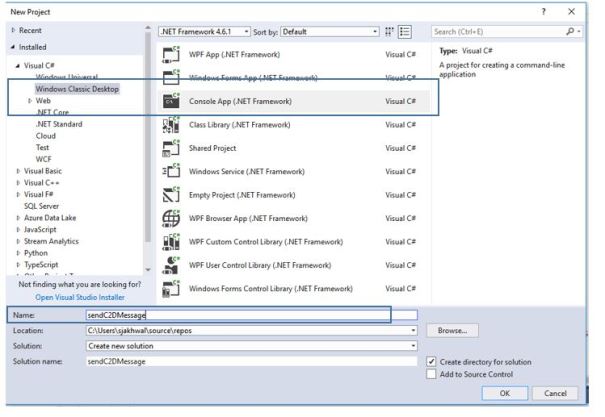
In Visual Studio, add a Visual C# Windows Classic Desktop project to the current solution, by using the Console App (.NET Framework) project template. Name the project sendC2DMessage
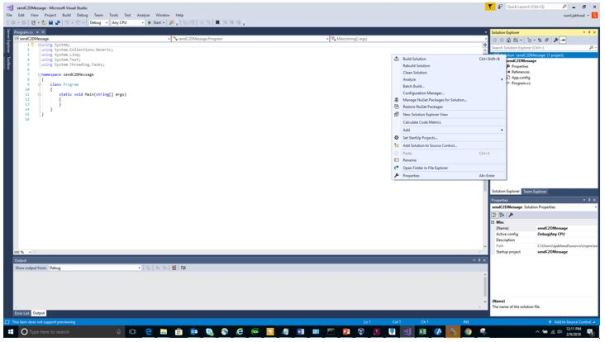
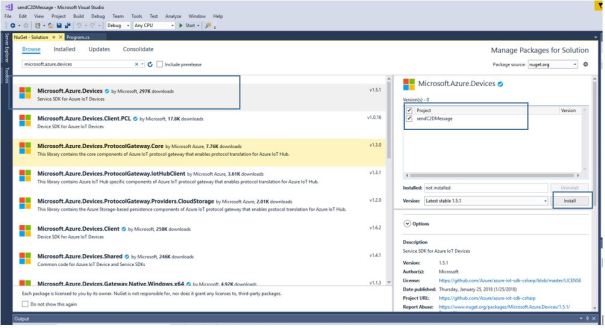
In Solution Explorer, right-click the sendC2DMessage project, and then click Manage NuGet Packages. This operation displays the NuGet Package Manager window.
Browse for Microsoft.Azure.Devices, click Install, and accept the terms of use. This operation downloads, installs, and adds a reference to the Azure Devices, with all its dependencies.
Add the following using statements at the top of the Program.cs file:
using Microsoft.Azure.Devices;
Add IoT hub connection string
static string connectionString = "<your IoT hub connection string>";
Add your device ID, in my case it is myIotDevice
await serviceClient.SendAsync("myIotDevice", commandMessage);
complete code looks like this
using System;
using System.Collections.Generic;
using System.Linq;
using System.Text;
using System.Threading.Tasks;
using Microsoft.Azure.Devices;

namespace sendC2DMessage
{
   class Program
   {
       static ServiceClient serviceClient;
       static string connectionString = "HostName=myIoT-Hub.azure-devices.net;SharedAccessKeyName=iothubowner;SharedAccessKey=xxxxxxxxxxxxx=";
       static void Main(string[] args)
       {
           Console.WriteLine("Send Cloud-to-Device message\n");
           serviceClient = ServiceClient.CreateFromConnectionString(connectionString);
           Console.WriteLine("Press any key to send a C2D message.");
           Console.ReadLine();
           sendC2DMessage().Wait();
           Console.ReadLine();
       }
       private async static Task sendC2DMessage()
       {
           var commandMessage = new Message(Encoding.ASCII.GetBytes("This is Cloud to Device message.."));
            await serviceClient.SendAsync("myIotDevice", commandMessage);
       }
   }
}
Now you are ready to run the applications.
Press F5 to start the console app.
Start IoT device simulation program in your VM as we did in Lab-50
Every time you hit enter on console app it will send C2D message “This is Cloud to Device message..” which will be visible in IoT device
3. Read D2C message using service bus queue endpoint
In this exercise we will route D2C messages to custom endpoint which is service bus queue and the read messages from endpoint
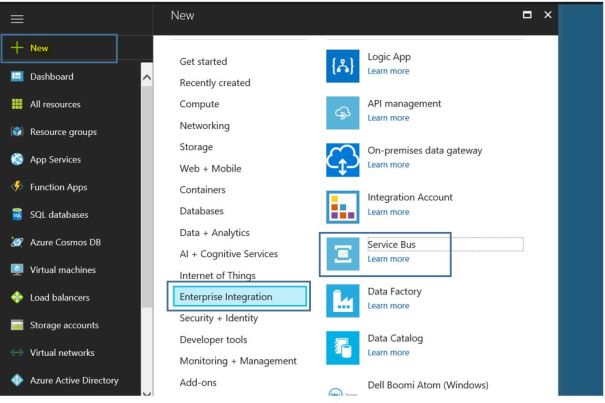
- Create service bus resource, New -> Enterprise Integration -> Service Bus
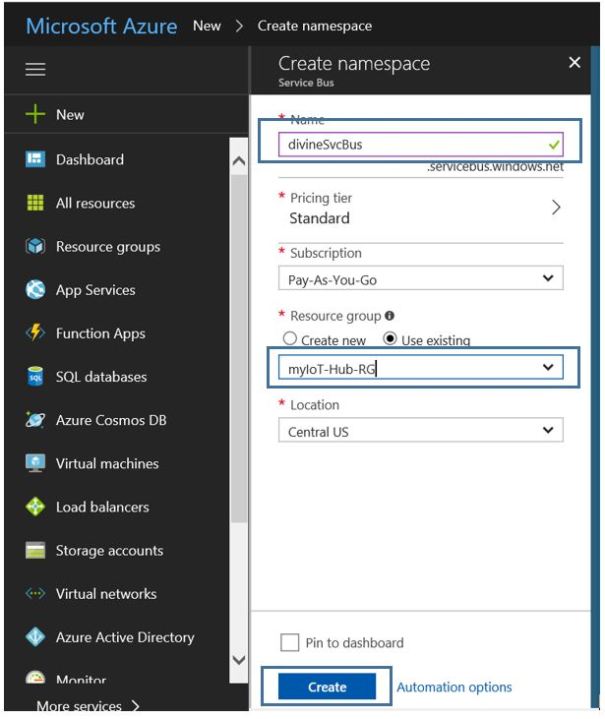
2. Give service bus resource a name and attach to existing resource group
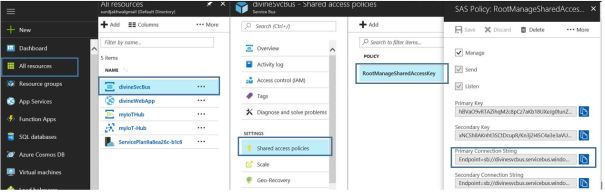
3. Note down service bus queue connection string, All resources -> <service bus> -> Shared access policies -> RootManagerSharedAccessKey -> Primary Connection String
4. Create a queue inside service bus resource, <service bus> -> Queues. Give queue name and click Create
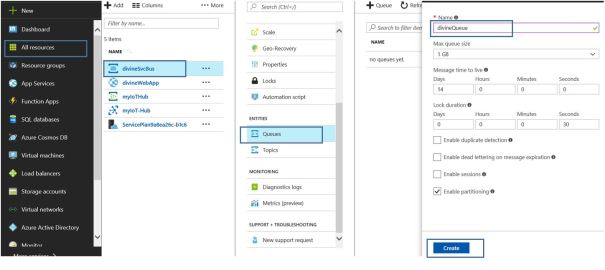
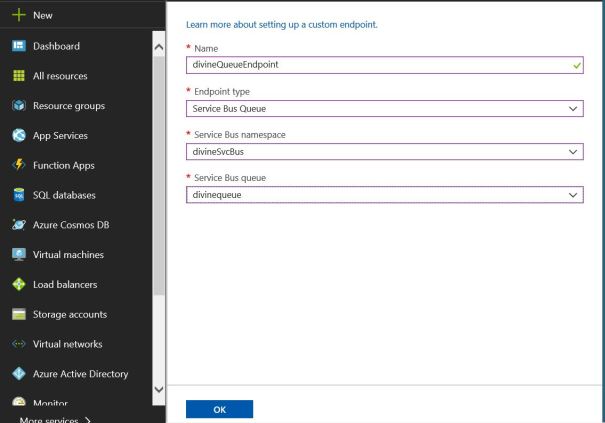
5. Create an endpoint in IoT hub, click on All Resource -> IoT hub -> Endpoint -> Add. Select endpoint type as ‘Service Bus Queue’, select Service Bus name in Service Bus namespace and finally select queue name
In Visual Studio, add a Visual C# Windows Classic Desktop project to the current solution, by using the Console App (.NET Framework) project template. Name the project receiveD2CMessageFromQueue
In Solution Explorer, right-click the receiveD2CMessageFromQueue project, and then click Manage NuGet Packages. This operation displays the NuGet Package Manager window.
Browse for WindowsAzure.Servicebus, click Install, and accept the terms of use. This operation downloads, installs, and adds a reference to the Azure Devices, with all its dependencies.
Add the following using statements at the top of the Program.cs file:
using System.IO;
using Microsoft.ServiceBus.Messaging;
Add your service bus queue connection string saved in earlier step. Provide your queue name
const string ServiceBusConnectionString = "<your service bus queue connection string>";
const string QueueName = "<your queue name>";
Complete code looks like this
using System;
using System.Collections.Generic;
using System.Linq;
using System.Text;
using System.Threading.Tasks;
using System.IO;
using Microsoft.ServiceBus.Messaging;
namespace readD2CMessageFromQueue
{
class Program
{
static void Main(string[] args)
{
Console.WriteLine("Receive critical messages. Ctrl-C to exit.\n");
var connectionString = "Endpoint=sb://divinesvcbus.servicebus.windows.net/;SharedAccessKeyName=RootManageSharedAccessKey;SharedAccessKey=xxxxxx=";
var queueName = "divineQueue";
var client = QueueClient.CreateFromConnectionString(connectionString, queueName);
client.OnMessage(message =>
{
Stream stream = message.GetBody<Stream>();
StreamReader reader = new StreamReader(stream, Encoding.ASCII);
string s = reader.ReadToEnd();
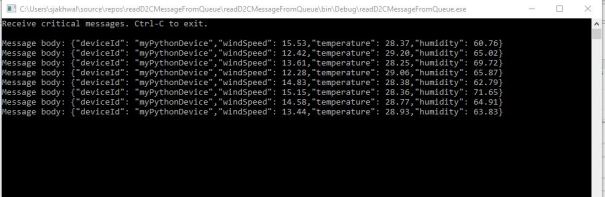
Console.WriteLine(String.Format("Message body: {0}", s));
});
Console.ReadLine();
}
}
}
Now you are ready to run the applications.
Press F5 to start the console app.
Start IoT device simulation program in your VM as we did in Lab-50
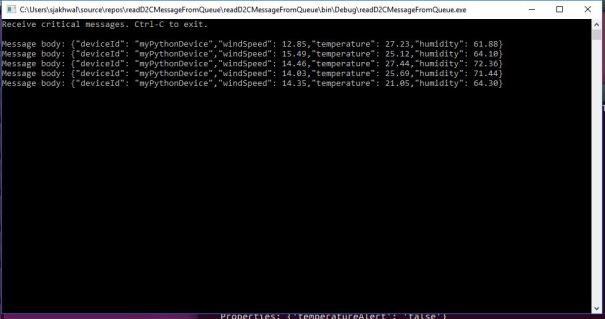
You will see D2C messages on console
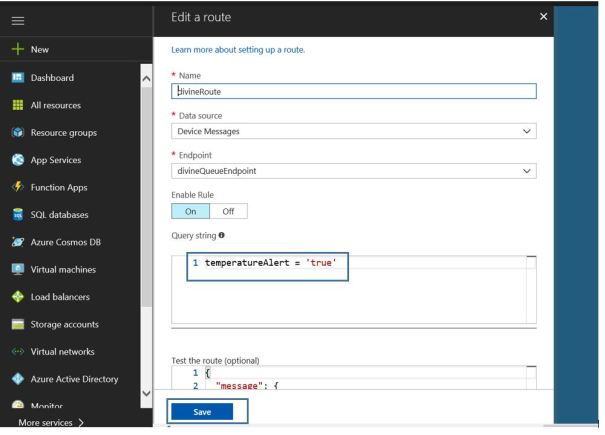
Let’s tweak the routing rule to route messages to queue endpoint only when temperatureAlert = true. The logic in simulated device (Ubuntu VM) is to send temperatureAlert = true whenever temp > 28. More on creating routing query here
Edit route to filter based on temperatureAlert = true. All Resources -> IoT hub -> Route and add following in query temperatureAlert = ‘true’
Start console app and simulated device. Now you should see only messages with temperature > 28. This mean our routing rule is working