In this lab we will learn basics of 802.1x authentication. I will show how to setup 802.1x security and try various authentication methods.
802.1x
802.1x is IEEE standard for L2 access control. It provides capability to grant or deny network connectivity to client. If 802.1x is enabled on a switch port, the port will be in a blocked state until user connected to port authenticated. Only 802.1x messages are allowed to go thru the port all other packets will be blocked. This is a good tutorial on 802.1x
These are the major components of 802.1x
- Authenticator: It’s a L2 switch or Wireless Access Point (WAP). The job of Authenticator is to act as a proxy for client or Supplicant and convert 802.1x message to RADIUS message and vice versa.
- Authentication server: It’s a server which validates client’s credentials. It contains client access info like username and password etc. We will be using RADIUS (RFC 2865) as authentication server
- Supplicant or Client- It’s a user machine (PC) which tries to access the network. By default client traffic is blocked by Authenticator except for 802.1x traffic
802.1x uses following protocols
- Extensible Authentication Protocol (EAP)—The message format and framework defined by RFC 4187 that provides a way for the supplicant and the authenticator to negotiate an authentication method (the EAP method).
- EAP method—Defines the authentication method; that is. the credential type and how it is submitted from the supplicant to the authentication server using the EAP framework.
Common EAP methods used in 802.1X networks are EAP-Transport Layer Security (EAP-TLS) and Protected EAP-Microsoft Challenge Handshake Authentication Protocol version 2 (PEAP-MSCHAPv2).
- EAP over LAN (EAPoL)—An encapsulation defined by 802.1X for the transport of the EAP from the supplicant to the switch over IEEE 802 networks.
EAPoL is a Layer 2 protocol.
- RADIUS—The de facto standard for communication between the switch and the authentication server.
The switch (Authenticator) extracts the EAP payload from the Layer 2 EAPoL frame and encapsulates the payload inside a Layer 7 RADIUS packet.

EAP and Radius messages

EAP methods
802.1x supports many EAP methods but in this lab I will try these methods
- Protect EAP or PEAP – Defined in RFC 4017. This is a two stage authentication method in first stage a secure TLS tunnel created between client and server and in second stage client authenticated. Client authentication is done by using protocols like CHAP, PAP, MSCHAPv2 (RFC 2759). In this method only server side certificate is needed.
- TLS (Transport Layer Security) – Defined in RFC 5216. This method uses TLS handshake to mutually authenticate client and server. Basically certificate is needed on both client and server
- TTLS (Tunneled TLS) – Defined in RFC 5281. Like PEAP this is also a two stage authentication method. TLS channel to exchange “attribute-value pairs” (AVPs), much like RADIUS. The flexibility of the AVP mechanism allows TTLS servers to validate user credentials against nearly any type of authentication mechanism
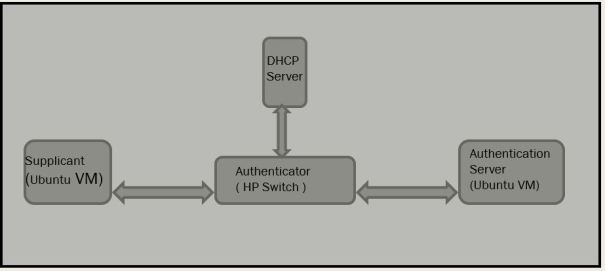
Topology diagram:
I have a Virtual Machine (VM) with Ubuntu 16.04 as Supplicant and one Virtual Machine with Ubuntu 16.04 as Authentication server. I am using Freeradius as RADIUS server. HP 1920 series switch as Authenticator and a wireless router as DHCP server. I have enabled 802.1x on the switch port, Supplicant is connected to this port
DHCP is enabled on Supplicant. Supplicant has no IP address because switch port is blocked by Authenticator. Remember port opened only when client successfully authenticated
Pre-requisite:
Below steps to configure Authentication server and Authenticator (switch)
Setup Authentication server
I am using freeradius as an Authentication server on Ubuntu 16.04 Virtual Machine. Download and install free radius. Freeradius man pages
$sudo apt-get install freeradius

$freeradius -v
divine@divine-VirtualBox:~$ freeradius -v
freeradius: FreeRADIUS Version 2.2.8, for host x86_64-pc-linux-gnu, built on Jul 26 2017 at 15:27:21
Copyright (C) 1999-2015 The FreeRADIUS server project and contributors.
There is NO warranty; not even for MERCHANTABILITY or FITNESS FOR A
PARTICULAR PURPOSE.
You may redistribute copies of FreeRADIUS under the terms of the
GNU General Public License.
For more information about these matters, see the file named COPYRIGHT.
divine@divine-VirtualBox:~$
Update configuration files under /etc/freeradius
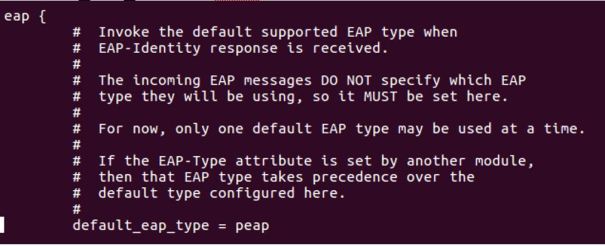
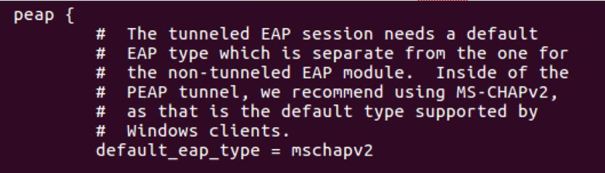
- Configure default EAP type in file eap.conf. default_eap_type = peap under eap block and default_eap_type = mschapv2 under peap block
2. Create user credentials in ‘users’ file. I have created username: divine and password: divine123

3. Create shared secret key in client.conf file. Add below line in the file, 192.168.1.12/24 is Authenticator (or switch) address. I have created secret key divine123. Note: This key needs to be configured on Authenticator also
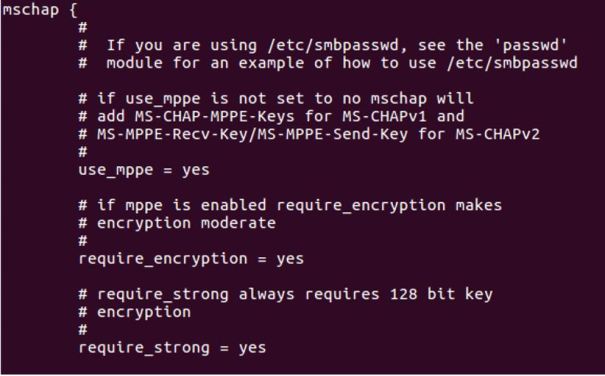
 4. Configure mschap under /etc/freeradius/modules/mschap
 5. Start freeradius server. $sudo service freeradius restart. Make sure server is running and listening on port 1812
 6. Now the server is running let’s test it to make sure it can handle incoming request. If you receive Access-Accept it means configuration is good. Try this command,
radtest <user> <password> <radius server ip> <port#> <shared secret>

Setup Authenticator (switch)
I am using a HP 1920 series switch as an Authenticator. Setting authenticator is easy, all you need to do is configure Authentication server (RADIUS) IP address and shared secret key this is the same key we setup on Authentication server.
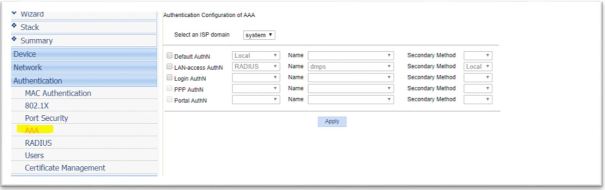
- Configure Authentication Method

2. Configure Authentication Server IP, Shared secret key. Note: Shared secret key is same as we configured on Authentication server

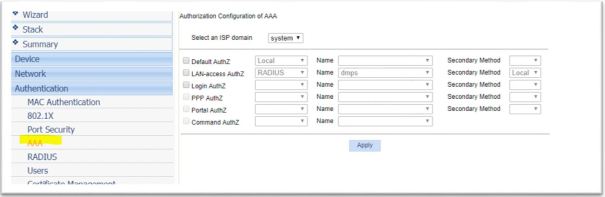
3. Associate RADIUS configuration with authentication and authorization
Generate self-signed certificate on Radius server and Client machine
We need SSL certificate on client and server depending which EAP method we use. Follow below steps to generate self signed certificate on client and server.
Generate CA (Certification Authority) certificate, server certificate and server key under /etc/freeradius/certs
divine@divine-VirtualBox:~/certs$ sudo openssl genrsa -des3 -out ca.key 1024
divine@divine-VirtualBox:~/certs$ openssl req -new -key ca.key -out ca.csr
divine@divine-VirtualBox:~/certs$ sudo openssl x509 -days 1095  -signkey ca.key -in ca.csr -req -out ca.crt

##Generate server key and certificate
divine@divine-VirtualBox:~/certs$ sudo openssl genrsa -des3 -out server.key 1024

##The signing request for the server certificate is generated by
divine@divine-VirtualBox:~/certs$ sudo openssl req  -new -key server.key -out server.csr

##A certificate serial number will be maintained in ca.serial
$echo -ne '01' > ca.serial

## Generate server certificate
divine@divine-VirtualBox:~/certs$ sudo openssl x509 -days 730 -CA ca.crt -CAkey ca.key  -in server.csr -req -out server.crt -CAserial ca.serial
Generate client key and certificate
We will sign client certificate with same CA which was used to sign server certificate so import CA certificate (ca.pem) and key (ca.key) from server to client machine
#Generate client private key
divine@divine-VirtualBox:~/certs$ sudo openssl genrsa -des3 -out client.key 1024

##The signing request for the client certificate is generated by
divine@divine-VirtualBox:~/certs$ sudo openssl req  -new -key client.key -out client.csr

##A certificate serial number will be maintained in ca.serial
$echo -ne '01' > ca.serial

## Generate client certificate
divine@divine-VirtualBox:~/certs$ sudo openssl x509 -days 730 -CA ca.pem -CAkey ca.key  -in client.csr -req -out client.crt -CAserial ca.serial
Procedure
Our setup is ready let’s try 802.1x authentication from Supplicant or client. I am using an Ubuntu 16.04 Virtual Machine as Supplicant. Enable 802.1x on Ubuntu, on the desktop click on System Settings -> Network -> Options
EAP-Type: PEAP with no server certificate validation
- In this mode certificate on server side is not needed, as you can see ‘No CA certificate is required’ checked in. In this mode no certificate exchanged between Authentication server and Supplicant

2. Once 802.1x starts Supplicant will ask for user name password in my case it is divine/divine123. 
3. Supplicant gets IP address from DHCP which mean port on switch is now open. Try ping test to authenticator and server make sure ping test pass
EAP-Type: PEAP with server certificate validation
1.Update eap.conf file in Authentication server. Make below three changes .
private_key_file = ${conf_dir}/server.key
certificate_file = ${conf_dir}/server.crt
CA_file = ${conf_dir}/ca.crt
2. Import ca.pem file from Authentication server to Supplicant machine. Under CA certificate add ca.pem and uncheck ‘No CA certificate is required’. This will make sure to validate server certificate

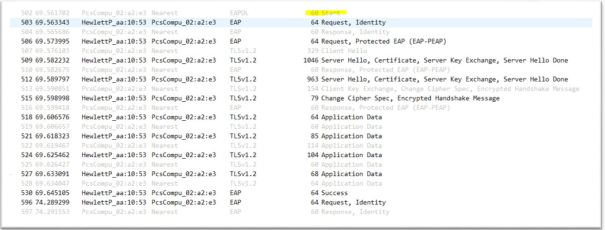
3. Disable and enable LAN interface (sudo ifconfig enp0s3 down & sudo ifconfig enp0s3 up). Below wireshark capture show EAP message exchange between Authenticator and Supplicant
4. Make sure Supplicant gets DHCP IP address. Ping Authenticator or server and make sure ping test pass
EAP-TYPE:TLS
In this mode both server and client need certificate.
1.Follow instructions to generate certificate on client machine
2. Change default_eap_type to tls in eap.conf file, leave other setting as it is
 3. Configure Supplicant

4. Disable and enable LAN port on supplicant to trigger 802.1x (sudo ifconfig enps03 down & sudo ifconfig enp0s3 up). Eap packets captured on Wireshark as you can see client and server side certificate exchanged

5. Make sure Supplicant gets DHCP IP address. Ping Authenticator or server and make sure ping test pass
EAP-TYPE: TTLS (Tunneled TLS)
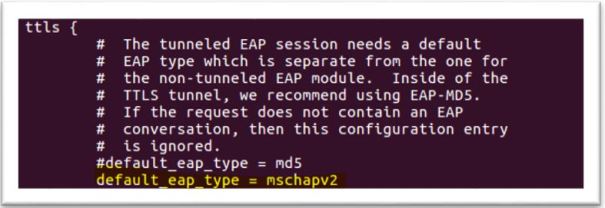
1.Change default_eap_type to ttls in eap.conf file also under ttls change default_eap_type to mschapv2. leave other setting as it is

2. Configure Supplicant. Tunneled tls doesn’t require certificate on supplicant

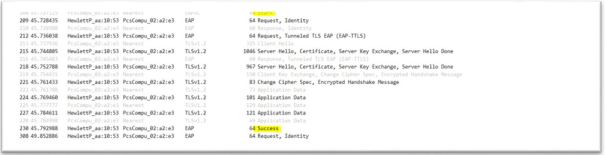
3. Disable and enable LAN port on supplicant to trigger 802.1x (sudo ifconfig enps03 down & sudo ifconfig enp0s3 up). Eap packets captured on Wireshark as you can see client and server side certificate exchanged
4. Make sure Supplicant gets DHCP IP address. Ping Authenticator or server and make sure ping test pass
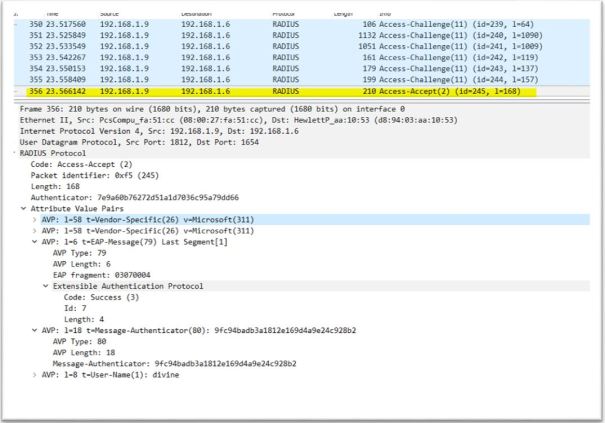
Radius messages between Authenticator and Authentication server
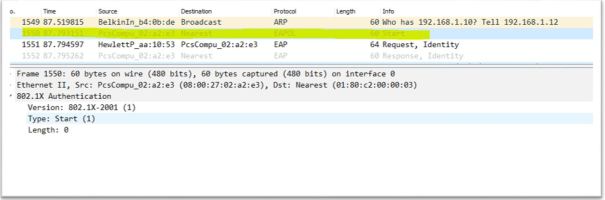
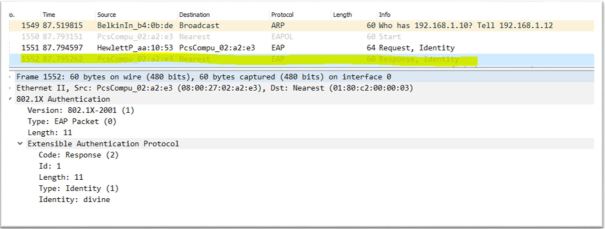
1.Supplicant sends EAP-Start message to Authenticator. Destination mac used in this message is a multicast address:01:80:c2:00:00:03 and type:0x888e
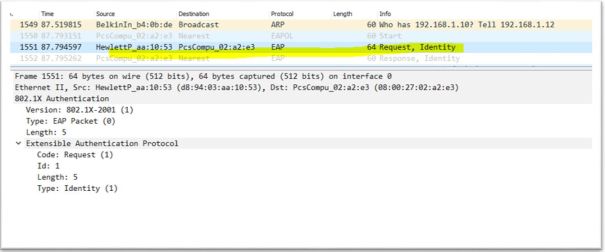
2. Authenticator ask for identify by sending Request-Identity message
3. Supplicant respond to identity message by sending Response-Identity message. In this message Supplicant sends username (divine), destination mac is multicast
4. Upon receiving the Response-Identity from Supplicant, Authenticator sends Radius message Access-Request to Authentication server. This message contains Authenticator ID, IP address and Supplicant username, mac address
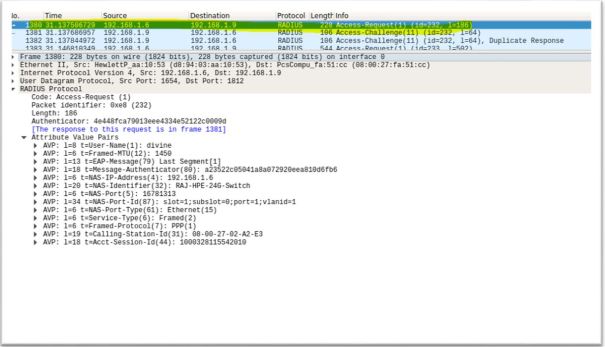
5. Authentication server look for username in user list if it finds username it sends challenge messages. Authentication servers sends multiple challenge messages to authenticate & authorize Supplicant

6. After server satisfied with challenge response from Supplicate it sends Access-Accept. Upon receiving Access-Accept Authenticator sends Success EAP message to Supplicant and open the port