I briefly touched Linux container network type in Lab-36. In this lab I will go over various methods to virtualize Linux container network. Linux containers support these types of network virtualization:
- empty
- phys
- veth
- vlan
- macvlan supports these modes:
- bridge
- vepa
- private
You can read more about Linux container manual pages here
Prerequisite
Using Lab-36 install Linux container. In this lab I am using Centos 7
Linux container (lxc) configuration file
lxc support two types of configuration files. Since we are working on network I will concentrate on network setting only:
- Default configuration file: In my OS this files is located in this path /etc/lxc/default.conf. This file contains default network types. Container inherits default network types from this file. default network setting in my system
#cat default.conf
lxc.network.type = veth
lxc.network.link = virbr0
lxc.network.flags = up
- Container configuration file: Each container has its own configuration file, in my OS this file is located in this path /var/lib/lxc/<container name>/conf. When container starts it uses this config file to setup container run time environment including network. This file inherits network setting from default.conf file. This is my container network file looks like for container lxc_cn1
# Template used to create this container: /usr/share/lxc/templates/lxc-ubuntu
# Parameters passed to the template:
# For additional config options, please look at lxc.container.conf(5)

# Common configuration
lxc.include = /usr/share/lxc/config/ubuntu.common.conf

# Container specific configuration
lxc.rootfs = /var/lib/lxc/lxc_cn1/rootfs
lxc.mount = /var/lib/lxc/lxc_cn1/fstab
lxc.utsname = lxc_cn1
lxc.arch = amd64


# Network configuration
lxc.network.type = veth
lxc.network.hwaddr = 00:16:3e:43:aa:ba
lxc.network.flags = up
lxc.network.link = virbr0
In my exercises I will be updating this file to create different network types.
I will perform these connectivity tests where ever applicable
- Ping test from container to container
- Ping test from host to container and container to host
- Ping to external system
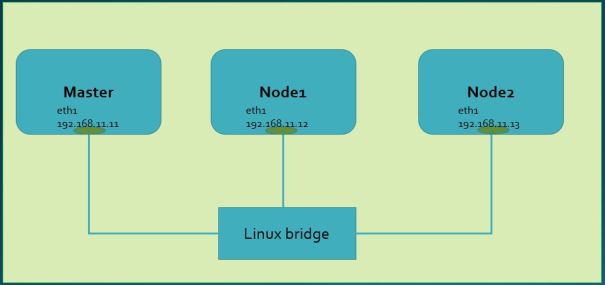
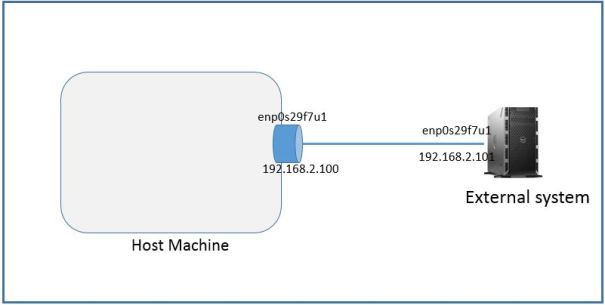
Below lab topology. I am using Linux servers connected thru physical interface enp0s29f7u1. I will create Linux containers on machine named host machine.
lxc.network.type= empty
In this mode no network interface created inside container. This option can be used when container is standalone and don’t need network connectivity.
create a container
#lxc-create -t ubuntu -n empty_cn1
Update container configuration file /var/lib/lxc/empty_cn1/config
# Network configuration
lxc.network.type = empty
lxc.network.flags = up
Start the container and check network setting
[root@localhost]# lxc-start -n empty_cn1 -d

[root@localhost]# lxc-info -n empty_cn1
Name:           empty_cn1
State:          RUNNING
PID:            11825
CPU use:        0.20 seconds
BlkIO use:      0 bytes
Memory use:     3.07 MiB
KMem use:       0 bytes
Link:           virbr0
 TX bytes:      3.01 MiB
 RX bytes:      7.31 KiB
 Total bytes:   3.01 MiB


//check container network setting. No interface created other than loopback
[root@localhost]# lxc-attach -n empty_cn1 /sbin/ip address
1: lo: <LOOPBACK,UP,LOWER_UP> mtu 65536 qdisc noqueue state UNKNOWN qlen 1
    link/loopback 00:00:00:00:00:00 brd 00:00:00:00:00:00
    inet 127.0.0.1/8 scope host lo
       valid_lft forever preferred_lft forever
    inet6 ::1/128 scope host
       valid_lft forever preferred_lft forever
lxc.network.type= phys
This option links host interface specified in lxc.network.link to container. To run this option you need an unused interface which can be assigned to container. Once interface assigned to container it disappears from host interface list.

Create a container
[root@localhost ~]# lxc-create -t ubuntu -n phys_cn1
Checking cache download in /var/cache/lxc/precise/rootfs-amd64 ...
Copy /var/cache/lxc/precise/rootfs-amd64 to /var/lib/lxc/phys_cn1/rootfs ...
Copying rootfs to /var/lib/lxc/phys_cn1/rootfs ...
Generating locales...
  en_US.UTF-8... up-to-date
Generation complete.
Creating SSH2 RSA key; this may take some time ...
Creating SSH2 DSA key; this may take some time ...
Creating SSH2 ECDSA key; this may take some time ...
Timezone in container is not configured. Adjust it manually.

##
# The default user is 'ubuntu' with password 'ubuntu'!
# Use the 'sudo' command to run tasks as root in the container.
##
Edit container config file /var/lib/lxc/phys_cn1/config. Note: I have updated fields in bold italic
lxc.network.link = enp0s29f7u1
lxc.network.type = phys
lxc.network.ipv4 = 192.168.2.1/24
# Network configuration
lxc.network.type = phys
lxc.network.hwaddr = 00:16:3e:bf:a5:4e
lxc.network.flags = up
lxc.network.link = enp0s29f7u1
lxc.network.ipv4 = 192.168.2.1/24
Start container and check network setting
[root@localhost]# lxc-start -n phys_cn1 -d
[root@localhost]# lxc-info -n phys_cn1
Name:           phys_cn1
State:          RUNNING
PID:            23805
IP:             192.168.2.1
CPU use:        0.21 seconds
BlkIO use:      0 bytes
Memory use:     3.10 MiB
KMem use:       0 bytes
Link:           enp0s29f7u1
 Total bytes:   0 bytes
[root@localhost phys_cn1]#

//network interface disappeared from host
[root@localhost ~]# ifconfig enp0s29f7u1
enp0s29f7u1: error fetching interface information: Device not found
Login to container and perform ping test to host and external system
[root@localhost]# lxc-console -n phys_cn1

//interface enp0s29f7u1 linked to container. IP address and mac assigned from
container configuration file
ubuntu@phys_cn1:~$ ifconfig
enp0s29f7u1 Link encap:Ethernet  HWaddr 00:16:3e:bf:a5:4e
          inet addr:192.168.2.1  Bcast:192.168.2.255  Mask:255.255.255.0
          inet6 addr: fe80::216:3eff:febf:a54e/64 Scope:Link
          UP BROADCAST RUNNING MULTICAST  MTU:1500  Metric:1
          RX packets:9422 errors:0 dropped:0 overruns:0 frame:0
          TX packets:12999 errors:0 dropped:0 overruns:0 carrier:0
          collisions:0 txqueuelen:1000
          RX bytes:934818 (934.8 KB)  TX bytes:2522162 (2.5 MB)

lo        Link encap:Local Loopback
          inet addr:127.0.0.1  Mask:255.0.0.0
          inet6 addr: ::1/128 Scope:Host
          UP LOOPBACK RUNNING  MTU:65536  Metric:1
          RX packets:0 errors:0 dropped:0 overruns:0 frame:0
          TX packets:0 errors:0 dropped:0 overruns:0 carrier:0
          collisions:0 txqueuelen:1
          RX bytes:0 (0.0 B)  TX bytes:0 (0.0 B)


//ping to external system passed
ubuntu@phys_cn1:~$ ping 192.168.2.101
PING 192.168.2.101 (192.168.2.101) 56(84) bytes of data.
64 bytes from 192.168.2.101: icmp_req=1 ttl=64 time=0.699 ms
64 bytes from 192.168.2.101: icmp_req=2 ttl=64 time=0.217 ms
64 bytes from 192.168.2.101: icmp_req=3 ttl=64 time=0.204 ms
^C
--- 192.168.2.101 ping statistics ---
3 packets transmitted, 3 received, 0% packet loss, time 2000ms
rtt min/avg/max/mdev = 0.204/0.373/0.699/0.230 ms

ubuntu@phys_cn1:~$ ip route
192.168.2.0/24 dev enp0s29f7u1  proto kernel  scope link  src 192.168.2.1
ubuntu@phys_cn1:~$
Ping container from host
//ping to container from host failed
[root@localhost ~]# ping 192.168.2.1
PING 192.168.2.1 (192.168.2.1) 56(84) bytes of data.
^C
--- 192.168.2.1 ping statistics ---
4 packets transmitted, 0 received, +4 errors, 100% packet loss, time 3004ms
Stop container
//stop container
[root@localhost phys_cn1]# lxc-stop -n phys_cn1

//host interface reappeared
[root@localhost phys_cn1]# ifconfig enp0s29f7u1
enp0s29f7u1: flags=4163<UP,BROADCAST,RUNNING,MULTICAST>  mtu 1500
        inet 192.168.2.100  netmask 255.255.255.0  broadcast 192.168.2.255
        inet6 fe80::250:b6ff:fe19:4165  prefixlen 64  scopeid 0x20
        ether 00:50:b6:19:41:65  txqueuelen 1000  (Ethernet)
        RX packets 9427  bytes 935162 (913.2 KiB)
        RX errors 0  dropped 0  overruns 0  frame 0
        TX packets 13025  bytes 2525292 (2.4 MiB)
        TX errors 0  dropped 0 overruns 0  carrier 0  collisions 0
lxc.network.type = vlan
In this mode a vlan interface is linked with the interface specified by the lxc.network.link and assigned to the container. The vlan identifier is specified by the option lxc.network.vlan.id
In this mode container can communicate with external system but can’t communicate with host

Create a container vlan_cn1
[root@localhost]# lxc-create -t ubuntu -n vlan_cn1
Checking cache download in /var/cache/lxc/precise/rootfs-amd64 ...
Copy /var/cache/lxc/precise/rootfs-amd64 to /var/lib/lxc/vlan_cn1/rootfs ...
Copying rootfs to /var/lib/lxc/vlan_cn1/rootfs ...
Generating locales...
  en_US.UTF-8... up-to-date
Generation complete.
Creating SSH2 RSA key; this may take some time ...
Creating SSH2 DSA key; this may take some time ...
Creating SSH2 ECDSA key; this may take some time ...
Timezone in container is not configured. Adjust it manually.

##
# The default user is 'ubuntu' with password 'ubuntu'!
# Use the 'sudo' command to run tasks as root in the container.
##

[root@localhost]# lxc-info -n vlan_cn1
Name:           vlan_cn1
State:          STOPPED
[root@localhost]#
Edit container configuration file. Note: I have updated fields in bold and italic
lxc.network.type= vlan
lxc.network.link = enp0s29f7u1
lxc.network.vlan.id = 100
lxc.network.ipv4 = 192.168.2.1/24
# Network configuration
lxc.network.type = vlan
lxc.network.vlan.id = 100
lxc.network.hwaddr = 00:16:3e:e2:d6:19
lxc.network.flags = up
lxc.network.link = enp0s29f7u1
lxc.network.ipv4 = 192.168.2.1/24
Start container
[root@localhost]# lxc-start -n vlan_cn1 -d
[root@localhost]# lxc-info -n vlan_cn1
Name:           vlan_cn1
State:          RUNNING
PID:            24472
IP:             192.168.2.1
CPU use:        0.21 seconds
BlkIO use:      0 bytes
Memory use:     3.70 MiB
KMem use:       0 bytes
Link:           enp0s29f7u1
 TX bytes:      913.24 KiB
 RX bytes:      2.41 MiB
 Total bytes:   3.30 MiB
[root@localhost vlan_cn1]#
To test connectivity we need to create vlan interface on external system. To create vlan interface you need to Install vconfig
#yum install epel-release
#yum install vconfig
[root@localhost ~]# yum install epel-release
[root@localhost ~]# yum install vconfig

//add vlan interface with vlan.id=100 on external system
[root@localhost ~]# vconfig add enp0s29f7u1 100
WARNING:  Could not open /proc/net/vlan/config.  Maybe you need to load the 8021q module, or maybe you are not using PROCFS??
Added VLAN with VID == 100 to IF -:enp0s29f7u1:-

//a vlan inteface with vlan.id=100 created
[root@localhost ~]# ip addr
5: enp0s29f7u1: <BROADCAST,MULTICAST,UP,LOWER_UP> mtu 1500 qdisc pfifo_fast state UP qlen 1000
    link/ether 00:50:b6:19:41:63 brd ff:ff:ff:ff:ff:ff
    inet 192.168.2.101/24 scope global enp0s29f7u1
       valid_lft forever preferred_lft forever
    inet6 fe80::250:b6ff:fe19:4163/64 scope link
       valid_lft forever preferred_lft forever
6: enp0s29f7u1.100@enp0s29f7u1: <BROADCAST,MULTICAST> mtu 1500 qdisc noop state DOWN
    link/ether 00:50:b6:19:41:63 brd ff:ff:ff:ff:ff:ff

//remove ip from base interface
[root@localhost ~]# ip addr del 192.168.2.101/24 dev enp0s29f7u1

//add ip to vlan interface
[root@localhost ~]# ip addr add 192.168.2.101/24 dev enp0s29f7u1.100@enp0s29f7u1

[root@localhost ~]# ifconfig enp0s29f7u1.100@enp0s29f7u1
enp0s29f7u1.100: flags=4098<BROADCAST,MULTICAST>  mtu 1500
inet 192.168.2.101  netmask 255.255.255.0  broadcast 0.0.0.0
ether 00:50:b6:19:41:63  txqueuelen 0  (Ethernet)
RX packets 0  bytes 0 (0.0 B)
RX errors 0  dropped 0  overruns 0  frame 0
TX packets 0  bytes 0 (0.0 B)
TX errors 0  dropped 0 overruns 0  carrier 0  collisions 0

[root@localhost ~]# ifconfig enp0s29f7u1.100@enp0s29f7u1 up

[root@localhost ~]# ifconfig enp0s29f7u1.100@enp0s29f7u1
enp0s29f7u1.100: flags=4163<UP,BROADCAST,RUNNING,MULTICAST>  mtu 1500
inet 192.168.2.101  netmask 255.255.255.0  broadcast 0.0.0.0
inet6 fe80::250:b6ff:fe19:4163  prefixlen 64  scopeid 0x20
ether 00:50:b6:19:41:63  txqueuelen 0  (Ethernet)
RX packets 0  bytes 0 (0.0 B)
RX errors 0  dropped 0  overruns 0  frame 0
TX packets 0  bytes 0 (0.0 B)
TX errors 0  dropped 0 overruns 0  carrier 0  collisions 0

[root@localhost ~]#ip addr
5: enp0s29f7u1: <BROADCAST,MULTICAST,UP,LOWER_UP> mtu 1500
qdisc pfifo_fast state UP qlen 1000
link/ether 00:50:b6:19:41:63 brd ff:ff:ff:ff:ff:ff
inet6 fe80::250:b6ff:fe19:4163/64 scope link
valid_lft forever preferred_lft forever

6: enp0s29f7u1.100@enp0s29f7u1: <BROADCAST,MULTICAST,UP,LOWER_UP> mtu 1500
qdisc noqueue state UP     link/ether 00:50:b6:19:41:63 brd ff:ff:ff:ff:ff:ff
inet 192.168.2.101/24 scope global enp0s29f7u1.100
valid_lft forever preferred_lft forever
inet6 fe80::250:b6ff:fe19:4163/64 scope link
valid_lft forever preferred_lft forever
Login to container and ping to external system
ubuntu@vlan_cn1:~$ ifconfig
eth0      Link encap:Ethernet  HWaddr 00:16:3e:e2:d6:19
          inet addr:192.168.2.1  Bcast:192.168.2.255  Mask:255.255.255.0
          inet6 addr: fe80::216:3eff:fee2:d619/64 Scope:Link
          UP BROADCAST RUNNING MULTICAST  MTU:1500  Metric:1
          RX packets:268 errors:0 dropped:0 overruns:0 frame:0
          TX packets:914 errors:0 dropped:0 overruns:0 carrier:0
          collisions:0 txqueuelen:1000
          RX bytes:21956 (21.9 KB)  TX bytes:81868 (81.8 KB)

lo        Link encap:Local Loopback
          inet addr:127.0.0.1  Mask:255.0.0.0
          inet6 addr: ::1/128 Scope:Host
          UP LOOPBACK RUNNING  MTU:65536  Metric:1
          RX packets:709 errors:0 dropped:0 overruns:0 frame:0
          TX packets:709 errors:0 dropped:0 overruns:0 carrier:0
          collisions:0 txqueuelen:1
          RX bytes:78800 (78.8 KB)  TX bytes:78800 (78.8 KB)

//ping to external system passed
ubuntu@vlan_cn1:~$ ping 192.168.2.101
PING 192.168.2.101 (192.168.2.101) 56(84) bytes of data.
64 bytes from 192.168.2.101: icmp_req=1 ttl=64 time=0.387 ms
64 bytes from 192.168.2.101: icmp_req=2 ttl=64 time=0.393 ms
64 bytes from 192.168.2.101: icmp_req=3 ttl=64 time=0.325 ms
64 bytes from 192.168.2.101: icmp_req=4 ttl=64 time=0.223 ms
^C
--- 192.168.2.101 ping statistics ---
4 packets transmitted, 4 received, 0% packet loss, time 2999ms
rtt min/avg/max/mdev = 0.223/0.332/0.393/0.068 ms
ubuntu@vlan_cn1:~$
Check incoming packets on external system. As can be seen packets are received with vlan.id=100
//see underlined for vlan.id
[root@localhost ~]# tcpdump -i enp0s29f7u1 -XX
tcpdump: WARNING: enp0s29f7u1: no IPv4 address assigned
tcpdump: verbose output suppressed, use -v or -vv for full protocol decode
listening on enp0s29f7u1, link-type EN10MB (Ethernet), capture size 65535 bytes
23:51:38.940412 IP 192.168.2.1 > 192.168.2.101: ICMP echo request, id 305, seq 115, length 64
        0x0000:  0050 b619 4163 0016 3ee2 d619 8100 0064  .P..Ac..>......d
        0x0010:  0800 4500 0054 5423 4000 4001 60cf c0a8  ..E..TT#@.@.`...
        0x0020:  0201 c0a8 0265 0800 6ddb 0131 0073 0250  .....e..m..1.s.P
        0x0030:  9558 0000 0000 2305 0f00 0000 0000 1011  .X....#.........
        0x0040:  1213 1415 1617 1819 1a1b 1c1d 1e1f 2021  ...............!
        0x0050:  2223 2425 2627 2829 2a2b 2c2d 2e2f 3031  "#$%&'()*+,-./01
        0x0060:  3233 3435 3637                           234567
23:51:38.940438 IP 192.168.2.101 > 192.168.2.1: ICMP echo reply, id 305, seq 115, length 64
        0x0000:  0016 3ee2 d619 0050 b619 4163 8100 0064  ..>....P..Ac...d
        0x0010:  0800 4500 0054 9f4b 0000 4001 55a7 c0a8  ..E..T.K..@.U...
        0x0020:  0265 c0a8 0201 0000 75db 0131 0073 0250  .e......u..1.s.P
        0x0030:  9558 0000 0000 2305 0f00 0000 0000 1011  .X....#.........
        0x0040:  1213 1415 1617 1819 1a1b 1c1d 1e1f 2021  ...............!
        0x0050:  2223 2425 2627 2829 2a2b 2c2d 2e2f 3031  "#$%&'()*+,-./01
        0x0060:  3233 3435 3637                           234567
Ping container from host
//ping from host to container failed
[root@localhost ~]# ping 192.168.2.1
PING 192.168.2.1 (192.168.2.1) 56(84) bytes of data.
From 166.127.6.242 icmp_seq=1 Time to live exceeded
From 166.127.6.242 icmp_seq=2 Time to live exceeded
From 166.127.6.242 icmp_seq=3 Time to live exceeded
From 166.127.6.242 icmp_seq=4 Time to live exceeded
From 166.127.6.242 icmp_seq=5 Time to live exceeded
^C
--- 192.168.2.1 ping statistics ---
5 packets transmitted, 0 received, +5 errors, 100% packet loss, time 4006ms

[root@localhost ~]#
lxc.network.type= veth
In this mode a virtual ethernet pair device is created with one side assigned to the container and the other side attached to a bridge specified by the lxc.network.link option.
In this mode containers can communicate with other, host can communicate with containers and containers can communicate with external system.
Below our topology diagram host machine is connected to external Linux server via physical interface enp0s29f7u1. This interface linked to bridge lxcbr0. No IP needed on this interface enp0s29f7u1
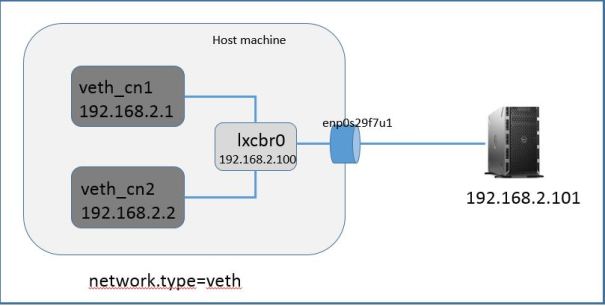
First we need to create a Linux bridge (lxcbr0), assign IP address to bridge (in the same subnet as containers) and link host machine physical interface (enp0s29f7u1) to it. I am using brctl command to perform these tasks
//create bridge lxcbr0
[root@localhost]# sudo brctl addbr lxcbr0

//assign IP address to bridge
[root@localhost ~]# ip addr add 192.168.2.100/24 dev lxcbr0

[root@localhost ~]# ifconfig lxcbr0
 lxcbr0: flags=4163<UP,BROADCAST,RUNNING,MULTICAST>  mtu 1500
         inet 192.168.2.100  netmask 255.255.255.0  broadcast 0.0.0.0
         inet6 fe80::9c7e:c7ff:fe64:be71  prefixlen 64  scopeid 0x20
         ether fe:01:92:6f:88:21  txqueuelen 1000  (Ethernet)
         RX packets 1554  bytes 505536 (493.6 KiB)
         RX errors 0  dropped 0  overruns 0  frame 0
         TX packets 19  bytes 3403 (3.3 KiB)
         TX errors 0  dropped 0 overruns 0  carrier 0  collisions 0

//link physical host interface to bridge
[root@localhost ~]# brctl addif lxcbr0 enp0s29f7u1

//bridge show interface associated wth it
[root@localhost ~]# brctl show
 bridge name     bridge id               STP enabled     interfaces
 lxcbr0          8000.0050b6194165       no              enp0s29f7u1
 virbr0          8000.000000000000       no

//no IP needed on physical interface
[root@localhost ~]# ifconfig enp0s29f7u1
enp0s29f7u1: flags=4163<UP,BROADCAST,RUNNING,MULTICAST>  mtu 1500
        ether 00:50:b6:19:41:65  txqueuelen 1000  (Ethernet)
        RX packets 9422  bytes 934818 (912.9 KiB)
        RX errors 0  dropped 0  overruns 0  frame 0
        TX packets 12589  bytes 2384139 (2.2 MiB)
        TX errors 0  dropped 0 overruns 0  carrier 0  collisions 0
Create two conatiners named veth_cn1 & veth_cn2
#lxc-create -t ubuntu -n veth_cn1
#lxc-create -t ubuntu -n veth_cn2
Edit container configuration files. container configuration files are located in this path /var/lib/lxc//config. Note: Remember I am using Centos, path on your machine may differ if you are not using Centos
container veth_cn1 configuration file. Note: I have updated fields in bold italic
# Network configuration
 lxc.network.type = veth
 lxc.network.hwaddr = 00:16:3e:0a:3b:cc
 lxc.network.flags = up
 lxc.network.link = lxcbr0
 lxc.network.ipv4 = 192.168.2.1/24
Container veth_cn2 configuration file. Note: I have updated fields in bold italic
# Network configuration
 lxc.network.type = veth
 lxc.network.hwaddr = 00:16:3e:9b:66:cf
 lxc.network.flags = up
 lxc.network.link = lxcbr0
 lxc.network.ipv4 = 192.168.2.2/24
Start both containers
[root@localhost]# lxc-start -n veth_cn1 -d

[root@localhost]# lxc-start -n veth_cn2 -d

//as you see two new veth interfaces created and attached to bridge (lxcbr0). The
other end of these interfaces are connected to containers
[root@localhost]# sudo brctl show
bridge name     bridge id               STP enabled     interfaces
lxcbr0          8000.0050b6194165       no              enp0s29f7u1
                                                        veth2GN030
                                                        vethMFY0GP
virbr0          8000.000000000000       no

//check veth interfaces
[root@localhost ~]# ifconfig veth2GN030
veth2GN030: flags=4163<UP,BROADCAST,RUNNING,MULTICAST>  mtu 1500
        inet6 fe80::fc01:92ff:fe6f:8821  prefixlen 64  scopeid 0x20
        ether fe:01:92:6f:88:21  txqueuelen 1000  (Ethernet)
        RX packets 882  bytes 295072 (288.1 KiB)
        RX errors 0  dropped 0  overruns 0  frame 0
        TX packets 937  bytes 307987 (300.7 KiB)
        TX errors 0  dropped 0 overruns 0  carrier 0  collisions 0

[root@localhost ~]# ifconfig vethMFY0GP
vethMFY0GP: flags=4163<UP,BROADCAST,RUNNING,MULTICAST>  mtu 1500
        inet6 fe80::fca6:3ff:fe2d:cbb5  prefixlen 64  scopeid 0x20
        ether fe:a6:03:2d:cb:b5  txqueuelen 1000  (Ethernet)
        RX packets 899  bytes 302950 (295.8 KiB)
        RX errors 0  dropped 0  overruns 0  frame 0
        TX packets 897  bytes 297597 (290.6 KiB)
        TX errors 0  dropped 0 overruns 0  carrier 0  collisions 0
Login to first container veth_cn1 using lxc-console, username/password:ubuntu/ubuntu and perform ping tests
[root@localhost ~]# lxc-console -n veth_cn1

ubuntu@veth_cn1:~$ ifconfig
 eth0      Link encap:Ethernet  HWaddr 00:16:3e:0a:3b:cc
           inet addr:192.168.2.1  Bcast:192.168.2.255  Mask:255.255.255.0
           inet6 addr: fe80::216:3eff:fe0a:3bcc/64 Scope:Link
           UP BROADCAST RUNNING MULTICAST  MTU:1500  Metric:1
           RX packets:814 errors:0 dropped:0 overruns:0 frame:0
           TX packets:767 errors:0 dropped:0 overruns:0 carrier:0
           collisions:0 txqueuelen:1000
           RX bytes:273205 (273.2 KB)  TX bytes:260226 (260.2 KB)

 lo        Link encap:Local Loopback
           inet addr:127.0.0.1  Mask:255.0.0.0
           inet6 addr: ::1/128 Scope:Host
           UP LOOPBACK RUNNING  MTU:65536  Metric:1
           RX packets:16 errors:0 dropped:0 overruns:0 frame:0
           TX packets:16 errors:0 dropped:0 overruns:0 carrier:0
           collisions:0 txqueuelen:1
           RX bytes:1184 (1.1 KB)  TX bytes:1184 (1.1 KB)

//ping to bridge interface ip
ubuntu@veth_cn1:~$ ping 192.168.2.100
 PING 192.168.2.100 (192.168.2.100) 56(84) bytes of data.
 64 bytes from 192.168.2.100: icmp_req=1 ttl=64 time=0.098 ms
 64 bytes from 192.168.2.100: icmp_req=2 ttl=64 time=0.040 ms
 64 bytes from 192.168.2.100: icmp_req=3 ttl=64 time=0.043 ms
 64 bytes from 192.168.2.100: icmp_req=4 ttl=64 time=0.041 ms
 ^C
 --- 192.168.2.100 ping statistics ---
 4 packets transmitted, 4 received, 0% packet loss, time 3000ms
 rtt min/avg/max/mdev = 0.040/0.055/0.098/0.025 ms

//ping to container veth_cn2
ubuntu@veth_cn1:~$ ping 192.168.2.2
 PING 192.168.2.2 (192.168.2.2) 56(84) bytes of data.
 64 bytes from 192.168.2.2: icmp_req=1 ttl=64 time=0.092 ms
 64 bytes from 192.168.2.2: icmp_req=2 ttl=64 time=0.045 ms
 ^C
 --- 192.168.2.2 ping statistics ---
 2 packets transmitted, 2 received, 0% packet loss, time 1000ms
 rtt min/avg/max/mdev = 0.045/0.068/0.092/0.024 ms

//ping to external system
ubuntu@veth_cn1:~$ ping 192.168.2.101
 PING 192.168.2.101 (192.168.2.101) 56(84) bytes of data.
 64 bytes from 192.168.2.101: icmp_req=1 ttl=64 time=0.565 ms
 64 bytes from 192.168.2.101: icmp_req=2 ttl=64 time=0.326 ms
 64 bytes from 192.168.2.101: icmp_req=3 ttl=64 time=0.378 ms
 ^C
 --- 192.168.2.101 ping statistics ---
 3 packets transmitted, 3 received, 0% packet loss, time 1999ms
 rtt min/avg/max/mdev = 0.326/0.423/0.565/0.102 ms
 ubuntu@veth_cn1:~$
Ping from host to containers
//ping to first container veth_cn1
[root@localhost ~]# ping 192.168.2.1
PING 192.168.2.1 (192.168.2.1) 56(84) bytes of data.
64 bytes from 192.168.2.1: icmp_seq=1 ttl=64 time=0.053 ms
64 bytes from 192.168.2.1: icmp_seq=2 ttl=64 time=0.036 ms
64 bytes from 192.168.2.1: icmp_seq=3 ttl=64 time=0.036 ms
^C
--- 192.168.2.1 ping statistics ---
3 packets transmitted, 3 received, 0% packet loss, time 1999ms
rtt min/avg/max/mdev = 0.036/0.041/0.053/0.010 ms


//ping to second container veth_cn2
[root@localhost ~]# ping 192.168.2.2
PING 192.168.2.2 (192.168.2.2) 56(84) bytes of data.
64 bytes from 192.168.2.2: icmp_seq=1 ttl=64 time=0.082 ms
64 bytes from 192.168.2.2: icmp_seq=2 ttl=64 time=0.039 ms
64 bytes from 192.168.2.2: icmp_seq=3 ttl=64 time=0.037 ms
^C
--- 192.168.2.2 ping statistics ---
3 packets transmitted, 3 received, 0% packet loss, time 1999ms
rtt min/avg/max/mdev = 0.037/0.052/0.082/0.022 ms
[root@localhost ~]#
Ping from external system to container veth_cn1 and veth_cn2
//ping to first container veth_cn1
[root@localhost ~]# ping 192.168.2.1
 PING 192.168.2.1 (192.168.2.1) 56(84) bytes of data.
 64 bytes from 192.168.2.1: icmp_seq=1 ttl=64 time=0.417 ms
 64 bytes from 192.168.2.1: icmp_seq=2 ttl=64 time=0.327 ms
 ^C
 --- 192.168.2.1 ping statistics ---
 2 packets transmitted, 2 received, 0% packet loss, time 1000ms
 rtt min/avg/max/mdev = 0.327/0.372/0.417/0.045 ms

//ping to second container veth_cn2
[root@localhost ~]# ping 192.168.2.2
 PING 192.168.2.2 (192.168.2.2) 56(84) bytes of data.
 64 bytes from 192.168.2.2: icmp_seq=1 ttl=64 time=0.614 ms
 64 bytes from 192.168.2.2: icmp_seq=2 ttl=64 time=0.393 ms
 64 bytes from 192.168.2.2: icmp_seq=3 ttl=64 time=0.341 ms
 ^C
 --- 192.168.2.2 ping statistics ---
 3 packets transmitted, 3 received, 0% packet loss, time 2000ms
 rtt min/avg/max/mdev = 0.341/0.449/0.614/0.119 ms
lxc.network.type= macvlan
macvlan supports these three modes
- bridge
- VEPA (Virtual Ethernet Port Aggregator
- private
Let’s try these modes one by one
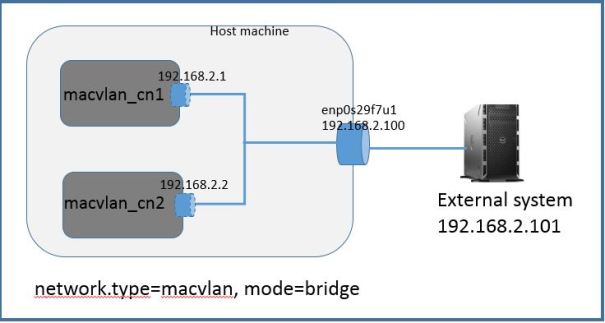
macvlan.mode = bridge
In macvlan bridge mode containers can communicate with each other, containers can communicate with external system and external system can communicate with containers. But containers do not have network access to host. In this mode you are creating logical network interfaces on host physical interface
Below topology diagram to test macvlan bridge mode. External system is a Linux server directly connected to host physical interface and configured in same subnet as containers.
Create two containers
lxc-create -t ubuntu -n macvlan_cn1
lxc-create -t ubuntu -n macvlan_cn2
Edit configuration file for containers.
macvlan_br1 container file: /var/lib/lxc/macvlan_cn1/config. Note: I have updated fields in bold italic
# Network configuration
lxc.network.type = macvlan
lxc.network.macvlan.mode = bridge
lxc.network.hwaddr = 00:16:3e:56:95:80
lxc.network.flags = up
lxc.network.link = enp0s29f7u1
lxc.network.ipv4 = 192.168.2.1/24
macvlan_br2 container file:/var/lib/lxc/macvlan_cn2/config. Note: I have updated fields in bold italics
# Network configuration
lxc.network.type = macvlan
lxc.network.macvlan.mode = bridge
lxc.network.hwaddr = 00:16:3e:cb:f5:71
lxc.network.flags = up
lxc.network.link = enp0s29f7u1
lxc.network.ipv4 = 192.168.2.2/24
Start both containers
#lxc-start -n macvlan_cn1 -d
#lxc-start -n macvlan_cn2 -d

[root@localhost]# lxc-info -n macvlan_cn1
Name:           macvlan_cn1
State:          RUNNING
PID:            8140
IP:             192.168.2.1
CPU use:        0.20 seconds
BlkIO use:      0 bytes
Memory use:     3.95 MiB
KMem use:       0 bytes
Link:           enp0s29f7u1
 TX bytes:      1.11 KiB
 RX bytes:      98.12 KiB
 Total bytes:   99.23 KiB

[root@localhost]# lxc-info -n macvlan_cn2
Name:           macvlan_cn2
State:          RUNNING
PID:            8353
IP:             192.168.2.2
CPU use:        0.20 seconds
BlkIO use:      0 bytes
Memory use:     3.72 MiB
KMem use:       0 bytes
Link:           enp0s29f7u1
 TX bytes:      1.11 KiB
 RX bytes:      98.87 KiB
 Total bytes:   99.98 KiB
Login to first container macvlan_cn1 and perform ping test.
[root@localhost ~]# lxc-console -n macvlan_cn1

ubuntu@macvlan_cn1:~$ ifconfig
eth0      Link encap:Ethernet  HWaddr 00:16:3e:56:95:80
          inet addr:192.168.2.1  Bcast:192.168.2.255  Mask:255.255.255.0
          inet6 addr: fe80::216:3eff:fe56:9580/64 Scope:Link
          UP BROADCAST RUNNING MULTICAST  MTU:1500  Metric:1
          RX packets:12 errors:0 dropped:0 overruns:0 frame:0
          TX packets:21 errors:0 dropped:0 overruns:0 carrier:0
          collisions:0 txqueuelen:1000
          RX bytes:4272 (4.2 KB)  TX bytes:5094 (5.0 KB)

lo        Link encap:Local Loopback
          inet addr:127.0.0.1  Mask:255.0.0.0
          inet6 addr: ::1/128 Scope:Host
          UP LOOPBACK RUNNING  MTU:65536  Metric:1
          RX packets:0 errors:0 dropped:0 overruns:0 frame:0
          TX packets:0 errors:0 dropped:0 overruns:0 carrier:0
          collisions:0 txqueuelen:1
          RX bytes:0 (0.0 B)  TX bytes:0 (0.0 B)

ubuntu@macvlan_cn1:~$ ip route
192.168.2.0/24 dev eth0  proto kernel  scope link  src 192.168.2.1

//ping to container 2 passed
ubuntu@macvlan_cn1:~$ ping 192.168.2.2
PING 192.168.2.2 (192.168.2.2) 56(84) bytes of data.
64 bytes from 192.168.2.2: icmp_req=1 ttl=64 time=0.086 ms
64 bytes from 192.168.2.2: icmp_req=2 ttl=64 time=0.038 ms
64 bytes from 192.168.2.2: icmp_req=3 ttl=64 time=0.038 ms
^C
--- 192.168.2.2 ping statistics ---
3 packets transmitted, 3 received, 0% packet loss, time 2000ms
rtt min/avg/max/mdev = 0.038/0.054/0.086/0.022 ms
Login to second container and perform ping test to first container
ubuntu@macvlan_cn2:~$ ifconfig
eth0      Link encap:Ethernet  HWaddr 00:16:3e:cb:f5:71
          inet addr:192.168.2.2  Bcast:192.168.2.255  Mask:255.255.255.0
          inet6 addr: fe80::216:3eff:fecb:f571/64 Scope:Link
          UP BROADCAST RUNNING MULTICAST  MTU:1500  Metric:1
          RX packets:26 errors:0 dropped:0 overruns:0 frame:0
          TX packets:34 errors:0 dropped:0 overruns:0 carrier:0
          collisions:0 txqueuelen:1000
          RX bytes:7868 (7.8 KB)  TX bytes:8208 (8.2 KB)

lo        Link encap:Local Loopback
          inet addr:127.0.0.1  Mask:255.0.0.0
          inet6 addr: ::1/128 Scope:Host
          UP LOOPBACK RUNNING  MTU:65536  Metric:1
          RX packets:0 errors:0 dropped:0 overruns:0 frame:0
          TX packets:0 errors:0 dropped:0 overruns:0 carrier:0
          collisions:0 txqueuelen:1
          RX bytes:0 (0.0 B)  TX bytes:0 (0.0 B)

//ping to first container ip passed
ubuntu@macvlan_cn2:~$ ping 192.168.2.1
PING 192.168.2.1 (192.168.2.1) 56(84) bytes of data.
64 bytes from 192.168.2.1: icmp_req=1 ttl=64 time=0.055 ms
64 bytes from 192.168.2.1: icmp_req=2 ttl=64 time=0.038 ms
64 bytes from 192.168.2.1: icmp_req=3 ttl=64 time=0.038 ms
64 bytes from 192.168.2.1: icmp_req=4 ttl=64 time=0.037 ms
^C
--- 192.168.2.1 ping statistics ---
4 packets transmitted, 4 received, 0% packet loss, time 3000ms
rtt min/avg/max/mdev = 0.037/0.042/0.055/0.007 ms

ubuntu@macvlan_cn2:~$ ip route
192.168.2.0/24 dev eth0  proto kernel  scope link  src 192.168.2.2
Ping test from host to containers
//ping from host to container 1 failed
[root@localhost ~]# ping 192.168.2.1
PING 192.168.2.1 (192.168.2.1) 56(84) bytes of data.
^C
--- 192.168.2.1 ping statistics ---
3 packets transmitted, 0 received, 100% packet loss, time 1999ms

//ping from host to container 2 failed
[root@localhost ~]# ping 192.168.2.2
PING 192.168.2.2 (192.168.2.2) 56(84) bytes of data.
^C
--- 192.168.2.2 ping statistics ---
3 packets transmitted, 0 received, 100% packet loss, time 1999ms
Ping to external machine. Login to a container and perform ping test to external system IP address
//ping from second container to external system pass
ubuntu@macvlan_br2:~$ ping 192.168.2.101
PING 192.168.2.101 (192.168.2.101) 56(84) bytes of data.
64 bytes from 192.168.2.101: icmp_req=1 ttl=64 time=0.460 ms
64 bytes from 192.168.2.101: icmp_req=2 ttl=64 time=0.433 ms
64 bytes from 192.168.2.101: icmp_req=3 ttl=64 time=0.316 ms
^C
--- 192.168.2.101 ping statistics ---
3 packets transmitted, 3 received, 0% packet loss, time 2000ms
rtt min/avg/max/mdev = 0.316/0.403/0.460/0.062 ms
ubuntu@macvlan_br2:~$

//ping from first container to external system
ubuntu@macvlan_br1:~$ ping 192.168.2.101
PING 192.168.2.101 (192.168.2.101) 56(84) bytes of data.
64 bytes from 192.168.2.101: icmp_req=1 ttl=64 time=0.774 ms
64 bytes from 192.168.2.101: icmp_req=2 ttl=64 time=0.329 ms
64 bytes from 192.168.2.101: icmp_req=3 ttl=64 time=0.218 ms
^C
--- 192.168.2.101 ping statistics ---
3 packets transmitted, 3 received, 0% packet loss, time 2000ms
rtt min/avg/max/mdev = 0.218/0.440/0.774/0.240 ms
ubuntu@macvlan_br1:~$
tcpdump on external machine
[root@]# tcpdump -i enp0s29f7u1
tcpdump: verbose output suppressed, use -v or -vv for full protocol decode
listening on enp0s29f7u1, link-type EN10MB (Ethernet), capture size 65535 bytes
23:50:13.477433 IP 0.0.0.0.bootpc > 255.255.255.255.bootps: BOOTP/DHCP, Request from 00:16:3e:56:95:80 (oui Unknown), length 300
23:50:14.071784 IP 192.168.2.1 > 192.168.2.101: ICMP echo request, id 306, seq 9, length 64
23:50:14.071806 IP 192.168.2.101 > 192.168.2.1: ICMP echo reply, id 306, seq 9, length 64
23:50:15.071807 IP 192.168.2.1 > 192.168.2.101: ICMP echo request, id 306, seq 10, length 64
23:50:15.071828 IP 192.168.2.101 > 192.168.2.1: ICMP echo reply, id 306, seq 10, length 64
macvlan.mode = vepa (virtual ethernet port aggregation)
In this mode containers have access to only external network. No access to host and other container network.

Edit configuration file for our containers (macvlan_cn1 & macvlan_cn2)
macvlan_cn1 container file: /var/lib/lxc/macvlan_cn1/config
# Network configuration
lxc.network.type = macvlan
lxc.network.macvlan.mode = vepa
lxc.network.hwaddr = 00:16:3e:56:95:80
lxc.network.flags = up
lxc.network.link = enp0s29f7u1
lxc.network.ipv4 = 192.168.2.1/24
macvlan_cn2 container file:/var/lib/lxc/macvlan_cn2/config
# Network configuration
lxc.network.type = macvlan
lxc.network.macvlan.mode = vepa
lxc.network.hwaddr = 00:16:3e:cb:f5:71
lxc.network.flags = up
lxc.network.link = enp0s29f7u1
lxc.network.ipv4 = 192.168.2.2/24
Start both containers
#lxc-start -n macvlan_cn1 -d
#lxc-start -n macvlan_cn2 -d

[root@localhost ~]# lxc-info -n macvlan_cn1
Name:           macvlan_cn1
State:          RUNNING
PID:            19204
IP:             192.168.2.1
CPU use:        0.21 seconds
BlkIO use:      0 bytes
Memory use:     5.98 MiB
KMem use:       0 bytes
Link:           enp0s29f7u1
 TX bytes:      891.69 KiB
 RX bytes:      2.00 MiB
 Total bytes:   2.87 MiB
[root@localhost ~]#

[root@localhost ~]# lxc-info -n macvlan_cn2
Name:           macvlan_cn2
State:          RUNNING
PID:            19382
IP:             192.168.2.2
CPU use:        0.20 seconds
BlkIO use:      0 bytes
Memory use:     3.71 MiB
KMem use:       0 bytes
Link:           enp0s29f7u1
 TX bytes:      891.69 KiB
 RX bytes:      2.00 MiB
 Total bytes:   2.87 MiB
[root@localhost ~]#
Login to container and perform ping test from container macvlan_cn1 to macvlan_cn2. Login/Password ubuntu/ubuntu
As you see ping test between container failed
[root@localhost ~]# lxc-console -n macvlan_cn1

ubuntu@macvlan_cn1:~$ ifconfig
eth0      Link encap:Ethernet  HWaddr 00:16:3e:56:95:80
          inet addr:192.168.2.1  Bcast:192.168.2.255  Mask:255.255.255.0
          inet6 addr: fe80::216:3eff:fe56:9580/64 Scope:Link
          UP BROADCAST RUNNING MULTICAST  MTU:1500  Metric:1
          RX packets:0 errors:0 dropped:0 overruns:0 frame:0
          TX packets:21 errors:0 dropped:0 overruns:0 carrier:0
          collisions:0 txqueuelen:1000
          RX bytes:0 (0.0 B)  TX bytes:5094 (5.0 KB)

lo        Link encap:Local Loopback
          inet addr:127.0.0.1  Mask:255.0.0.0
          inet6 addr: ::1/128 Scope:Host
          UP LOOPBACK RUNNING  MTU:65536  Metric:1
          RX packets:0 errors:0 dropped:0 overruns:0 frame:0
          TX packets:0 errors:0 dropped:0 overruns:0 carrier:0
          collisions:0 txqueuelen:1
          RX bytes:0 (0.0 B)  TX bytes:0 (0.0 B)

ubuntu@macvlan_cn1:~$ ip route
192.168.2.0/24 dev eth0  proto kernel  scope link  src 192.168.2.1

//ping from container 1 to container 2 failed
ubuntu@macvlan_cn1:~$ ping 192.168.2.2
PING 192.168.2.2 (192.168.2.2) 56(84) bytes of data.
From 192.168.2.1 icmp_seq=1 Destination Host Unreachable
From 192.168.2.1 icmp_seq=2 Destination Host Unreachable
From 192.168.2.1 icmp_seq=3 Destination Host Unreachable
From 192.168.2.1 icmp_seq=4 Destination Host Unreachable
^C
--- 192.168.2.2 ping statistics ---
5 packets transmitted, 0 received, +4 errors, 100% packet loss, time 4001ms
pipe 4
Perform ping test from container macvlan_cn2 to macvlan_cn1. As you can see ping test failed
ubuntu@macvlan_cn2:~$ ifconfig
eth0      Link encap:Ethernet  HWaddr 00:16:3e:cb:f5:71
          inet addr:192.168.2.2  Bcast:192.168.2.255  Mask:255.255.255.0
          inet6 addr: fe80::216:3eff:fecb:f571/64 Scope:Link
          UP BROADCAST RUNNING MULTICAST  MTU:1500  Metric:1
          RX packets:0 errors:0 dropped:0 overruns:0 frame:0
          TX packets:32 errors:0 dropped:0 overruns:0 carrier:0
          collisions:0 txqueuelen:1000
          RX bytes:0 (0.0 B)  TX bytes:8856 (8.8 KB)

lo        Link encap:Local Loopback
          inet addr:127.0.0.1  Mask:255.0.0.0
          inet6 addr: ::1/128 Scope:Host
          UP LOOPBACK RUNNING  MTU:65536  Metric:1
          RX packets:16 errors:0 dropped:0 overruns:0 frame:0
          TX packets:16 errors:0 dropped:0 overruns:0 carrier:0
          collisions:0 txqueuelen:1
          RX bytes:1184 (1.1 KB)  TX bytes:1184 (1.1 KB)

ubuntu@macvlan_cn2:~$ ip route
192.168.2.0/24 dev eth0  proto kernel  scope link  src 192.168.2.2

//ping test from container 2 to container 1 failed
ubuntu@macvlan_cn2:~$ ping 192.168.2.1
PING 192.168.2.1 (192.168.2.1) 56(84) bytes of data.
From 192.168.2.2 icmp_seq=1 Destination Host Unreachable
From 192.168.2.2 icmp_seq=2 Destination Host Unreachable
From 192.168.2.2 icmp_seq=3 Destination Host Unreachable
From 192.168.2.2 icmp_seq=4 Destination Host Unreachable
^C
--- 192.168.2.1 ping statistics ---
4 packets transmitted, 0 received, +4 errors, 100% packet loss, time 3000ms
pipe 4
Ping from container to external system.
As you can see ping test pass
[root@localhost ~]# lxc-console -n macvlan_cn2

Connected to tty 1
Type <Ctrl+a q> to exit the console, <Ctrl+a Ctrl+a> to enter Ctrl+a itself

//ping to external system passed
ubuntu@macvlan_cn2:~$ ping 192.168.2.101
PING 192.168.2.101 (192.168.2.101) 56(84) bytes of data.
64 bytes from 192.168.2.101: icmp_req=1 ttl=64 time=0.373 ms
64 bytes from 192.168.2.101: icmp_req=2 ttl=64 time=0.271 ms
64 bytes from 192.168.2.101: icmp_req=3 ttl=64 time=0.384 ms
64 bytes from 192.168.2.101: icmp_req=4 ttl=64 time=0.265 ms
64 bytes from 192.168.2.101: icmp_req=5 ttl=64 time=0.400 ms
64 bytes from 192.168.2.101: icmp_req=6 ttl=64 time=0.398 ms
64 bytes from 192.168.2.101: icmp_req=7 ttl=64 time=0.347 ms
64 bytes from 192.168.2.101: icmp_req=8 ttl=64 time=0.381 ms
^C
--- 192.168.2.101 ping statistics ---
8 packets transmitted, 8 received, 0% packet loss, time 6999ms
rtt min/avg/max/mdev = 0.265/0.352/0.400/0.053 ms
Ping from container to host. As you can see ping failed
[root@localhost macvlan_cn1]# ifconfig enp0s29f7u1
enp0s29f7u1: flags=4163<UP,BROADCAST,RUNNING,MULTICAST>  mtu 1500
        inet 192.168.2.100  netmask 255.255.255.0  broadcast 0.0.0.0
        ether 00:50:b6:19:41:65  txqueuelen 1000  (Ethernet)
        RX packets 9392  bytes 932640 (910.7 KiB)
        RX errors 0  dropped 0  overruns 0  frame 0
        TX packets 11896  bytes 2158529 (2.0 MiB)
        TX errors 0  dropped 0 overruns 0  carrier 0  collisions 0

//ping from container to host failed
ubuntu@macvlan_cn2:~$ ping 192.168.2.100
PING 192.168.2.100 (192.168.2.100) 56(84) bytes of data.
From 192.168.2.2 icmp_seq=1 Destination Host Unreachable
From 192.168.2.2 icmp_seq=2 Destination Host Unreachable
From 192.168.2.2 icmp_seq=3 Destination Host Unreachable
From 192.168.2.2 icmp_seq=4 Destination Host Unreachable
^C
--- 192.168.2.100 ping statistics ---
4 packets transmitted, 0 received, +4 errors, 100% packet loss, time 3000ms
pipe 4
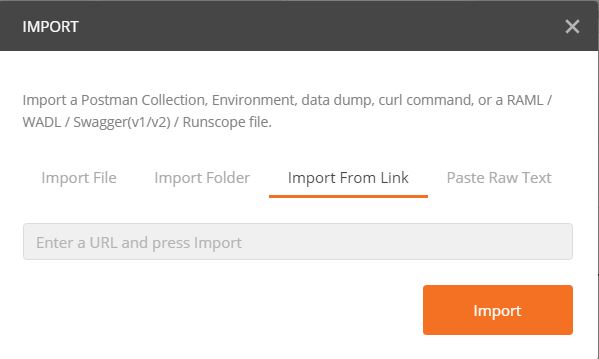
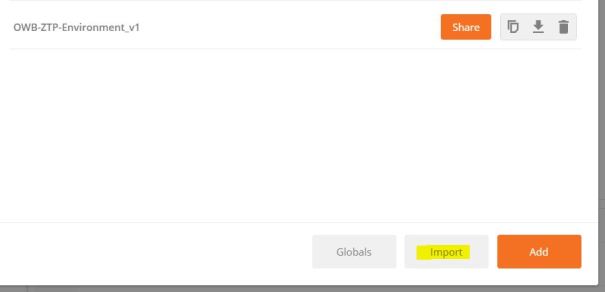
Save


 and ‘Manage Environments’